
AFW
| SITE MENU: | Our Fishing Reports with Pictures | Useful Resources | Pleasure Craft "Amber Bones II" | Other Boating Stuff | |
|
|
Home
|
Other Boating-Related Pictures
|
Local Webcams | Contact
Us
|
|
![]()
Engine Failure - Jan. 2006
Page Last Updated:
Wednesday, July 19, 2023 10:44 AM -0400
(ET)
Updates are posted in reverse
chronological order; this means the most recent entry is on top.
The original issue is introduced at the bottom.
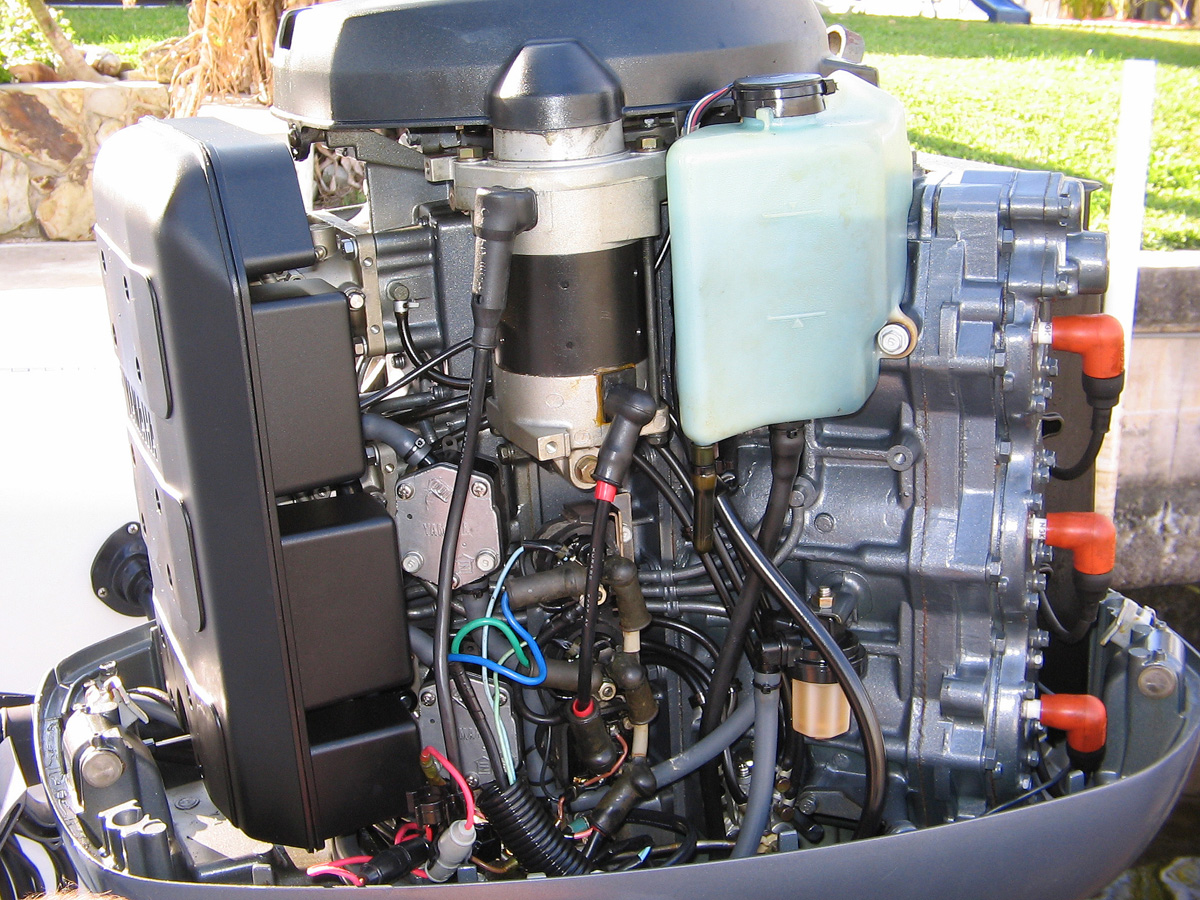
Engine is an outboard 1997 Yamaha Saltwater Series II
( model S150TXRV ) 150HP, 2 stroke, 6 cylinder, and at failure the meter read 426 hours
If you have any comments you'd like to share, I'd be
happy to hear from you.
Also, if you have any questions, do ask!
You may contact me by clicking here.
Update: THU, JUL 16, 2009 - General
Update
We've been boating quite a bit lately and the engine is
running strong, other than a small problem with water in the fuel tank.
I also checked the compression recently and it still looks good:
Port Stbd
117 120
117 115
110 115
Update: SAT, SEP 6, 2008 - General
Update
We have not been boating much since my last update, but
the engine continues to run strong. I start and run it for at least 15
minutes every 2 weeks. I feel that this is a very important practice, to
exercise one's engine, for many reasons. Also I want to say good
luck Scott Corbey with your 175 Vmax repair!
Update: TUE, APR 8, 2008 - General
Update; 142nd
Hour Of Operation On Rebuild (568 hrs on dash hour meter)
Well once again it is April, and it is the heart of
boating & outdoor season here in Florida. I noticed that I am
getting quite a few hits to this repair page here and wanted to let everyone
know that the engine has completed about 142hrs since the rebuild, and all is
well.
So, if your power head blew, and you want to save some serious money, consider rebuilding the unit yourself. I did, and I never previously tore apart an engine before. It is quite intimidating at first, but after you have completed the job and fire up that motor you'll feel a deep satisfaction about your accomplishment.
Update: SUN, APR 15, 2007 - General
Update; 74h
Hour Of Operation On Rebuild (500 hrs on dash hour meter)
The motor continues to run great. No problems and
all is well.
Update: SUN, JUL 30, 2006 - Combustion
Chamber Check
Today after running around in the river for a bit I
pulled the spark plugs to look for evidence of water intrusion. After
performing several flushes with the crankshaft in different positions, I was
not able to prove that any water is getting inside the combustion chamber, so
I am happy about that.
Update: FRI, JUL 21, 2006 - Compression
Check; 45h
Hour Of Operation On Rebuild (471 hrs on dash hour meter)
The engine has been performing well.
Tonight I checked the compression:
| Port | Stbd |
| 4th: 123 | 1st: 120 |
| 5th: 125 milky |
2nd: 118 |
| 6th: 113 then 110 | 3rd: 114 ("20 over" bore) |
1st - 6th indicate the order in which I made the measurements. Notice on the port center cylinder "milky"; I noticed a milky appearance on the plug when I pulled it indicating water possibly entered the cylinder. However, after I ran the engine tonight then pulled the plug (and repeat), I was unable to reproduce the milky condition. So I am not sure what these observations indicate, but I am not very worried at this point; if you think there is reason for concern, please contact me by clicking here.
Update: THU, JUN 28, 2006 - 14th
Hour Of Operation On Rebuild
So far so good. We have been going on lots of fishing
trips (click here to see fishing
reports). The engine has completed 14 hours of operation. I am
going to start to reduce the 1:25 oil:fuel ratio. In all actuality, I am
really running a lower ratio than that (oil more concentrated). I
estimate I have been running probably closer to 1:20 oil:fuel because I am
running 1:25 premix, and the oil injection pump is or isn't working on all
cylinders (I have not determined the problem yet, but the engine is consuming
oil from the reserve tank - that I know), so that brings the ratio lower.
Update: TUE, JUN 20, 2006 - Rebuild
Is Now Beyond 10th Hour
We've been out on 12-14 hour trips a couple times since my last
update with no fish to show for but a good performing rebuild still. I
took her to WOT several times, and allowed WOT RPM which was about 4900RPM for a few
seconds.
I'm still getting some seepage mainly around the gasket at the joint between heads and water-jacket covers.
Also, I have not checked the oil pump again but it is consuming oil because the remote tank is slowly getting lower. I am still running 25:1 premix but at some point I need to see if all cylinders are getting oil from the pump (my previous test showed that they weren't).
Update: TUE, JUN 13, 2006 - Engine
Appearance
I pulled the cover tonight for the first time since our
Saturday outing, and found what it appears to be little tiny leaks of water
from all around the water jackets on the cylinder heads - sort of like little
"bubbles" of water had come through. At first I was caught off
guard, but now I am thinking this may be due to having Rustoleum paint on the
water jacket mating surfaces.
I checked torque on water jacket bolts and head bolts. Most bolts were tight; a few water jacket bolts were turned just a little to tighten them.
I also pulled all spark plugs; no signs of water.
Update: SUN, JUN 11, 2006 - Maiden
Fishing Voyage - 1st Significant Outing Since Rebuild
We had a 14 hour day on the water today. Click
here for our fishing report. She ran well, except in the beginning
it sounded like some cylinders were missing initially. I'm not
sure why and hoping that it isn't water leaking in through the exhaust covers
that sat from the Thursday evening flush. Need to figure out how to test
for water leakage into the cylinders.
Here we are cruising along
about 3200RPM ![]() .
3400 was our maximum sustained RPM that we turned today. I did briefly
touch 4000 a few times.
.
3400 was our maximum sustained RPM that we turned today. I did briefly
touch 4000 a few times.
Update: FRI, JUN 9, 2006 - Maiden
Test Voyage After Rebuild
I took her out for the first time last night; we did some canal
cruising then into and up the river about a half mile. It performed
well. I will need to adjust up either idle or something else as when it
is warm/hot it doesn't want to stay running idle. But that happened
before the failure also.
I ran it at 3200 for a few minutes, then took it to idle (neutral) and took some temps: I saw 190F in the same area I saw 170F at 2000 (neutral) a few nights back. I need someone to confirm that this is normal, or not.
I briefly bumped 4000RPM.
So far so good...
Update: WED, JUN 7, 2006 - Misc
Details
11:00pm
Just got settled down after working on the boat.
I put the flywheel on with the replacement key (used key I got from salvage is slightly different than the original). After I put on the flywheel, but before tightening the nut, I found some rotary play with the flywheel - Half a tooth of play. I tightened the nut. She ran. Should I go back and check for TDC to make sure or is this not necessary with only half a tooth of play?
Also, I determined that I am not sure that the engine oil pump is working. I pulled several oil tubes off the carbs and there was no trace of oil. I then bled the oil pump, and the bleeder screw oozed oil, but still nothing at the tested 3 of 6 tubes connected to the barrels on the carbs.
I put 17 gallons of 93 octane fuel into the tank to fill it. I added 2 gallons of 2 stroke lube. that makes 50 gallons of fuel and 2 gallons of lube (52 gallon tank). That makes the recommended 25:1 fuel:lube ratio, assuming my oil pump is not working. I will look into the oil pump problem further but there is no immediate need for this due to the 25:1 ratio I mixed for break-in.
I have literally the cover to put over the CDI unit, and need to bundle wires, install alarm, and alarm light, and will be completely done with the rebuild, oh, and deal with the oil pump situation.
I ran the motor tonight in gear at just over 1000, and am gaining confidence in it. I did not see that 170F temperature tonight for unknown reason. 156F was the max temp I saw.
Update: WED, JUN 7, 2006 - Temperature
Observations
Morning
Last night, while using a non-contact
laser/infrared thermometer, I made some temperature observations, while
running the rebuild
at 1500RPM for some time then increased to 2000 (all while in neutral).
While running 2000 I observed the hottest readings of the whole engine on the
starboard lower cylinder (the oversized one) at up to 170F. I took this
temperature aiming at the cylinder toward the crank (rear of cylinder).
Remaining cylinders varied from 135-155 or so.
I am a bit concerned about this "hot spot". Here I am at 2000RPM, no prop load, and running 170F, just 25F or so short of overheat alarm. However, overheat alarm for that side of the V is on top of outer area of cylinder head where it was about 135F or so, so if my hotspot may very well get into the 200s before my overheat alarm sounds (just speculation though). Although I am unable to get a clear visual path to the port side lower cylinder due to oil pump hoses, and etc., I think it is running much cooler based on what I could measure. Why the imbalance? I can't imagine what this temp will be at 4000 or 5000 RPM under load...wondering if a rich fuel / air mixture cause an increase in temp like this...
HOWEVER, if I remember correctly, perhaps it is hottest in this area because I believe the water exits the powerhead on this side and all that heated water is simply passing by this area (I hope...).
Also, I discovered my first obvious mistake last night. To make a long story short, I had not done more than finger-tighten the flywheel bolt, and after some run time, I found that the flywheel had sheared the key that holds it in sync to the crank. This morning, my salvage guy set me up with a similar key..will install tonight. The flywheel surface has some scoring, but I am hoping that it is not significant to disrupt timing. A new flywheel is $1100 on boats.net. UN-FREAKING-REAL.
If all goes well I should be taking the boat out for a canal cruise, and will be packing paddles for this event. Maybe I'll even get courageous and go into the river.
Stay tuned...
Update: SUN, JUN 4, 2006 - Alarm
System Checking
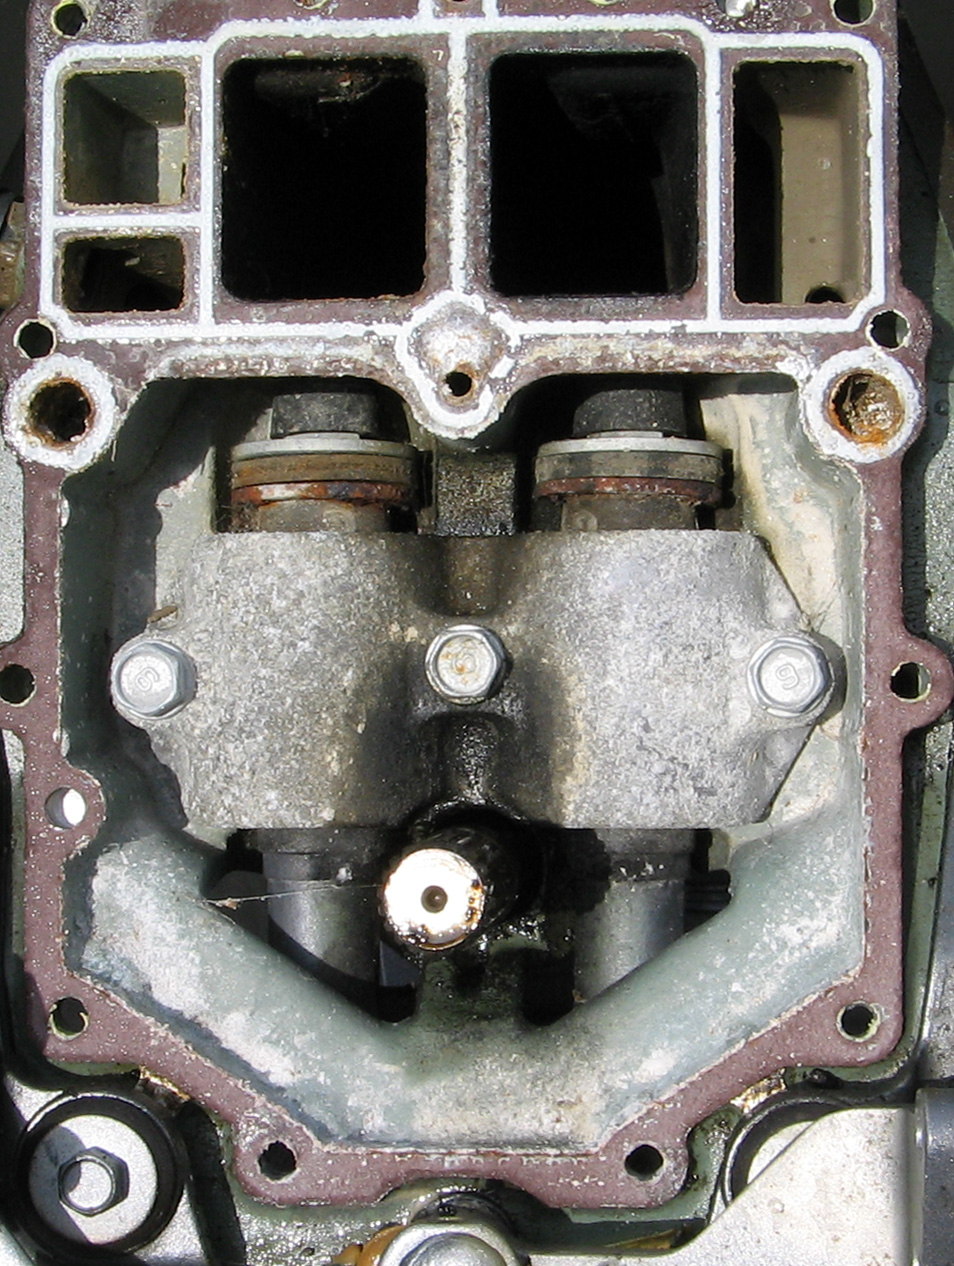
This morning I began testing the three sensors that connect to
the heads. Here is my setup in the kitchen:
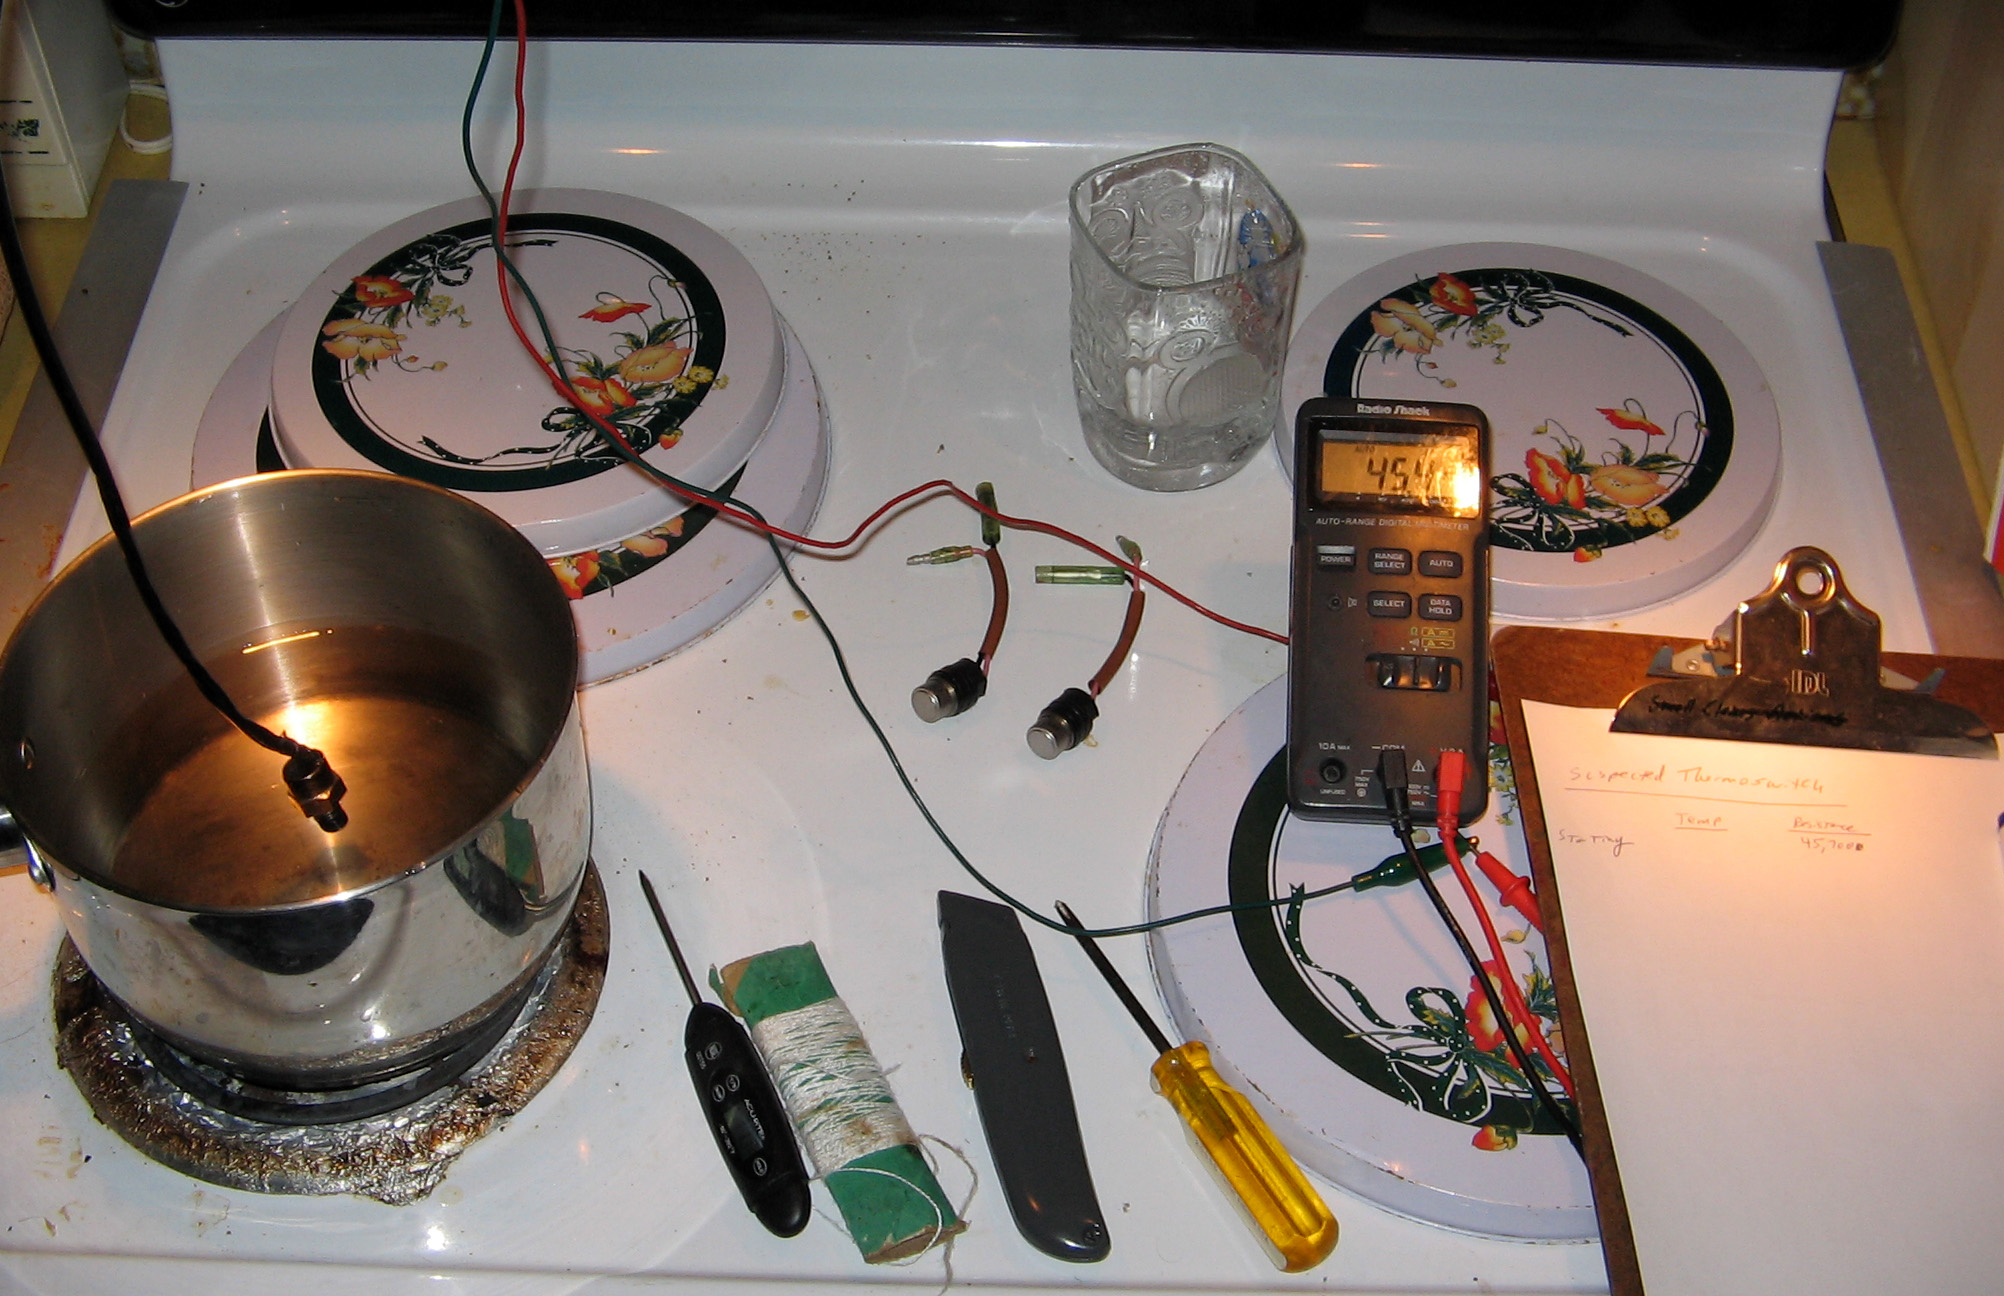
The two like-sensors apparently are the "overheat switches" that are suppose to activate the alarm test within specs.
The third sensor, unlike the other two, which screws into one of the heads (stbd), I assume to be a knock sensor:
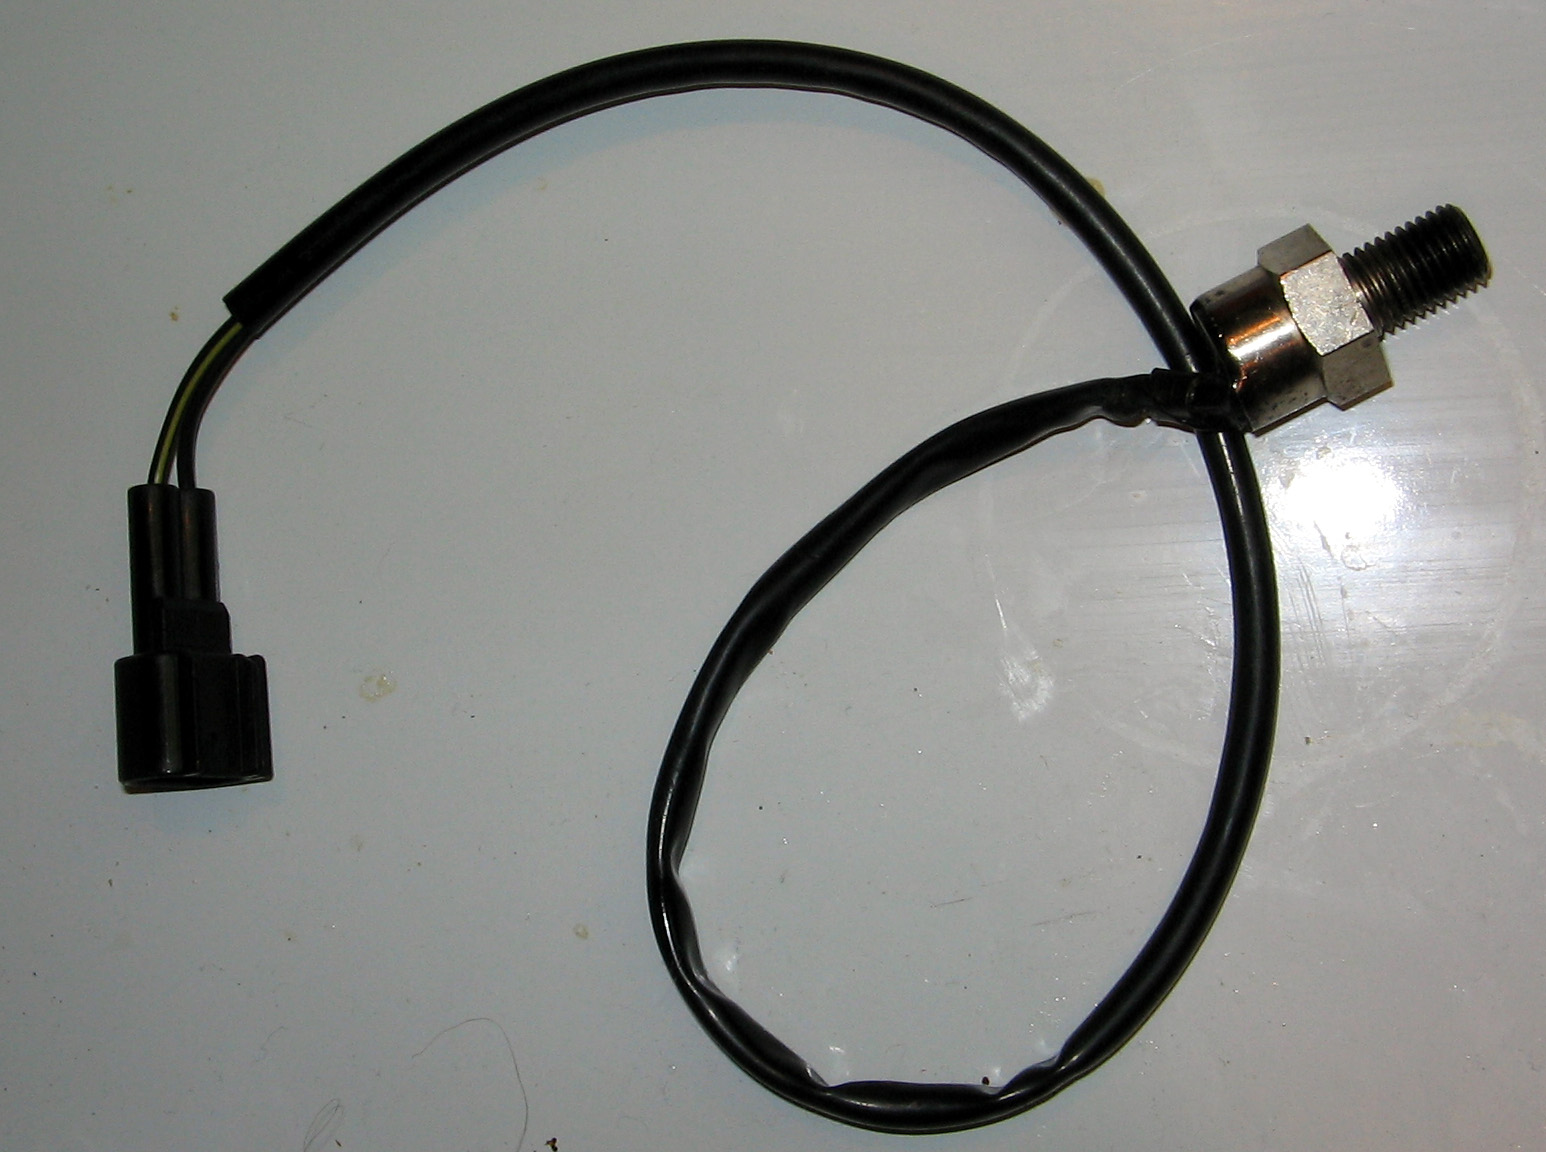
But I am not getting good readings off of it. Need to
confirm what kind of sensor this is.
I believe it is a thermosensor.
Update: SAT, JUN 3, 2006 - Big
News
It is 9:46pm and I just got finished up. It was another
killer-hot day filled with tedious assembly.
At about 7:30 tonight, she was cranked with expectations of
fire. ![]() Click here to view a video.
Click here to view a video.
What you just saw was the engine starting for the 4th time. You also saw me briefly put it in gear (notice the rush of water). IT FIRED!!! WOO HOO!!!. It fired almost immediately after I began cranking, but then my battery went dead so I had to get the charger out. After the battery was charged she fired right up. She runs fairly smooth. After running the engine for the first time for about 6-8 minutes, I noticed alot of smoke and shut it off quick. I noticed a 3/4" bead of cooling water formed up from the stbd head gasket. I checked the torque on the upper bolts of the stbd head and noticed at least one was not tight so I retorqued it. That is strange as I am certain I torqued these. I hope that water bead was only as a result of the of the loose head bolt.
I also noticed that the tops of the heads got very hot I don't know if this is normal or not. My new thermostats are rated 50C. A few days ago, I observed the beginning of opening of one of the the thermostats at 125F, and fully open by 135F by testing with a pot of water on the stove. I need to confirm that these are the proper thermostats for my engine. I would also like to use a laser temperature tool to obtain temperatures of various areas of the engine's surfaces and compare these readings to readings that perhaps Yamaha repair techs have gathered.
So before I fired her I ran down to the autoparts store and got 5 feet of fuel line hose, and then disconnected the boat's tank from the primer bulb, and hooked this new (temporary) fuel line to the primer bulb and into a 2 gallon mixture of fresh gas & and oil at 25:1. Now yes, I do have oil injection, but I did not prime the oil injection system so I wanted to be safe and use the non-oil-injection ratio that the book states. Perhaps that increased smoke 6-8 minutes after the premier run was the oil injection system kicking in (I hope). I hope it was not cooling water leaking through the stbd head gasket and burning up.
There are some immediate things I need to do before running the motor again:
1) Learn, understand, and test the overheat alarming system.
2) Obtain surface temperatures of properly running engines similar to this one.
Update: FRI, JUN 2, 2006 - The
Pressure Is On
This weekend I have made it a realistic goal to crank for the
first time, and expect fire.
The pressure is on. I got to get this done! There are alot of pieces to the puzzle but I am slowly knocking one by one out.
Update: WED, MAY 31, 2006 - More
Tests
Soon I plan to fill the block water cavity with fresh water
and see if it holds without leaks through the gaskets, although I understand
that this will not rule out gasket leaks under "normal operating
conditions". At least I should be able to rule out gasket leaks
during "unusual conditions".
Also, I have initiated another Rustoleum test. I painted a clean TV Diner aluminum pan with Rustoleum Rusty Metal Primer, attached it to a plastic conduit pipe, and submerged it in sea water. Again, although not a perfect simulation to real-world engine operation, at least we'll see what happens to the paint/aluminum after being submerged in seawater.
Tonight I did some research on the subject of Marine Corrosion, due to my block corrosion situation, and yes I acknowledge it is after-the-fact at this point, but I ran into this very informative article that every boater should read and understand.
Update: MON, MAY 29, 2006 - Installed
Water Jackets & Exhaust Cover Plates
I tested one of my new thermostats in a pot of water on the
stove. The thermostat indicates 50C on it. It began opening
at 125F and was fully open by 135F. My daughter really enjoyed the
science behind operation of a thermostat. 50C = 122F so I assume it is
working correctly. I was surprised to see how significantly cooler this
engine apparently is designed to run compared to an auto engine.
Got the head water jackets installed along with thermostats and finally the exhaust covers.
I worked until about 2:00pm. Had to stop due to the heat. An hour later it is raining now.
Update: SUN, MAY 28, 2006 - Attached
Powerhead To Midsection
Evening
Wow this is quite a job. I need a day off.
Tonight I was able to get the heads on. I then ran an
initial compression test.
(without the intake and carbs on, but I did add some extra lube in through the
spark plug holes).
Results:
Port Top 120
Stbd Top 117
Port Middle 119 Stbd
Middle 115
Port Bottom 118 Stbd
Bottom 110
(oversize piston in cylinder: Stbd Bottom)
I measured Port first. I ran the test a second time and some of the
readings were up to 5 pounds lower. I am unable to find compression
specs in my book. Not sure if my readings are good or what.
Afternoon
The sun and heat here in Florida is brutal right now at
2:06pm. So I'm inside soaking up some AC.
Got the PH attached to the mid section after rigging up a lift mechanism to lift the PH from the cart to the boat. I used a boat lift and maneuvered the boat in perpendicular to the way a boat would rest on the lift. Then I raised the lift high, and wrapped a heavy chain around it.
With the wife at the lift controls, I had to carefully guide the lower bearing housing of the PH onto the shaft protruding from the midsection.
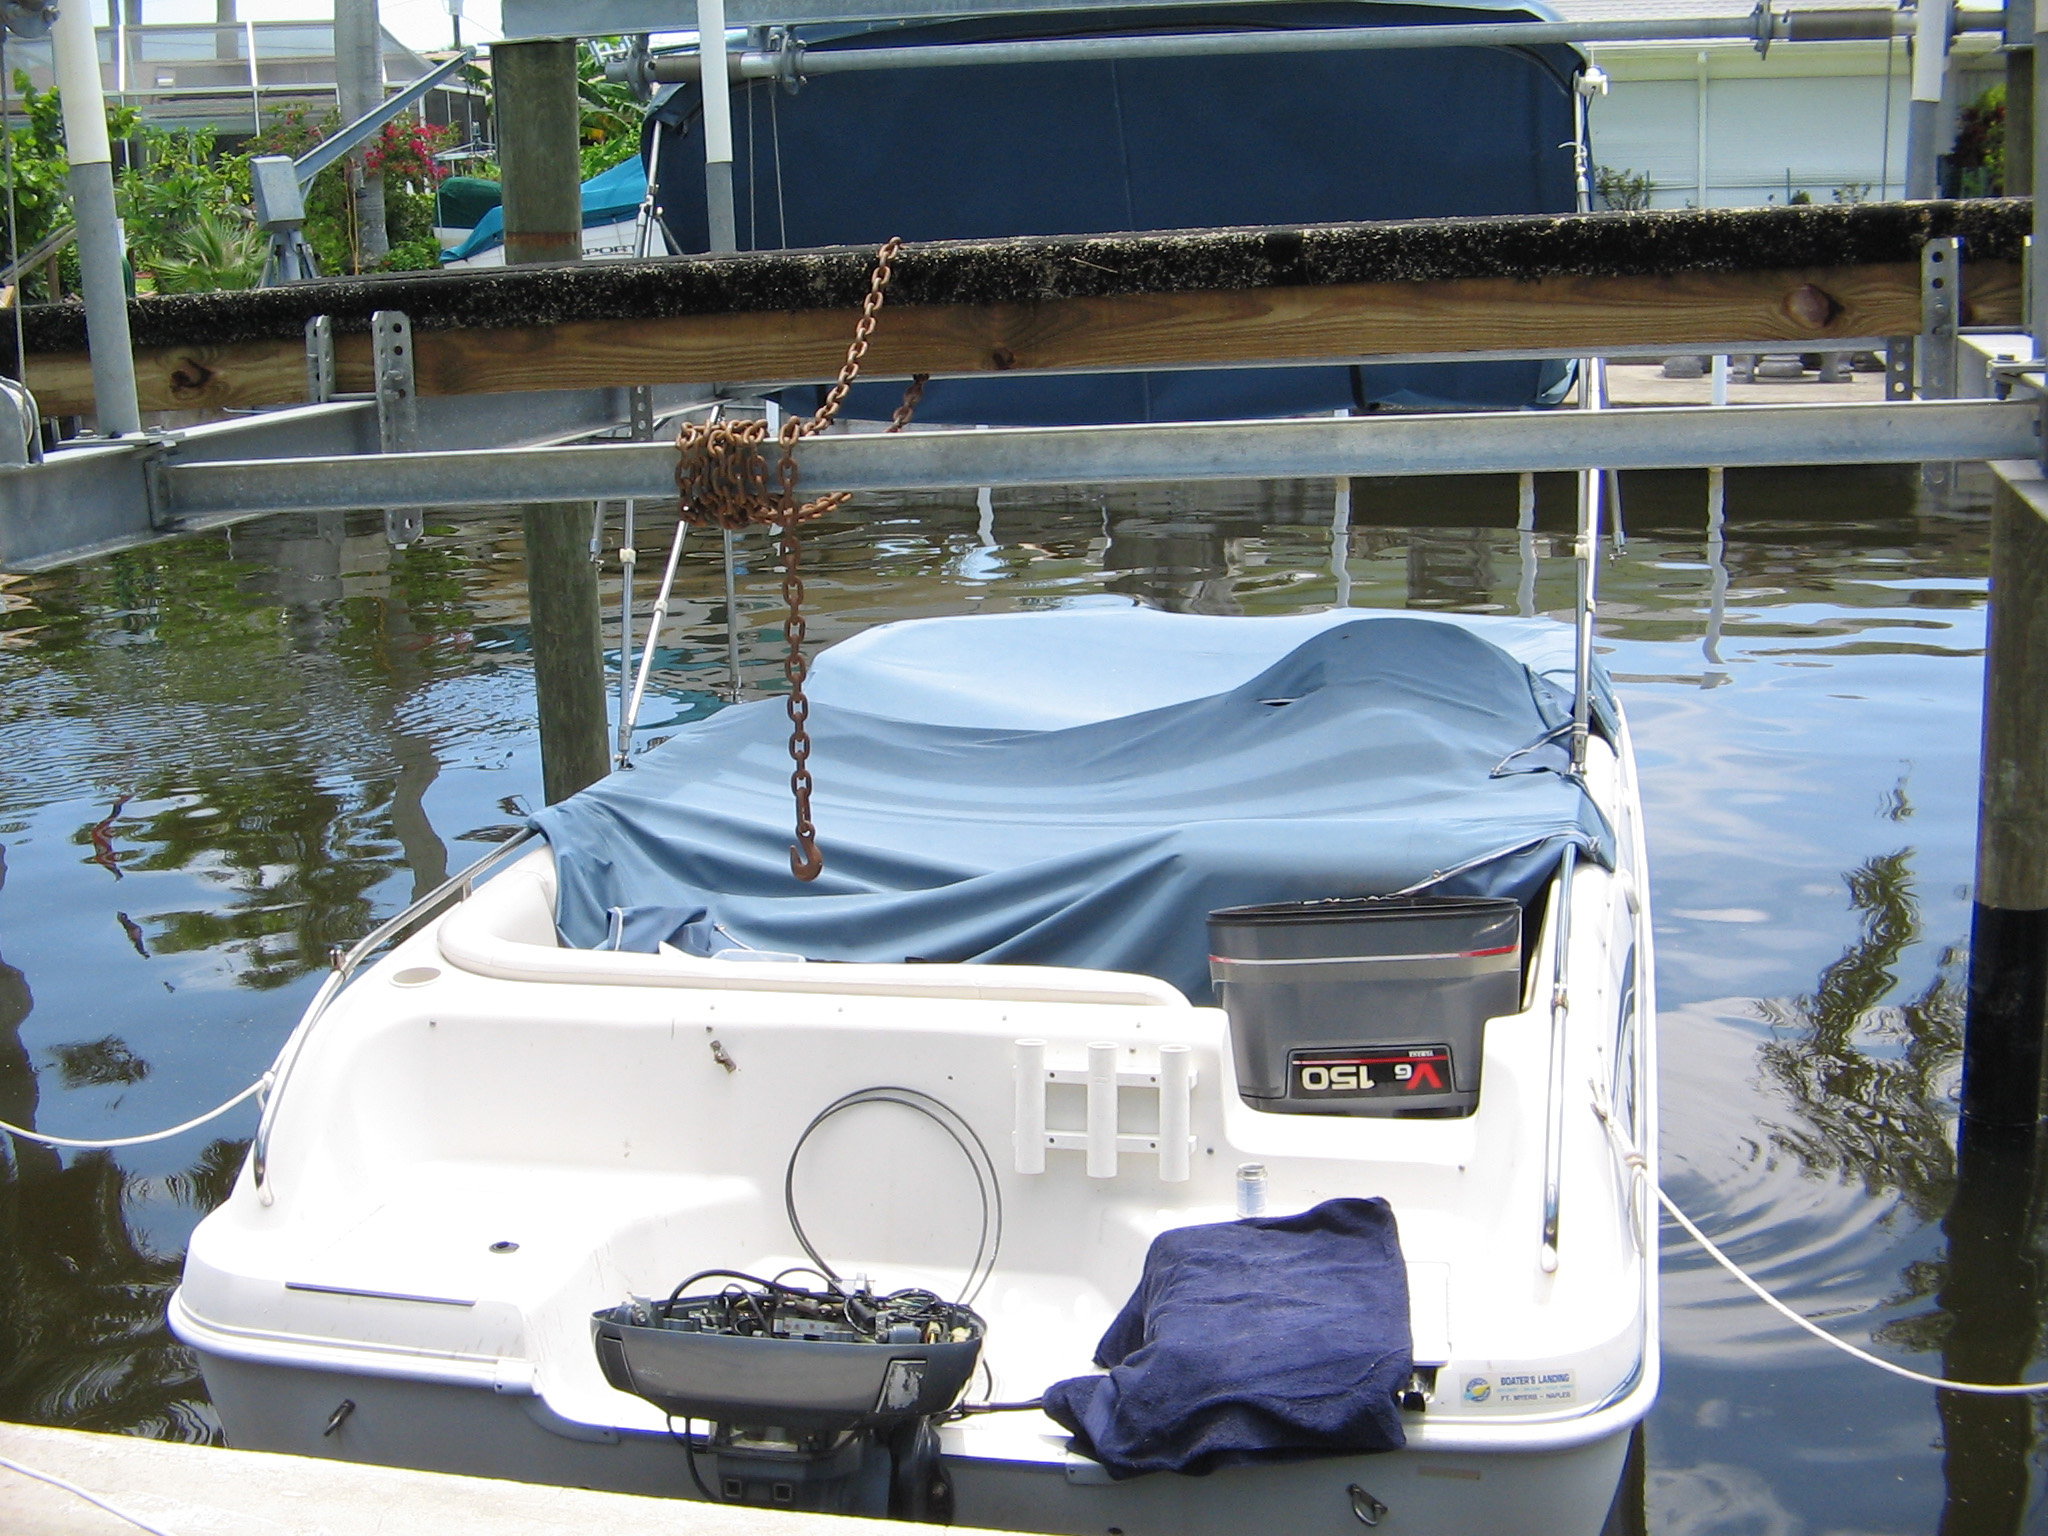 Lifting Rig |
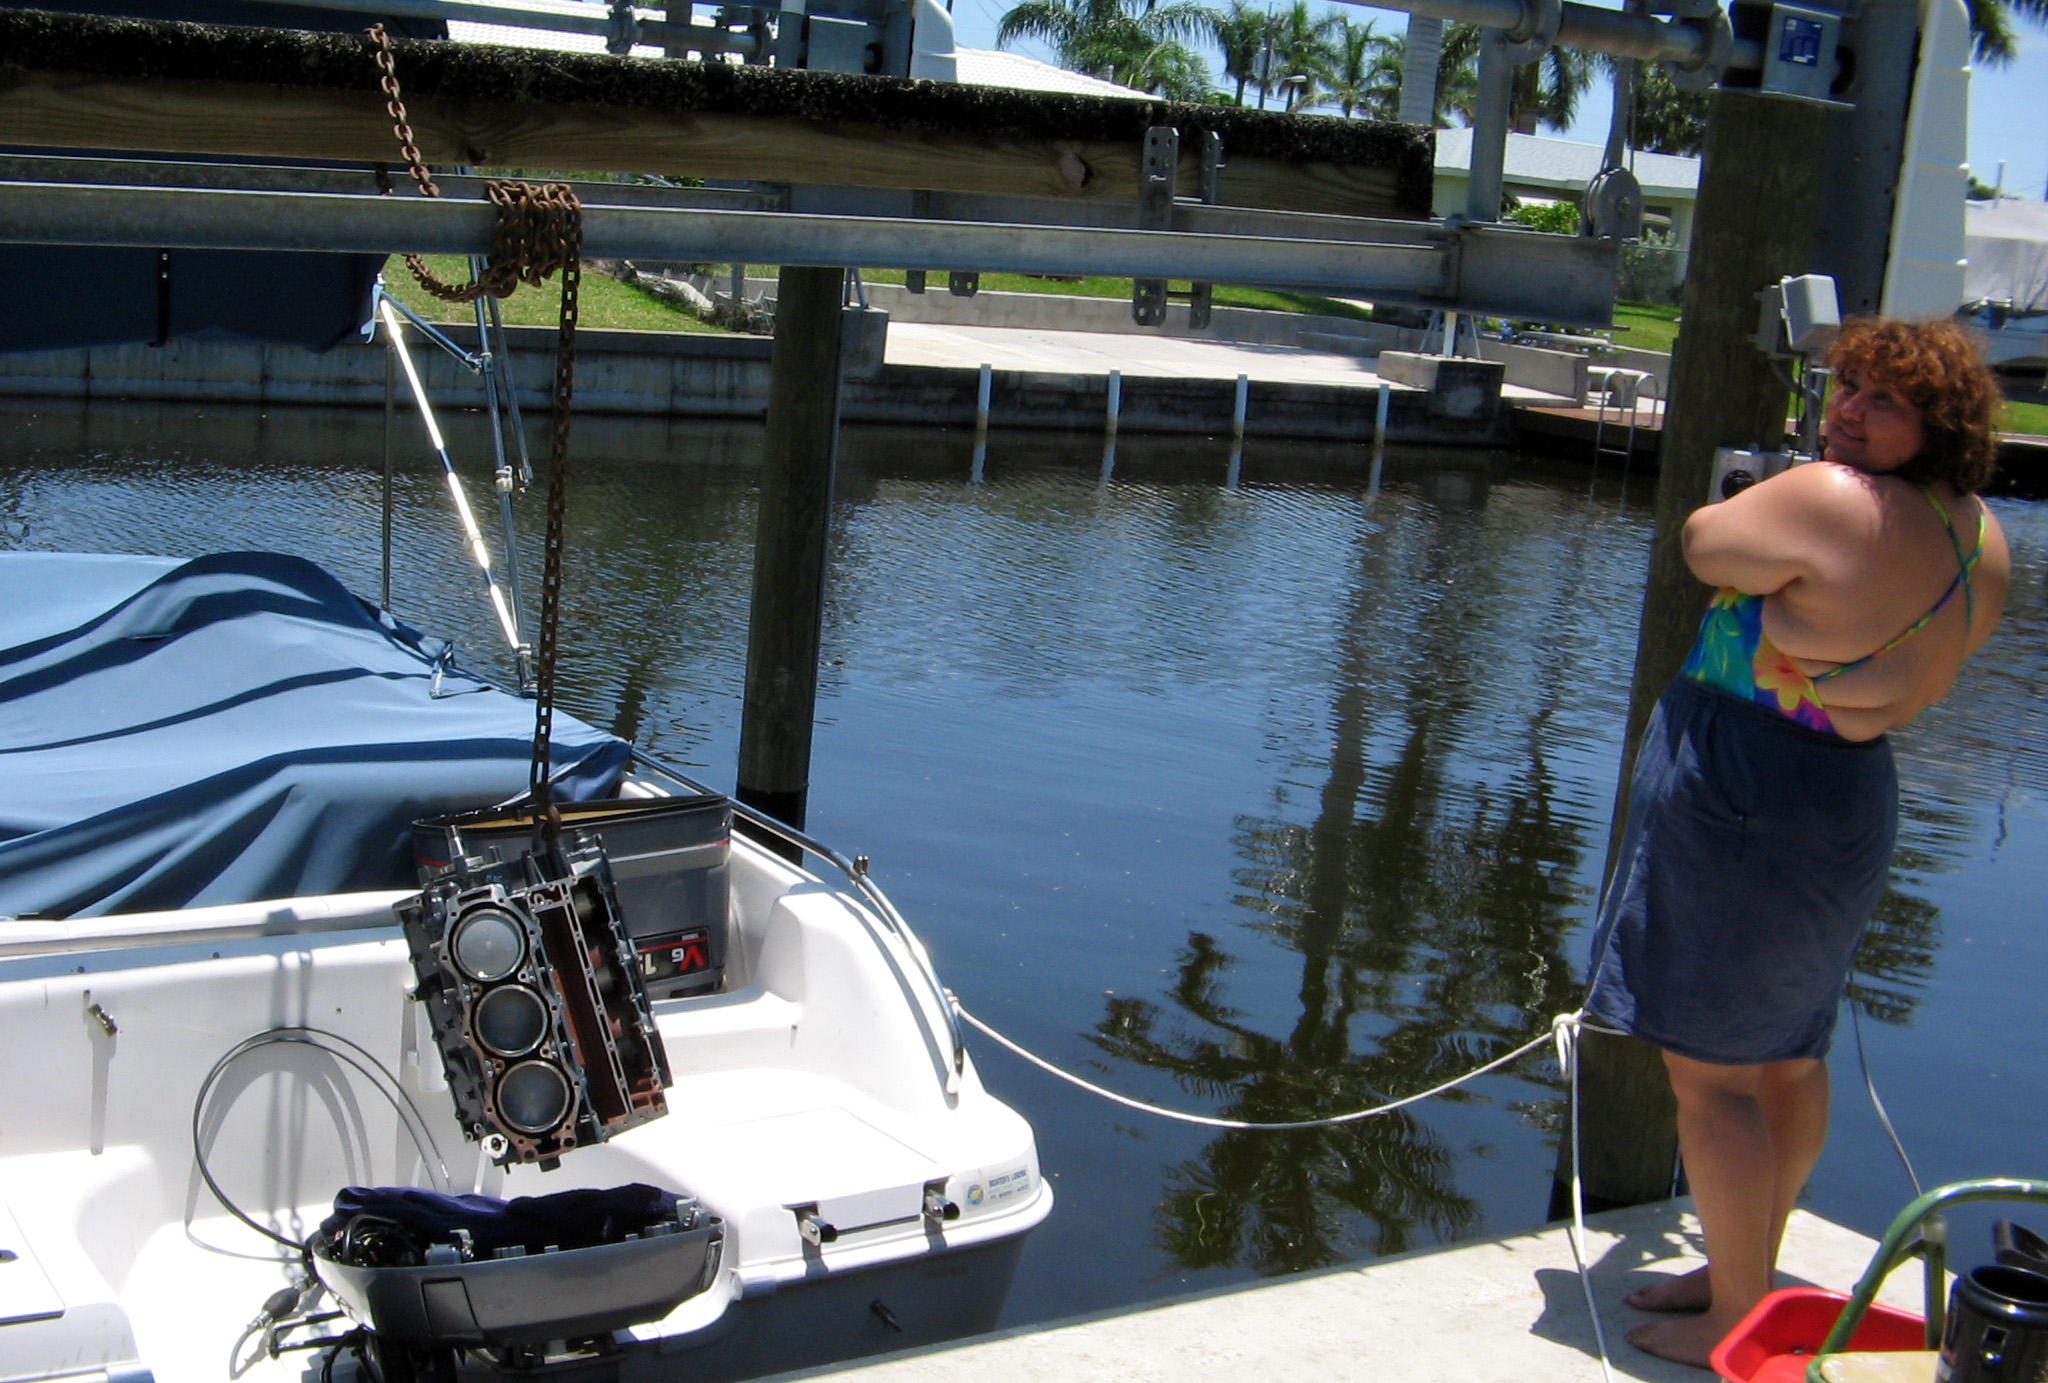 Powerhead Dangles Above Midsection |
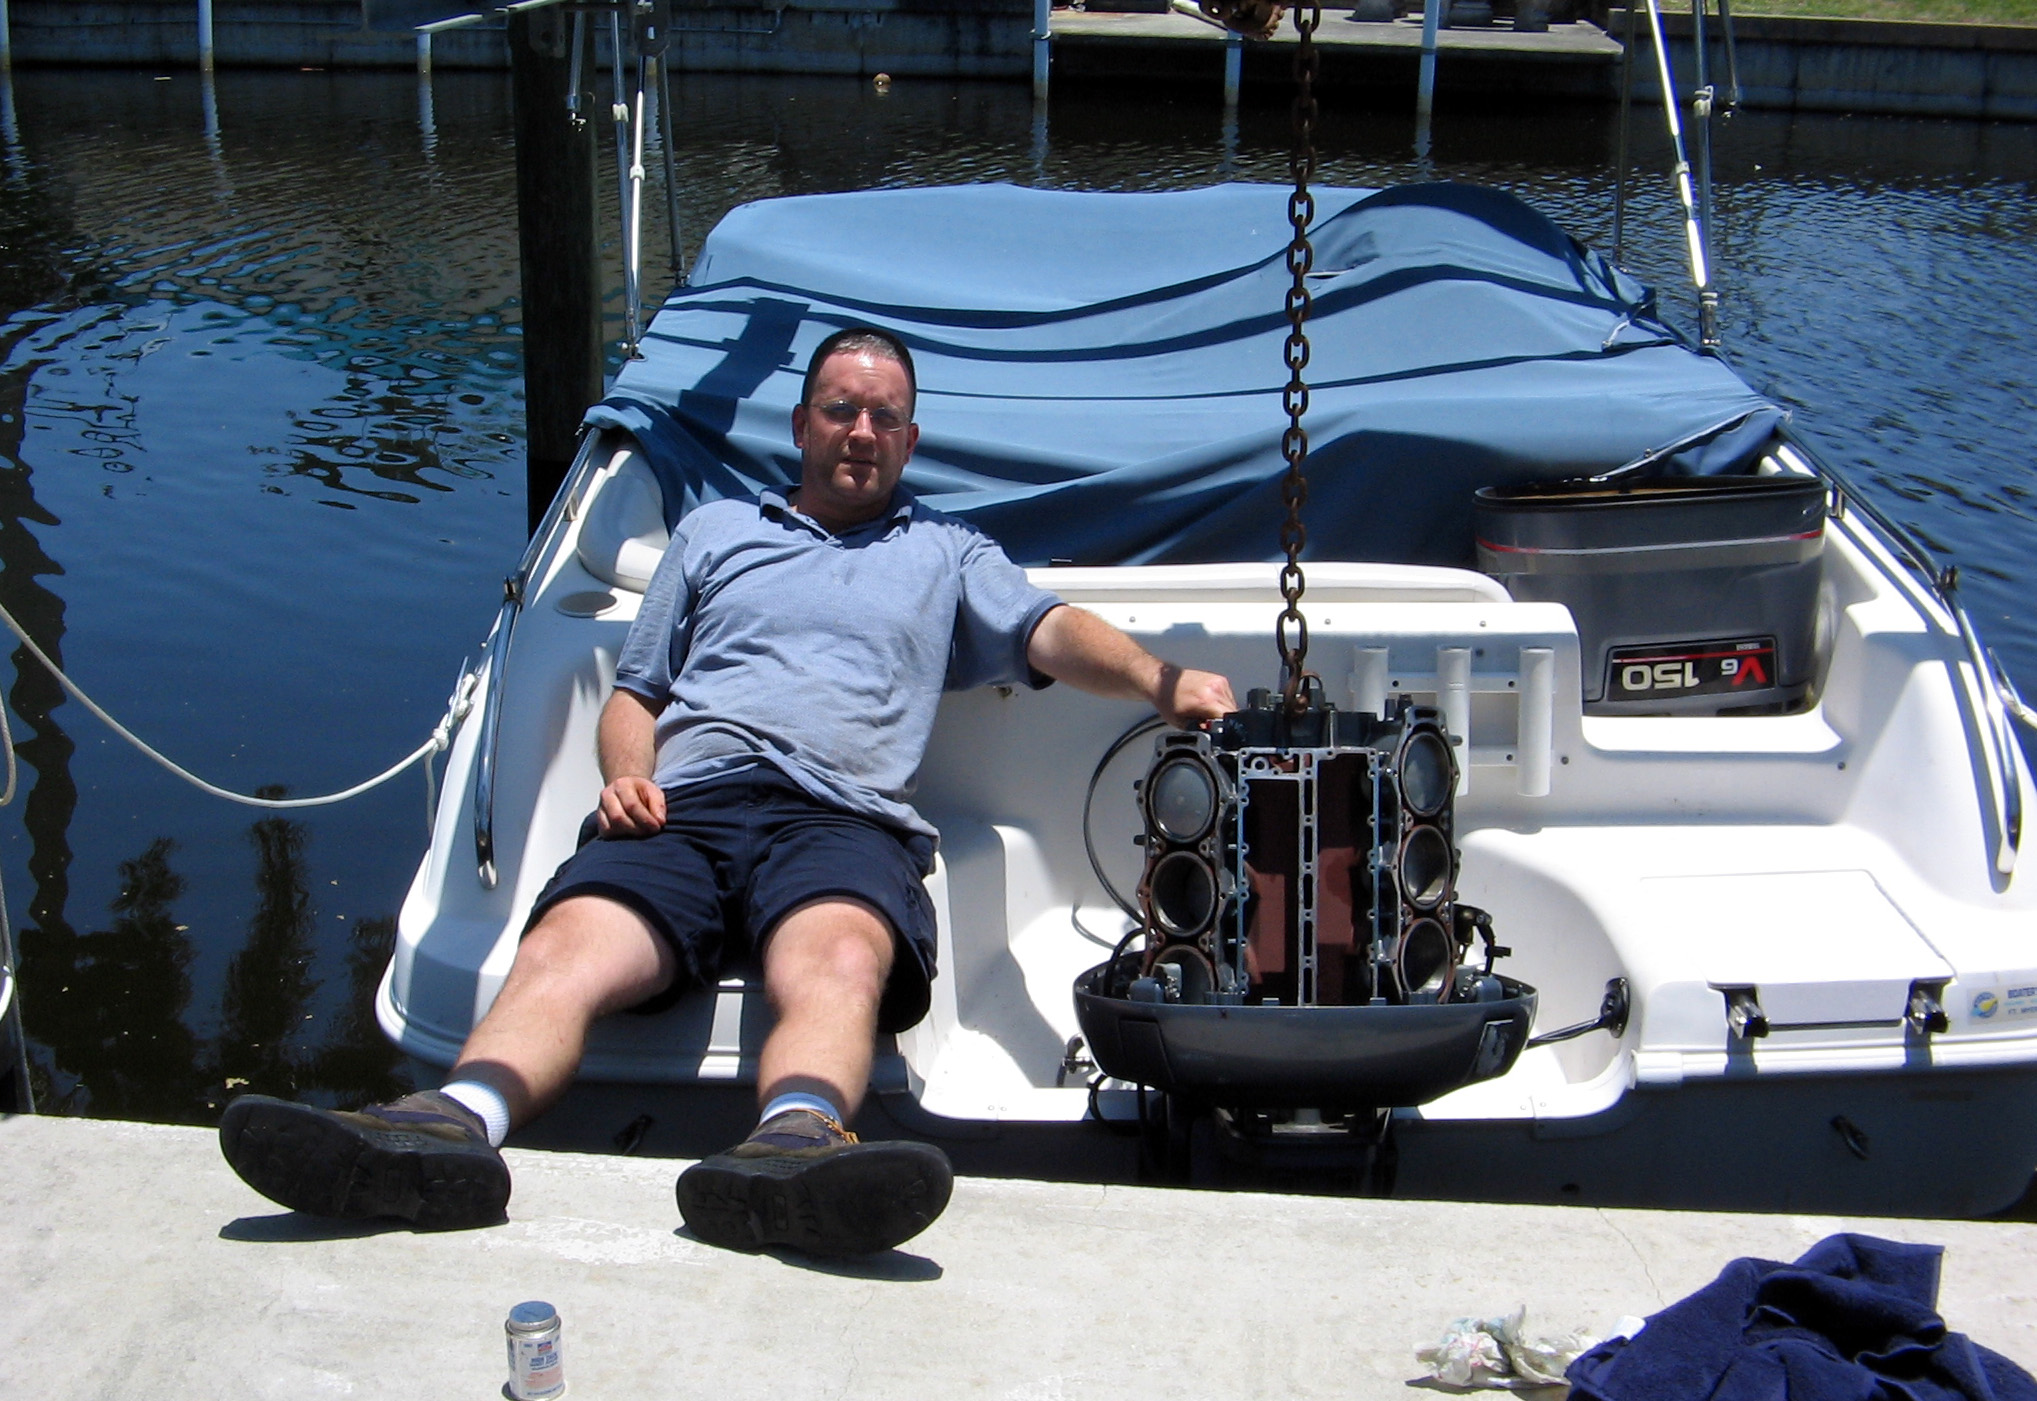 Jason "Chilling Out" After Powerhead Lowered And Put Into Place |
After all the setup, attaching the powerhead to the midsection was a piece of cake.
Before I attached the powerhead to the midsection, I attached an appropriate size socket to the drive shaft, and connected a drill to it. I ran the drive shaft clockwise and observed waterflow out of the midsection, showing that the impeller is functional.
Morning
Sun is up, and I got a good night of sleep. You know what
that means.
Check out this video of cranking the engine while on the bench:
|
Update: SAT, MAY 27, 2006 - Continuation Of Rebuild
Evening
I ended up pulling all the pistons out of the cylinders and
reseated the crank. That solved the problem. So I reinstalled the
pistons (this will give you patience of steel), attached the rods to the
crank, used locktite blue on those bolts. I changed out the seals and
o-rings for both the top and bottom main bearings: WHAT A JOB to do that
task.
Then I applied gel seal on the block, and installed the block half. After tightening the bolts with an auto parts store loaner torque wrench, I found out that I had overtorqued them due to a screwy torque wrench. WHAT A PIECE OF JUNK.
Aggravated, I went out and purchased a $20 torque wrench that is very easy to use. So I decided that I had better pull the block half off and redo the gel seal. UGGGG. Done.
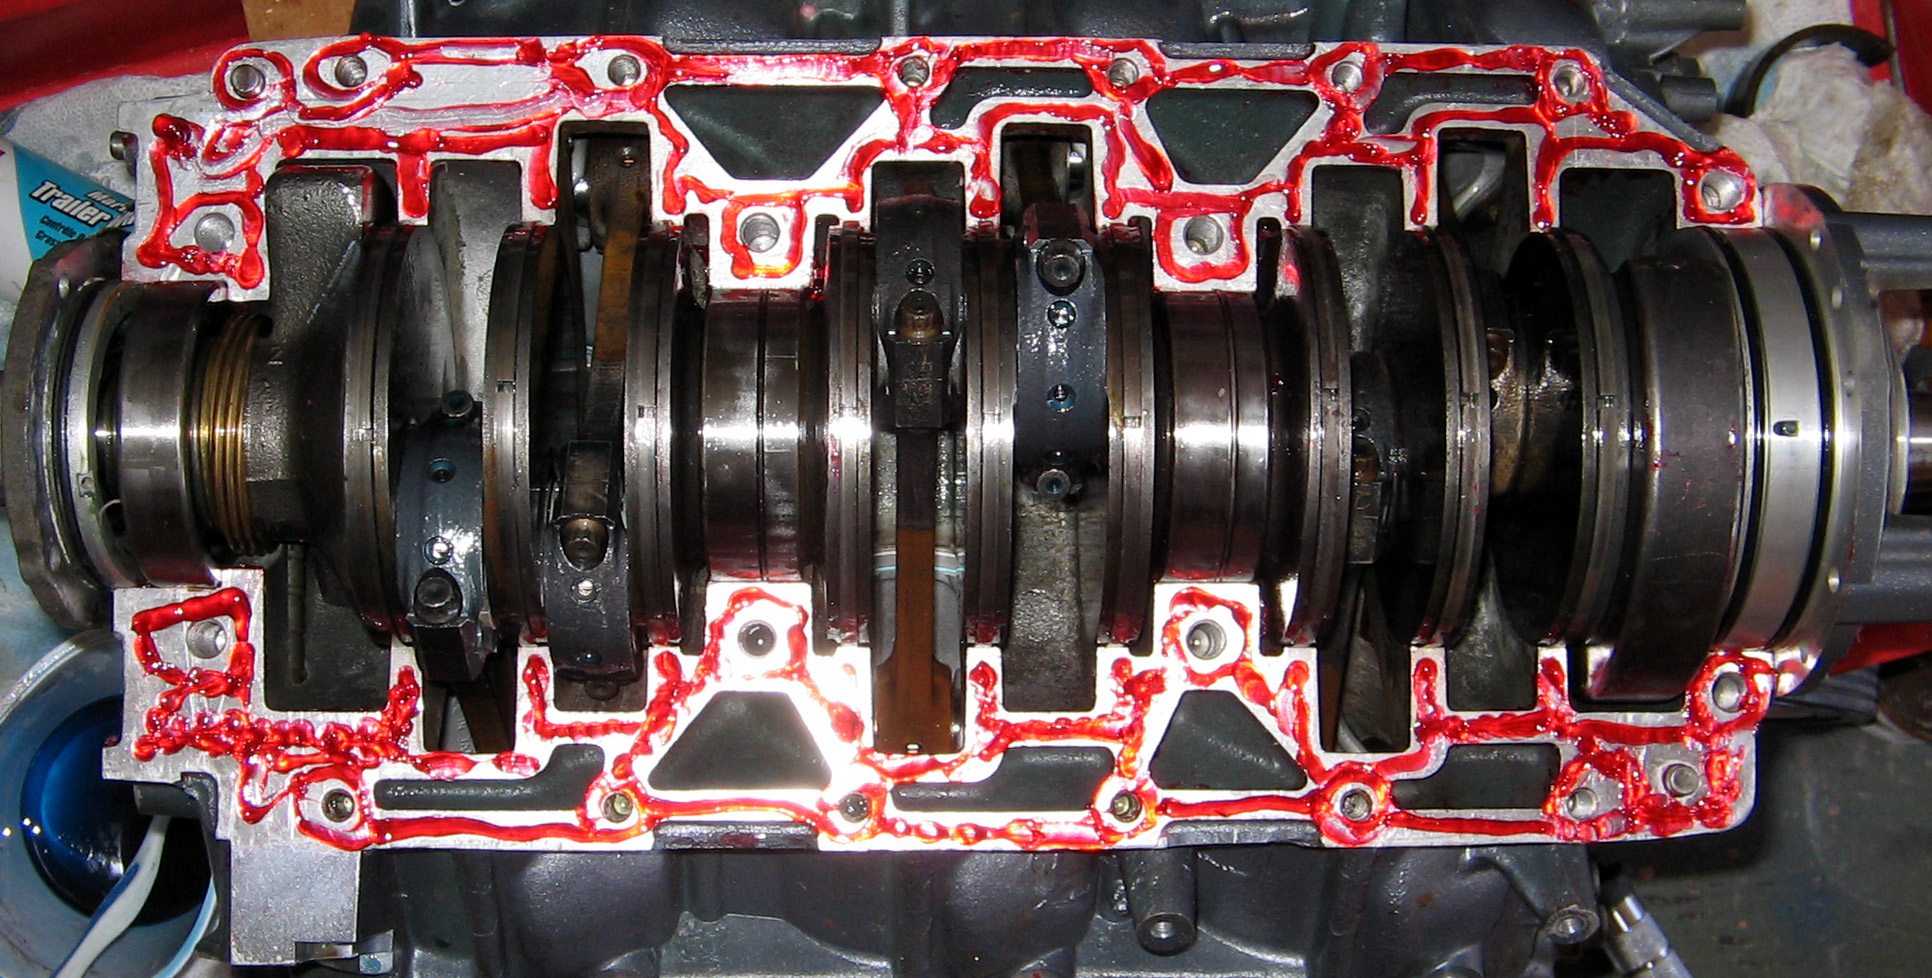
Gel Seal On Block 2nd Time
It looked a lot better the first time
The powerhead is just about ready to install on the boat.
I tinkered with the starter as I want to run the starter on the powerhead before I install it on the boat just to make sure the sounds of the crank and pistons are correct. I mounted the starter and flywheel to the powerhead but am concerned about the torque of the starter when I connect power; I have not yet tried this (and maybe I wont afterall); I don't want the powerhead to be torqued onto the floor. (!)
About this time I began running out of "steam". I continued though by preparing the midsection surface to mate the powerhead. I found water holes on midsection that appear to not go anywhere; they appear closed:
If this is the case, how do the cylinder waterjackets drain?
Here's the garage tonight:
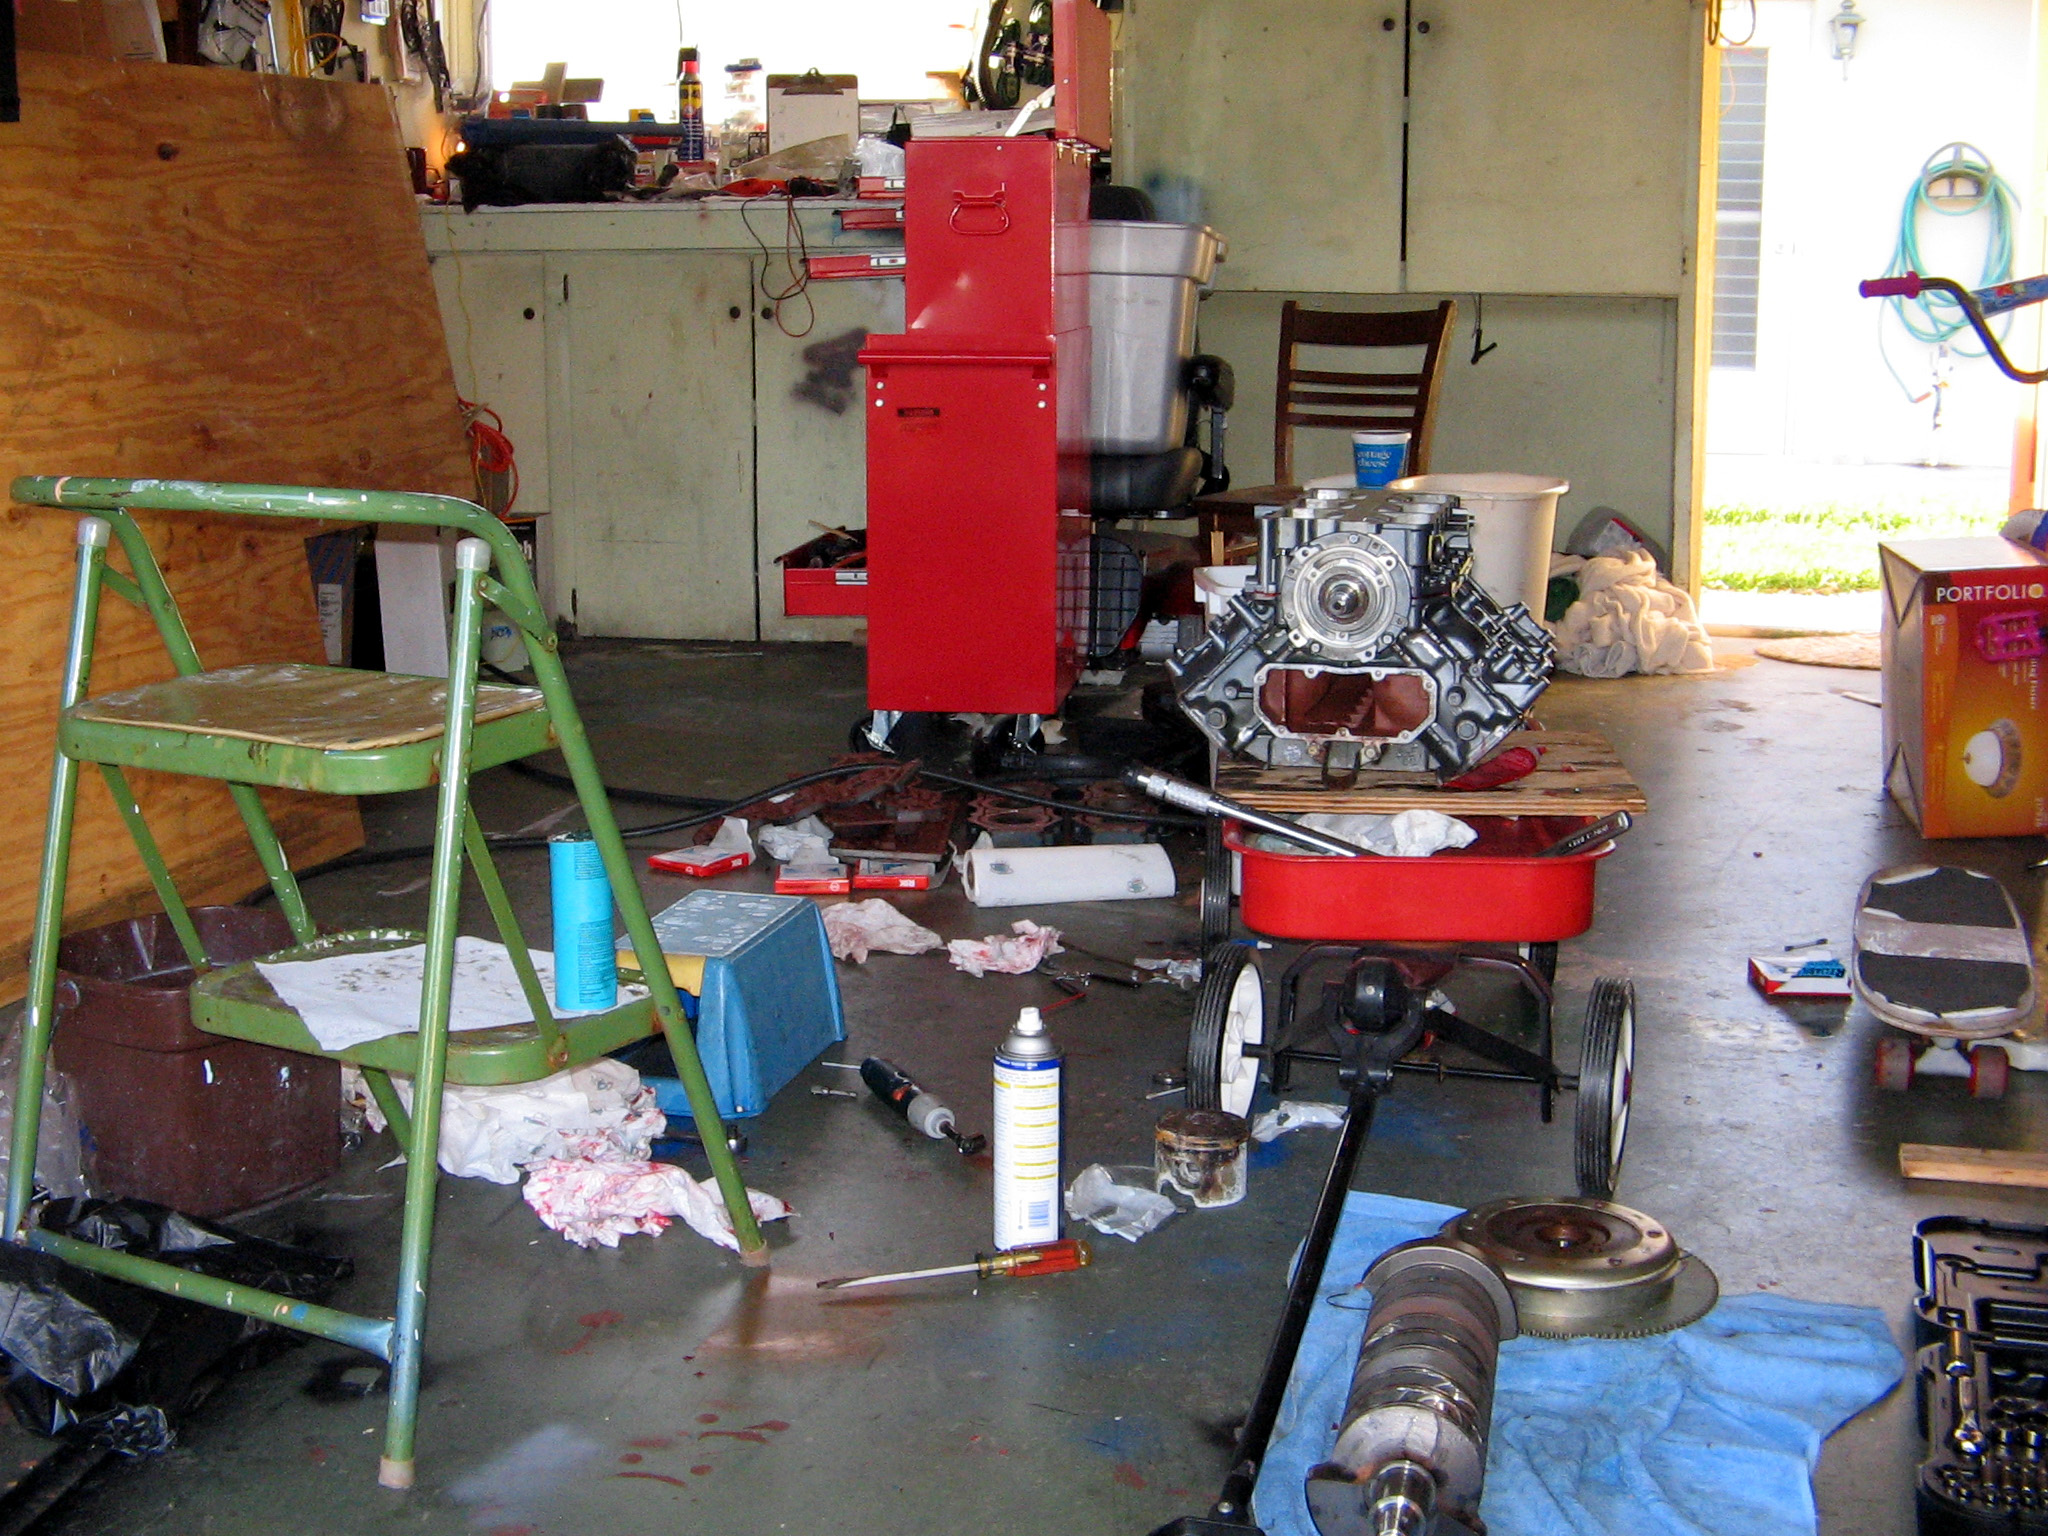
Yes, I know it is not the tidiest, but I don't rebuild engines every day either.
Morning
I assembled the 3 original rods and 3 replacement (used) rods to all 6 new pistons
using new wristpins, snaprings, and wristpin bearings. I also installed
all pistons to the block and attached to the crank. There is roughness
when turning the crank...The crank bumps up when I turn it. ...this is
not right.
Here's a recap of some of the prep work that has occurred over the last 2 months:
-A replacement crankshaft has been purchased - It is used and in very good condition. The lower bearing on this replacement crank will be used as it appears in good condition. The old crank will not be used as I have found that machining a crank and putting oversized bearings on is not possible for my motor. Also, I found that rebuilding a crank is not as good as just getting a good used one.
- 3 rods were determined to be imperfect and so 3 good used ones were purchased.
- All rods were weighed and found to be within a couple of tenths of an ounce of each other.
- New Sea Pro pistons, wristpins, snaprings, wrist bearings, and rod-to-crank bearings will be used.
- Of the 2 center main bearings, the lower center main was replaced with a new one. The upper center main will be reused.
- The top main bearing will be reused.
- The machinist bored cylinder 5 to "20 over". The remaining cylinders were honed.
- The failure-causing hole in the aluminum V which allowed water to pass into cylinders 5 and a bit into 3 has been welded by the machinist.
- An additional aluminum weld was performed by the machinist after a small chunk of aluminum was discovered to be missing from a gasket mating surface after water pressure cleaning of the block. Machining of that surface was completed.
- Water cavaties on the block, heads, water jackets, thermostat housings, and exhaust covers have been wirebrushed to remove as much corrosion as possible.
- All water contacting surfaces have been sprayed with Rustoleum Rusty Metal Primer.
- Gasket surfaces & block half mating surfaces have been cleaned and solvent brushed. I plan to coat all surfaces (except block halves) with Permatex High Tack Gasket Sealant. The block halves will get:
"Pro Seal Gasket Eliminator", "Manufactured by Loctite Corp for Pro Marine Parts, Bradenton Fl" Part # GS1
- A power head gasket kit was purchased which includes seals for main bearings and etc...
- All reused parts have/will be solvent washed with gasoline.
Update: FRI, MAY 26, 2006 - Beginning
Of Rebuild
OK FOLKS wish this newbie-engine-rebuilder a miracle.
While you read this I am probably knee deep in oil putting this motor back
together.
Here I am, "knee deep":
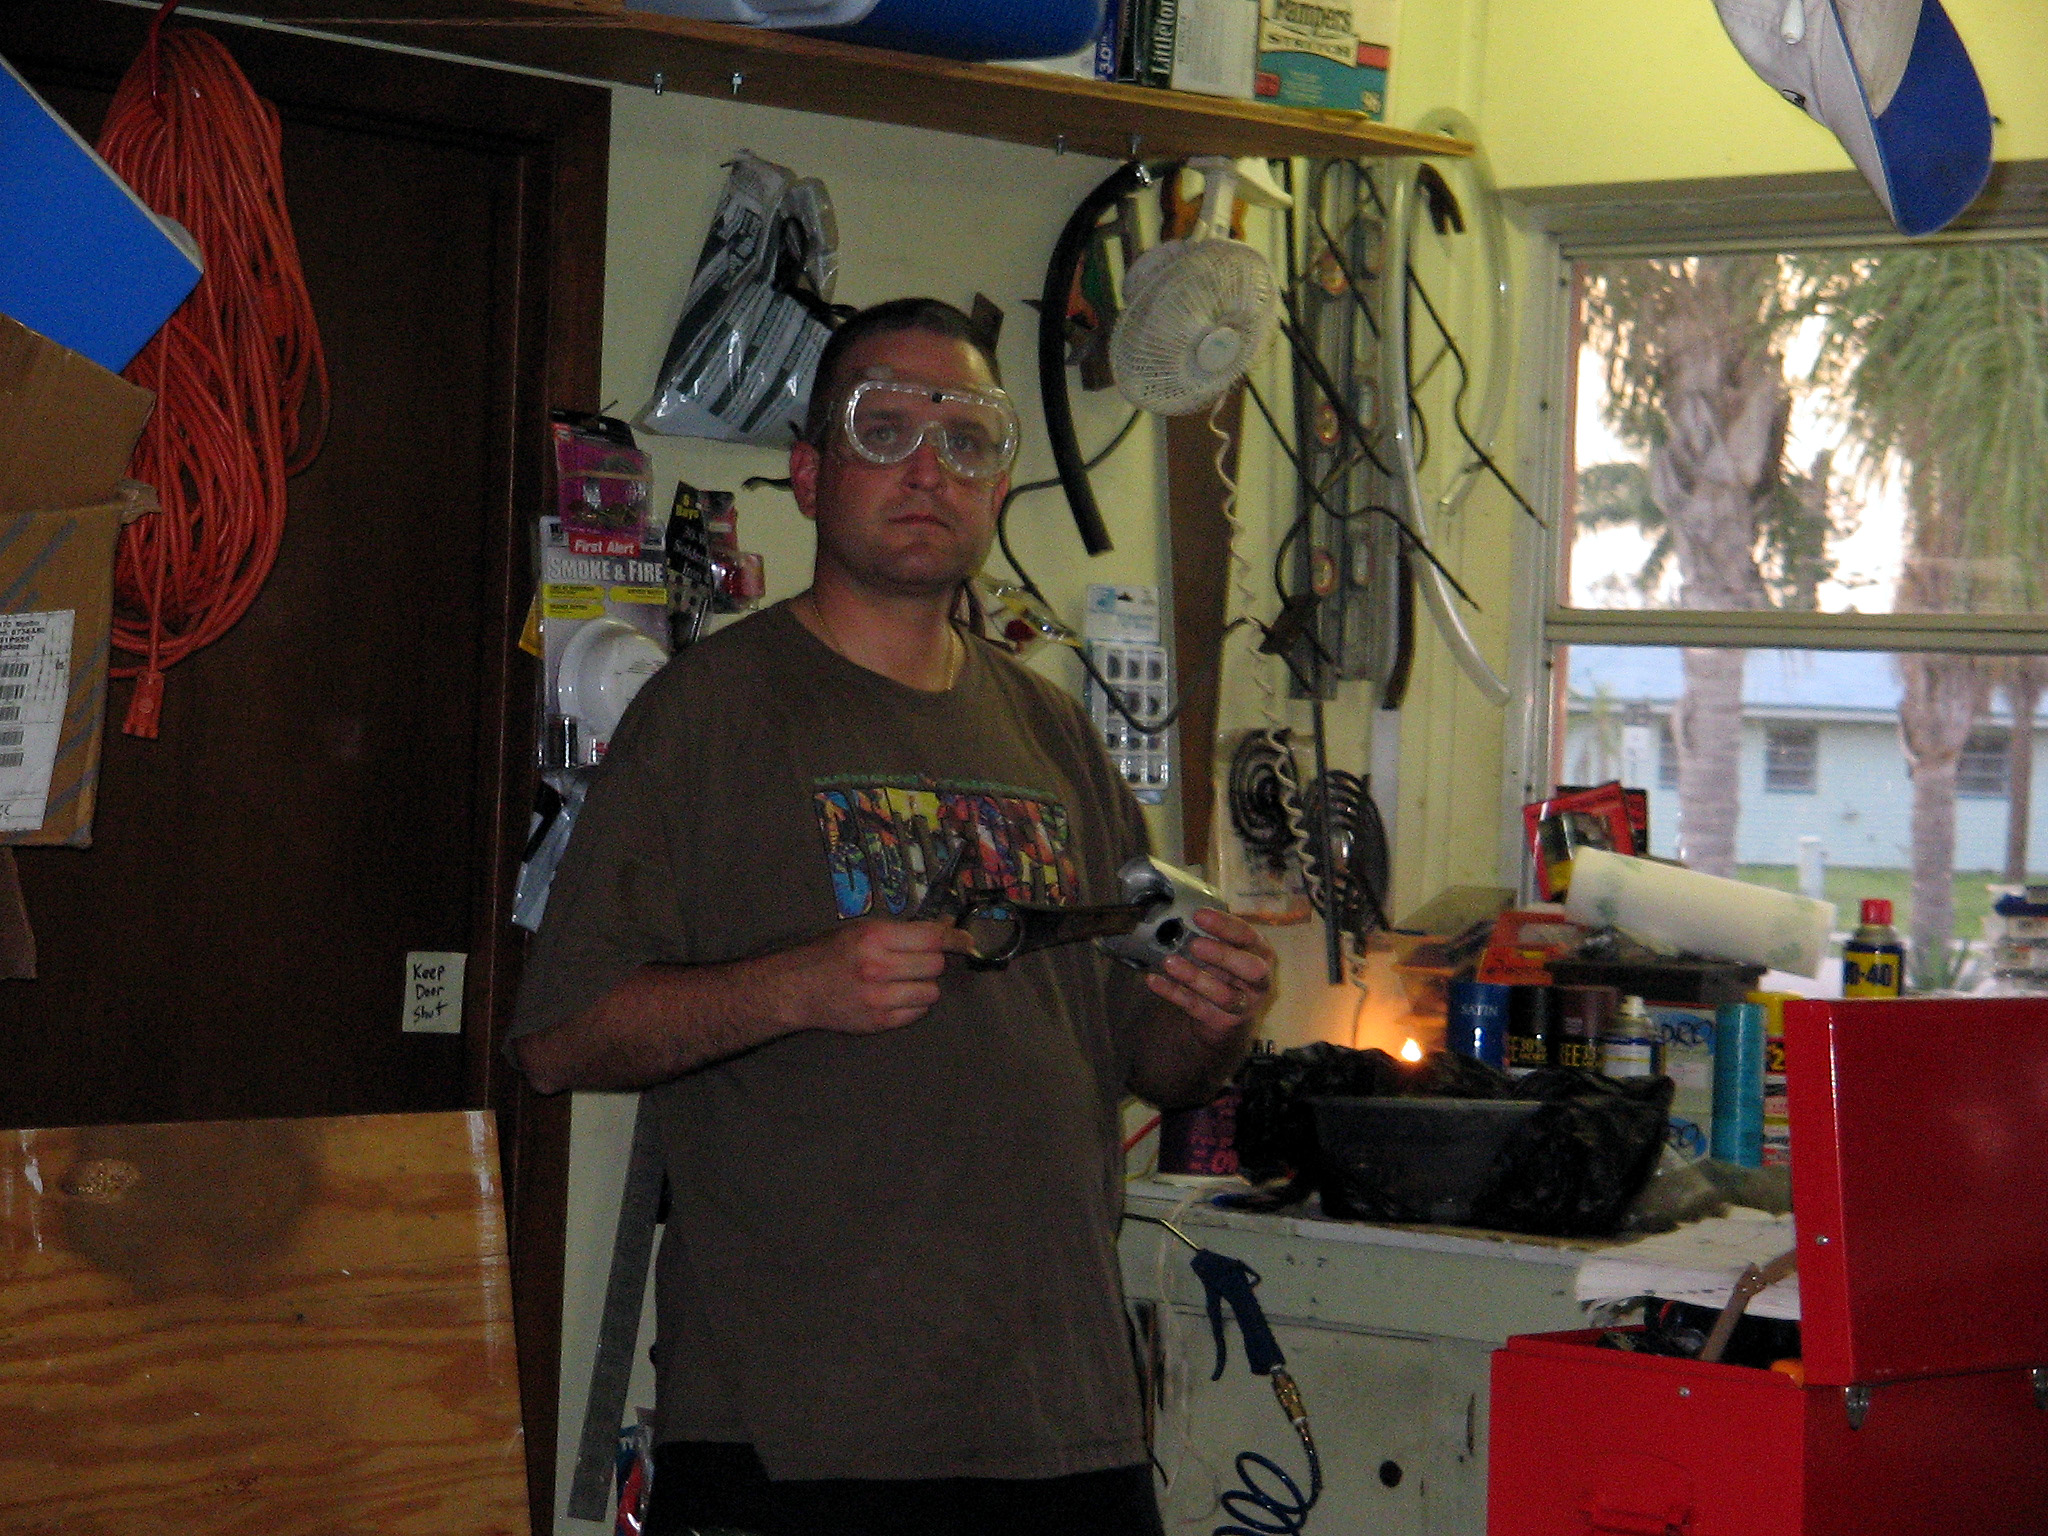
I'm really not as unhappy as I look! I'm just intense at this
moment.
Update: MON, MAY 22, 2006 - Misc
I didn't do tons of work on the block this weekend but I do
feel a bit better about my progress.
I called a local marine repair shop that I bought some parts from and discussed my concerns about painting all the water passages of my block, heads, and water jackets with Rustoleum Rusty Metal Primer (which is rated at only 200* F, shame on me for not seeing this before I coated the water passages, lol). He said don't worry about it - if any paint peels off it will go right out the exhaust. I hope so.
Also, after much patience, I was able to work the center main bearing (lower) check valve from the block. I used PB Blaster, a flat tip screwdriver and a variety of tiny screwdrivers to coax the valve out of the opening.
Then I removed all 8 of the sacrificial anodes and cleaned their surrounding seating areas.
I am ready to place a final (hopefully) parts order.
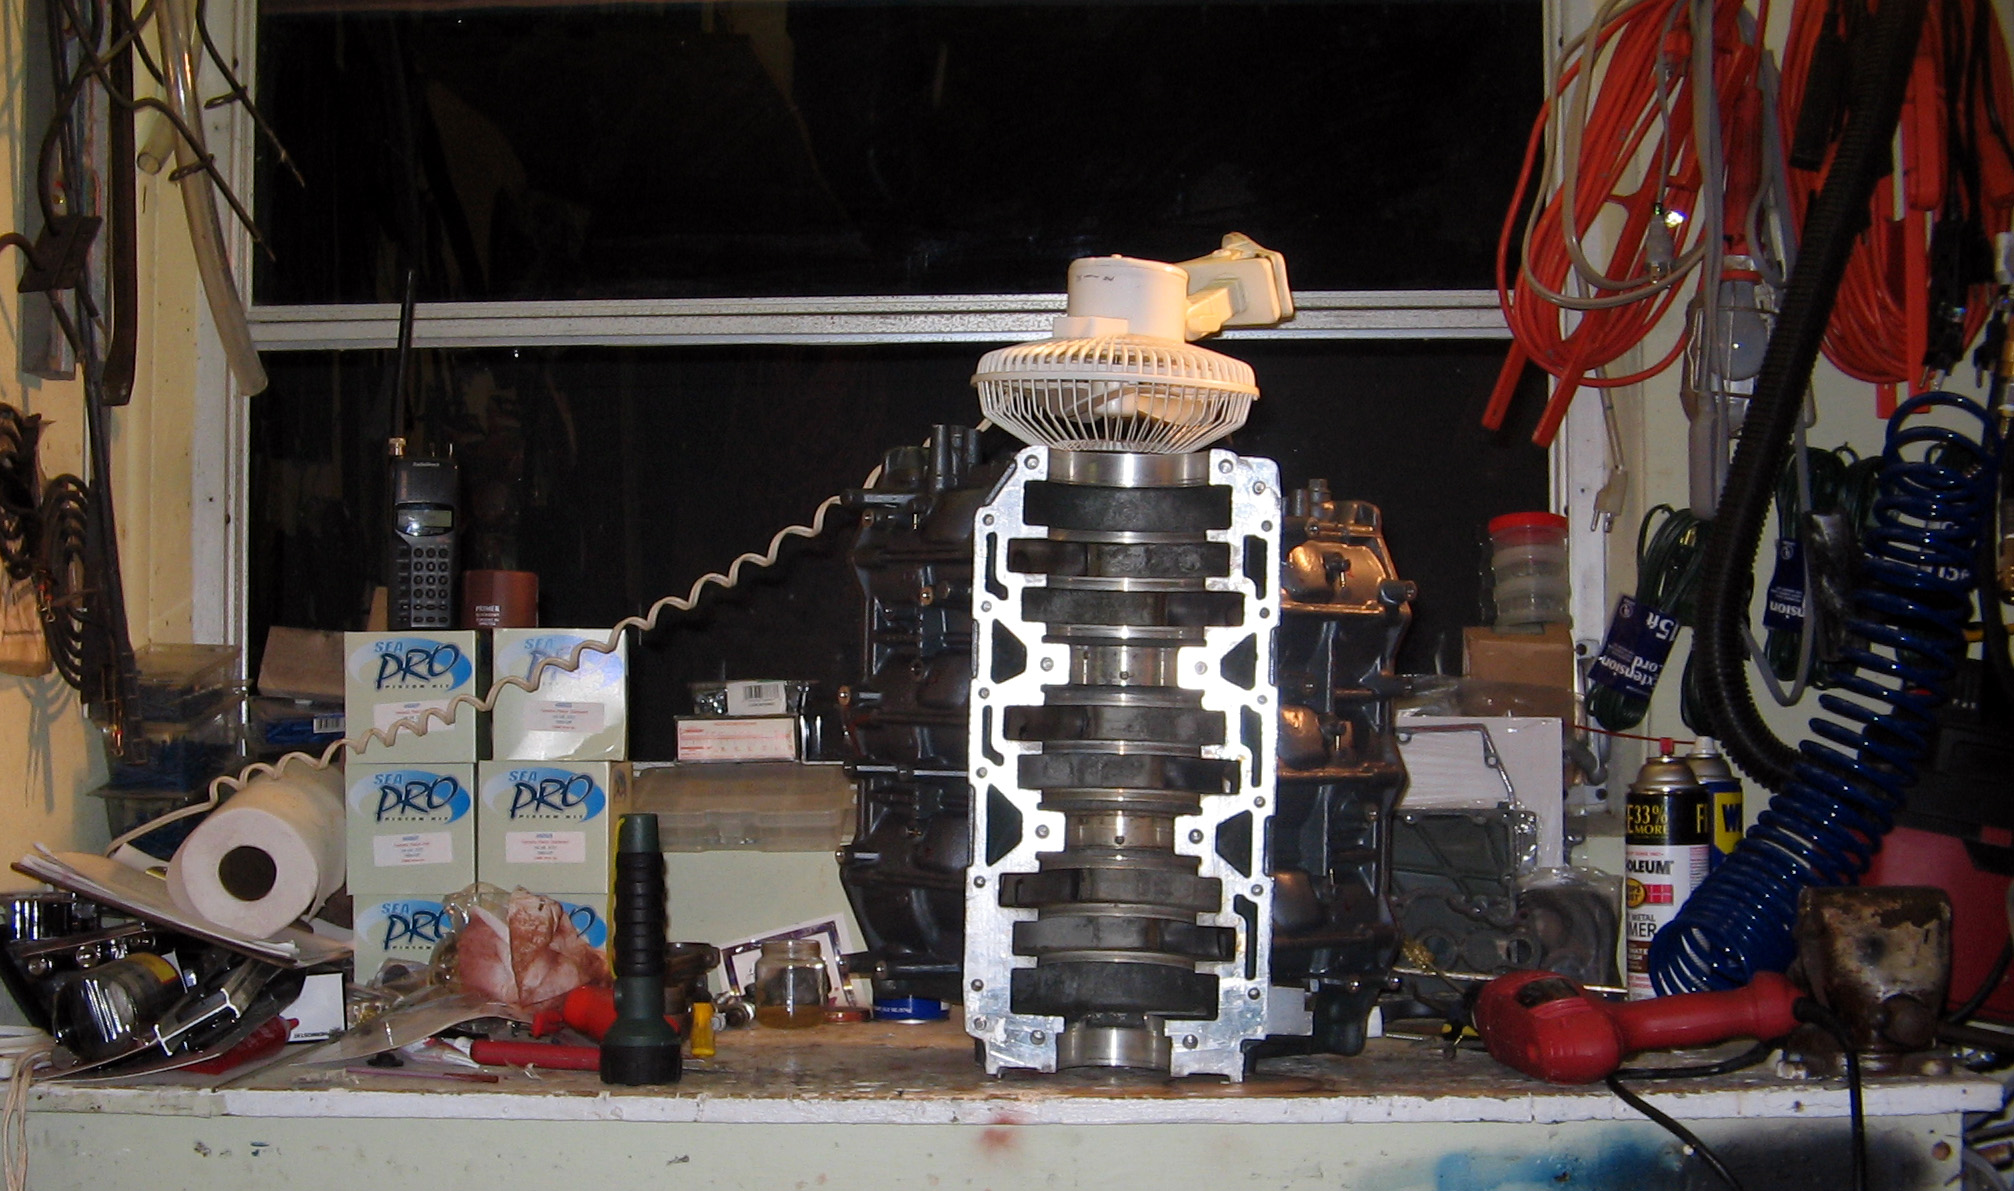
Update: SAT, MAY 13, 2006 - Cleaning
Corrosion, Painting, & etc.
THIS IS A HUGE JOB SO FAR.
The last 2 days I cleaned corrosion with a variety of wire
brushes, and painted all water cavities with Rustoleum Rusty Metal
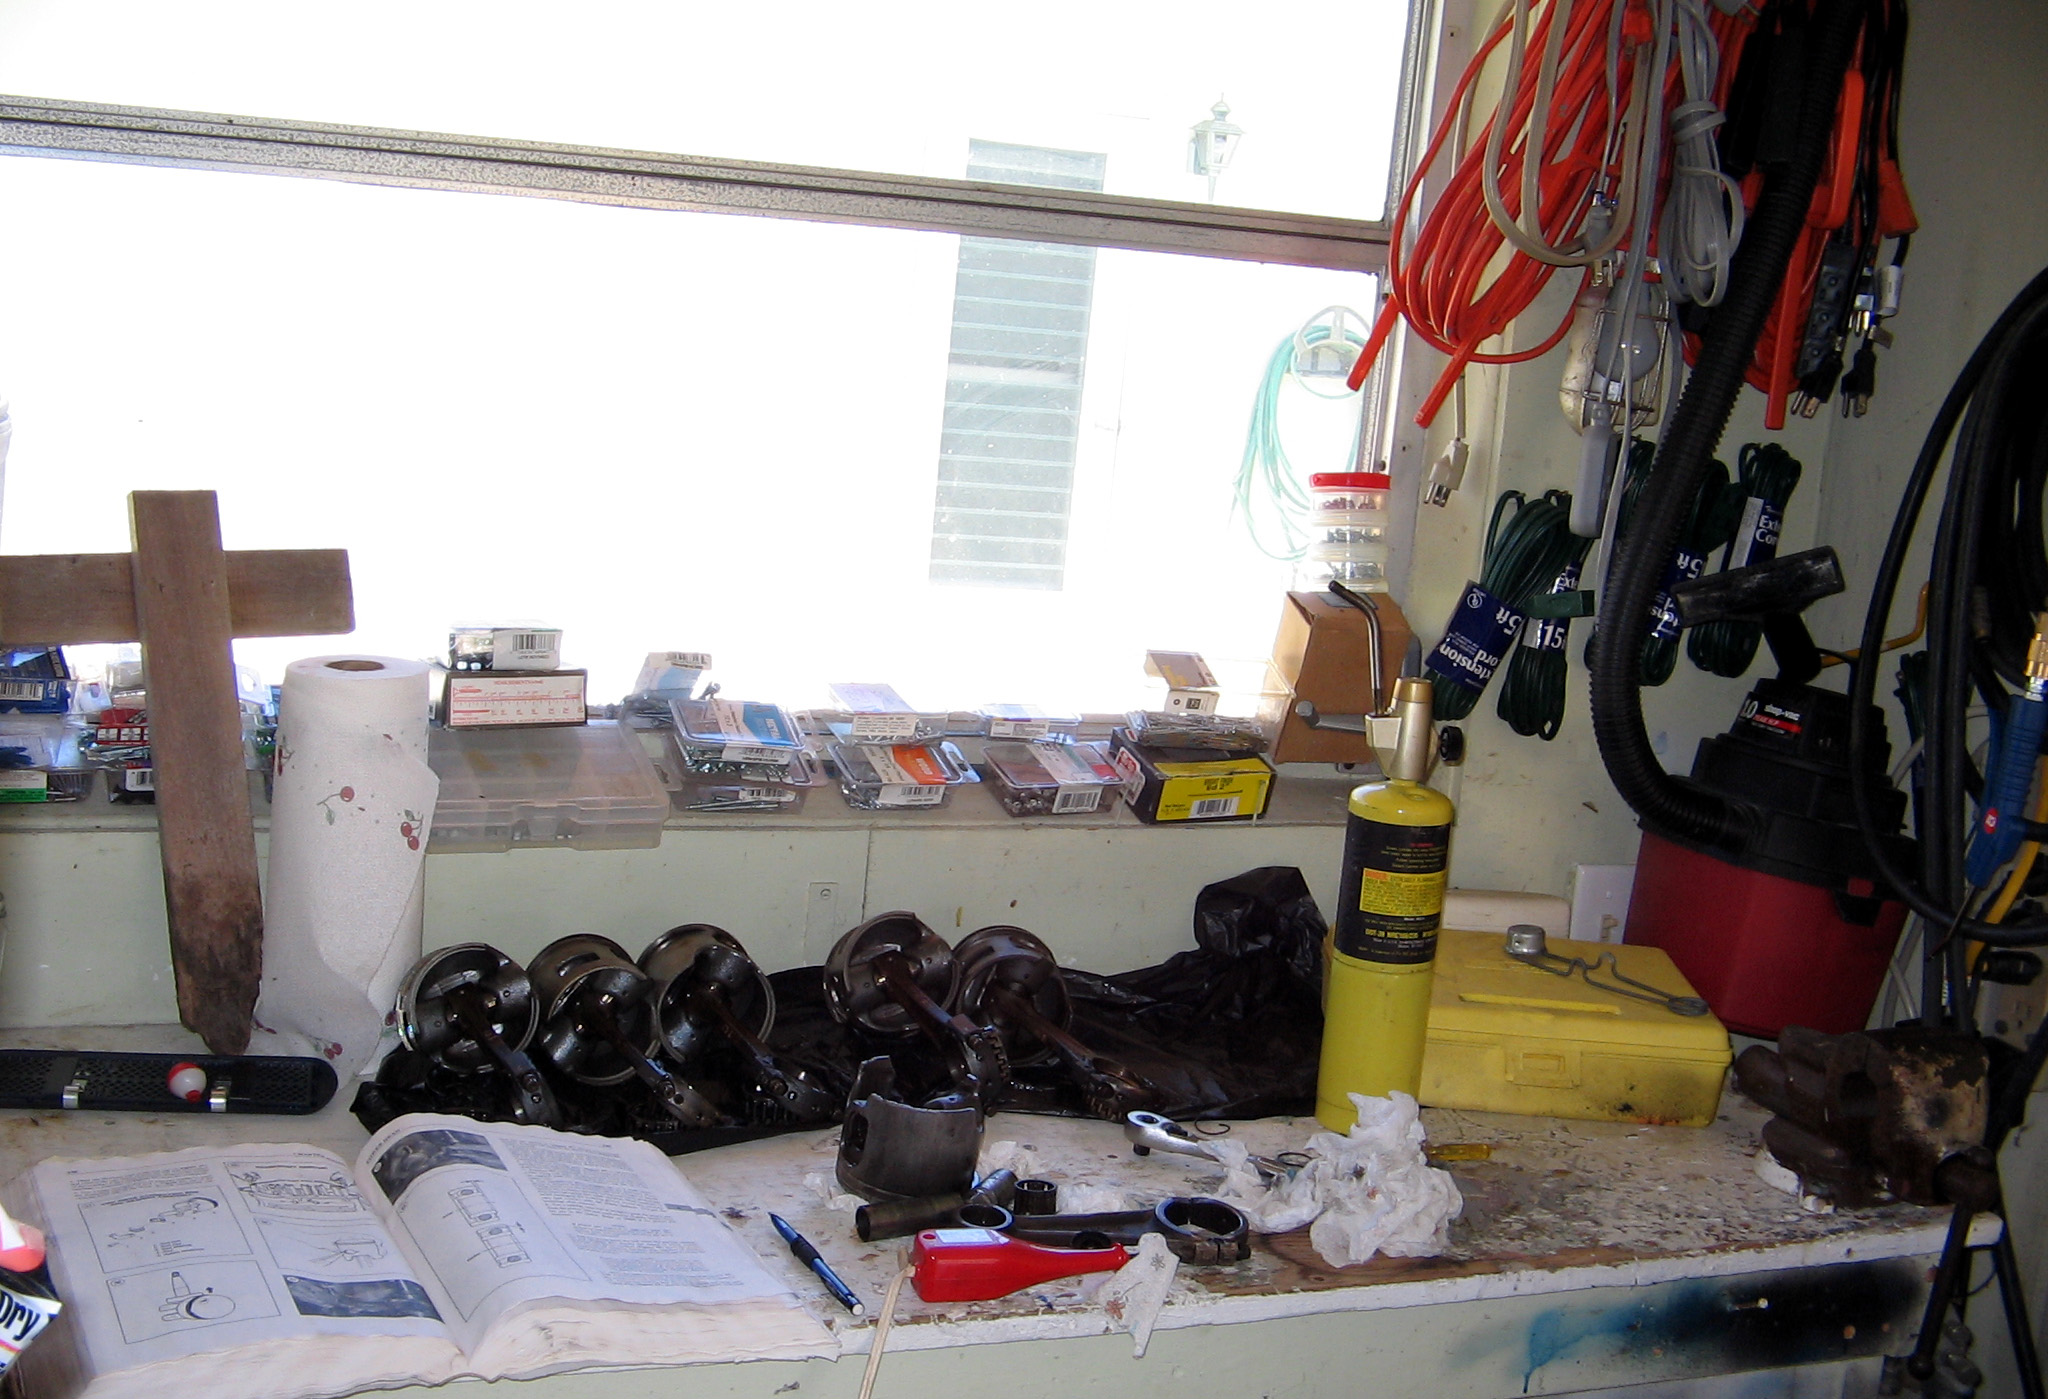
Primer. Here's what the bench looked like last night:
This morning I did a final washing of the block in scalding hot soapy water.
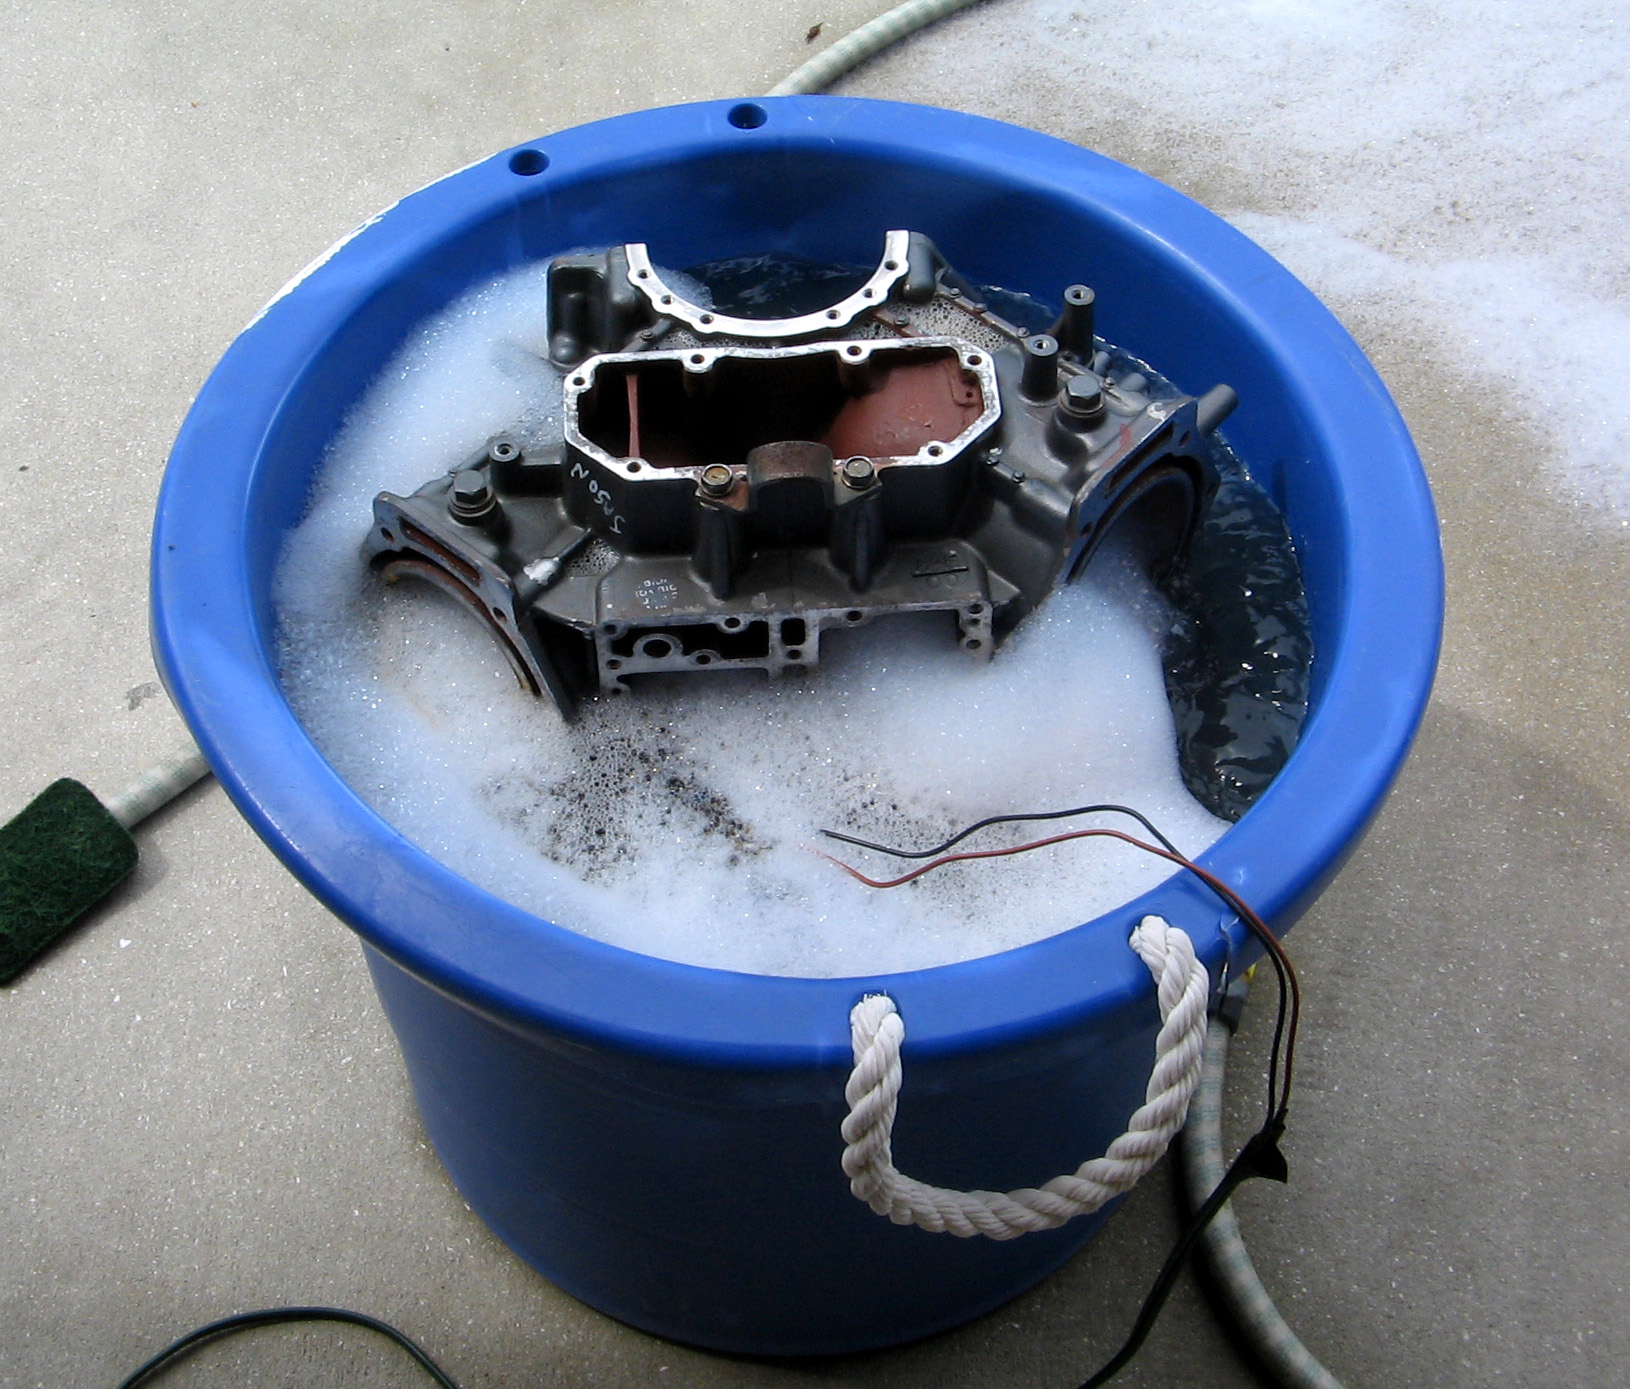
The wires you see going into the tub are for
a 12 volt bilge pump I am using
to circulate the hot soapy water through the block.
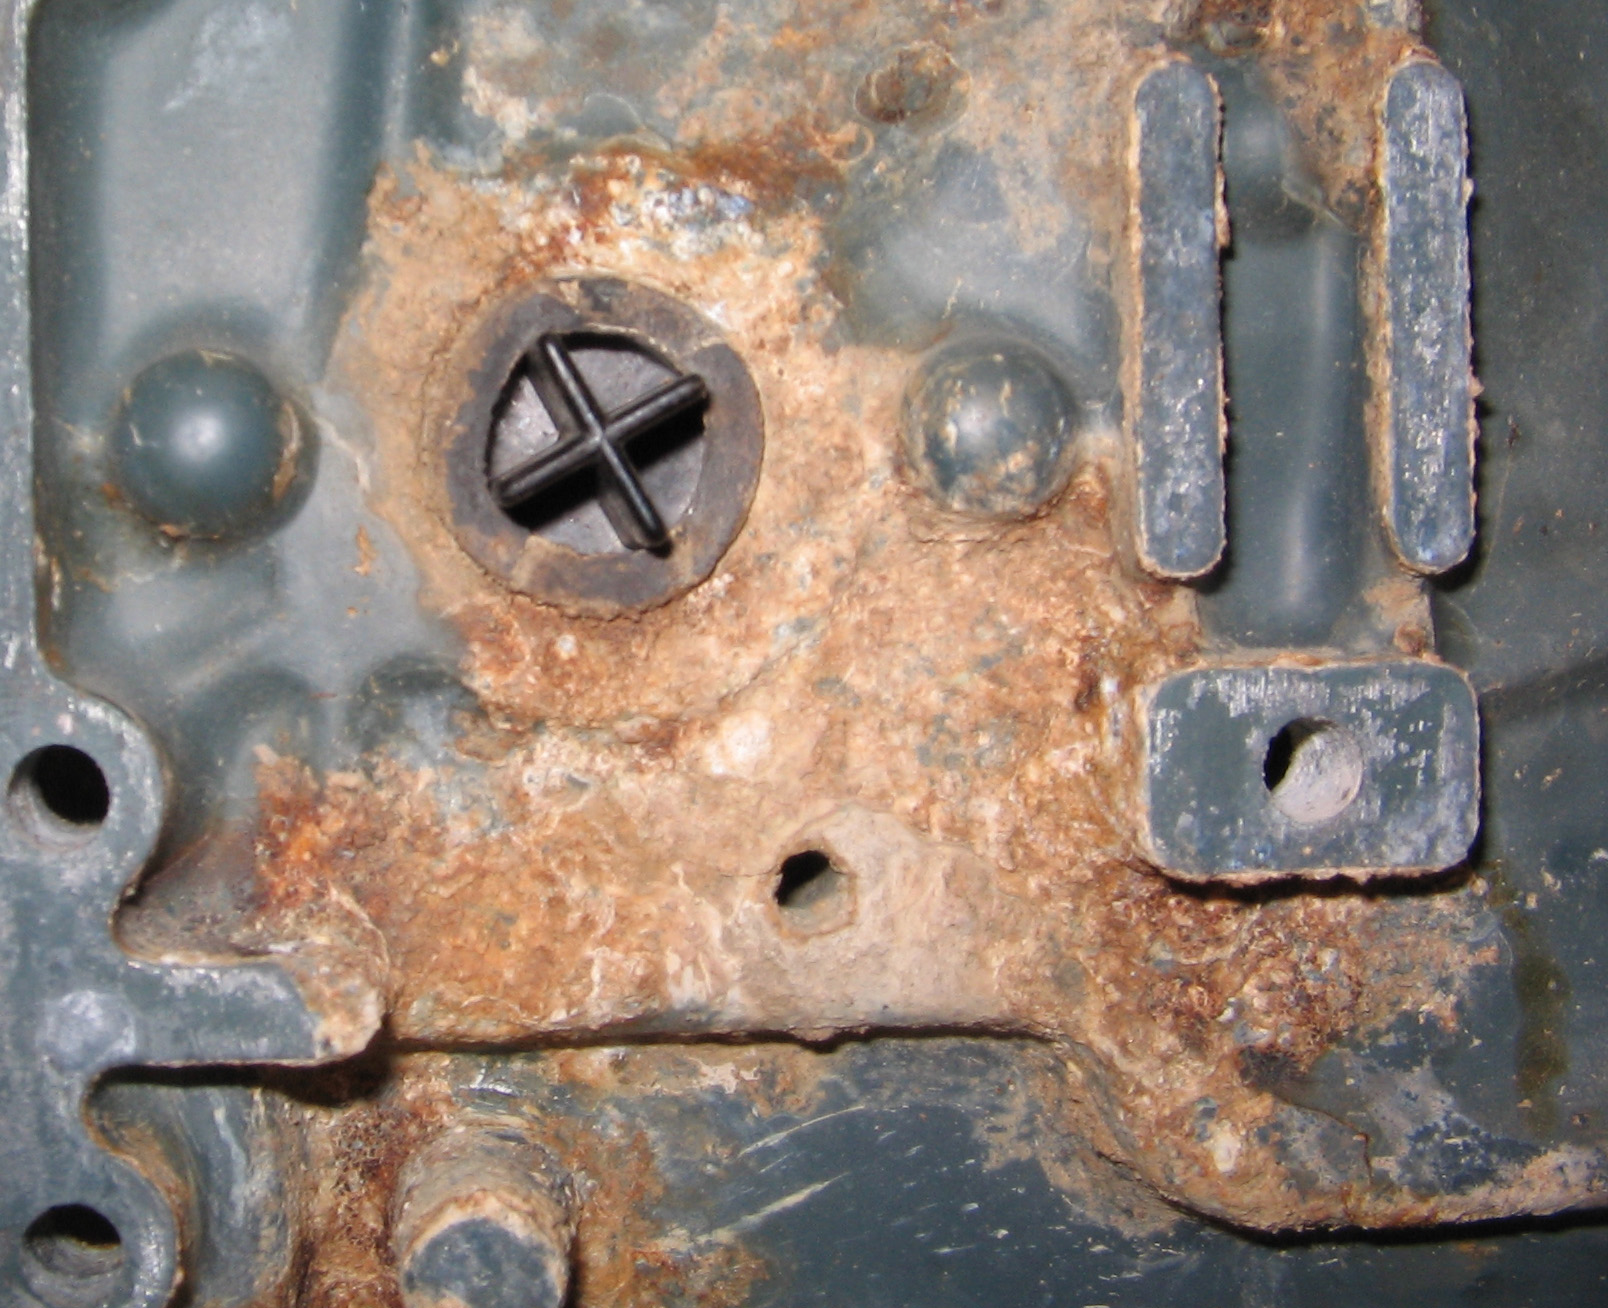
I also discovered an improperly functioning check valve that is for the center main bearing (lower). The valve is missing the "check" portion of it:
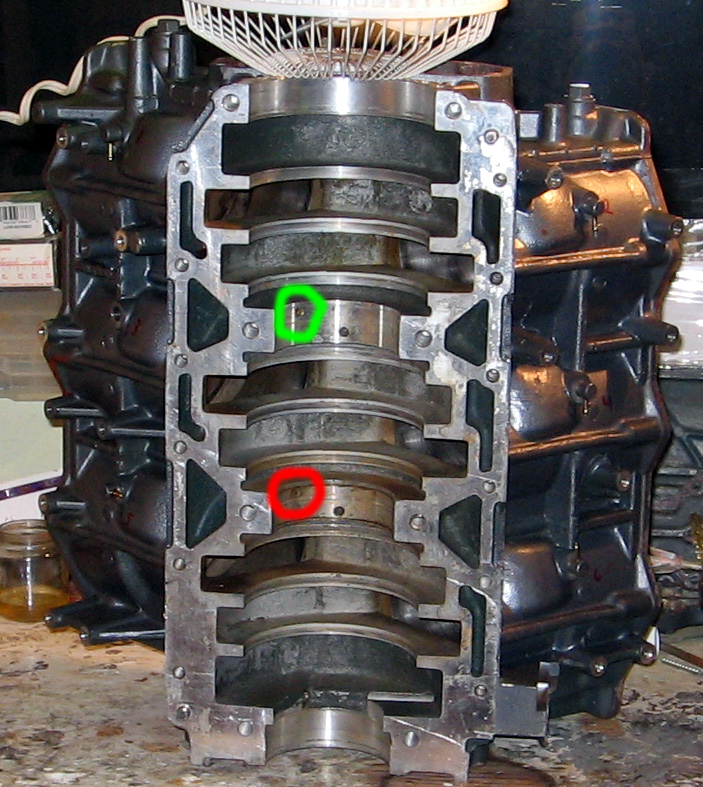 Center Main Bearing Check Valves Green = working check valve Red = broken check valve |
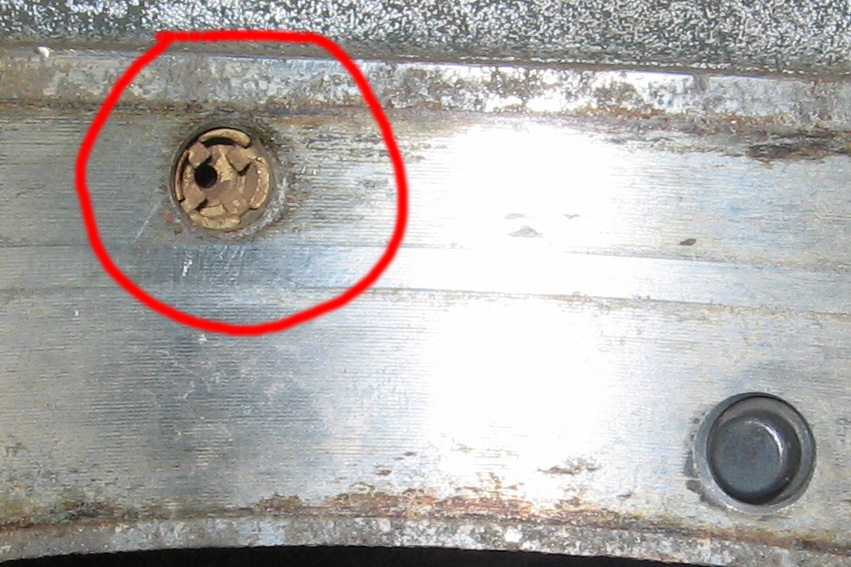 Close-up on bad center main bearing (lower) check valve |
Also, I found that the 3 used rods I purchased from the salvage shop don't have the same numbers on them. All of the orig. rods had the number 6 printed on them.
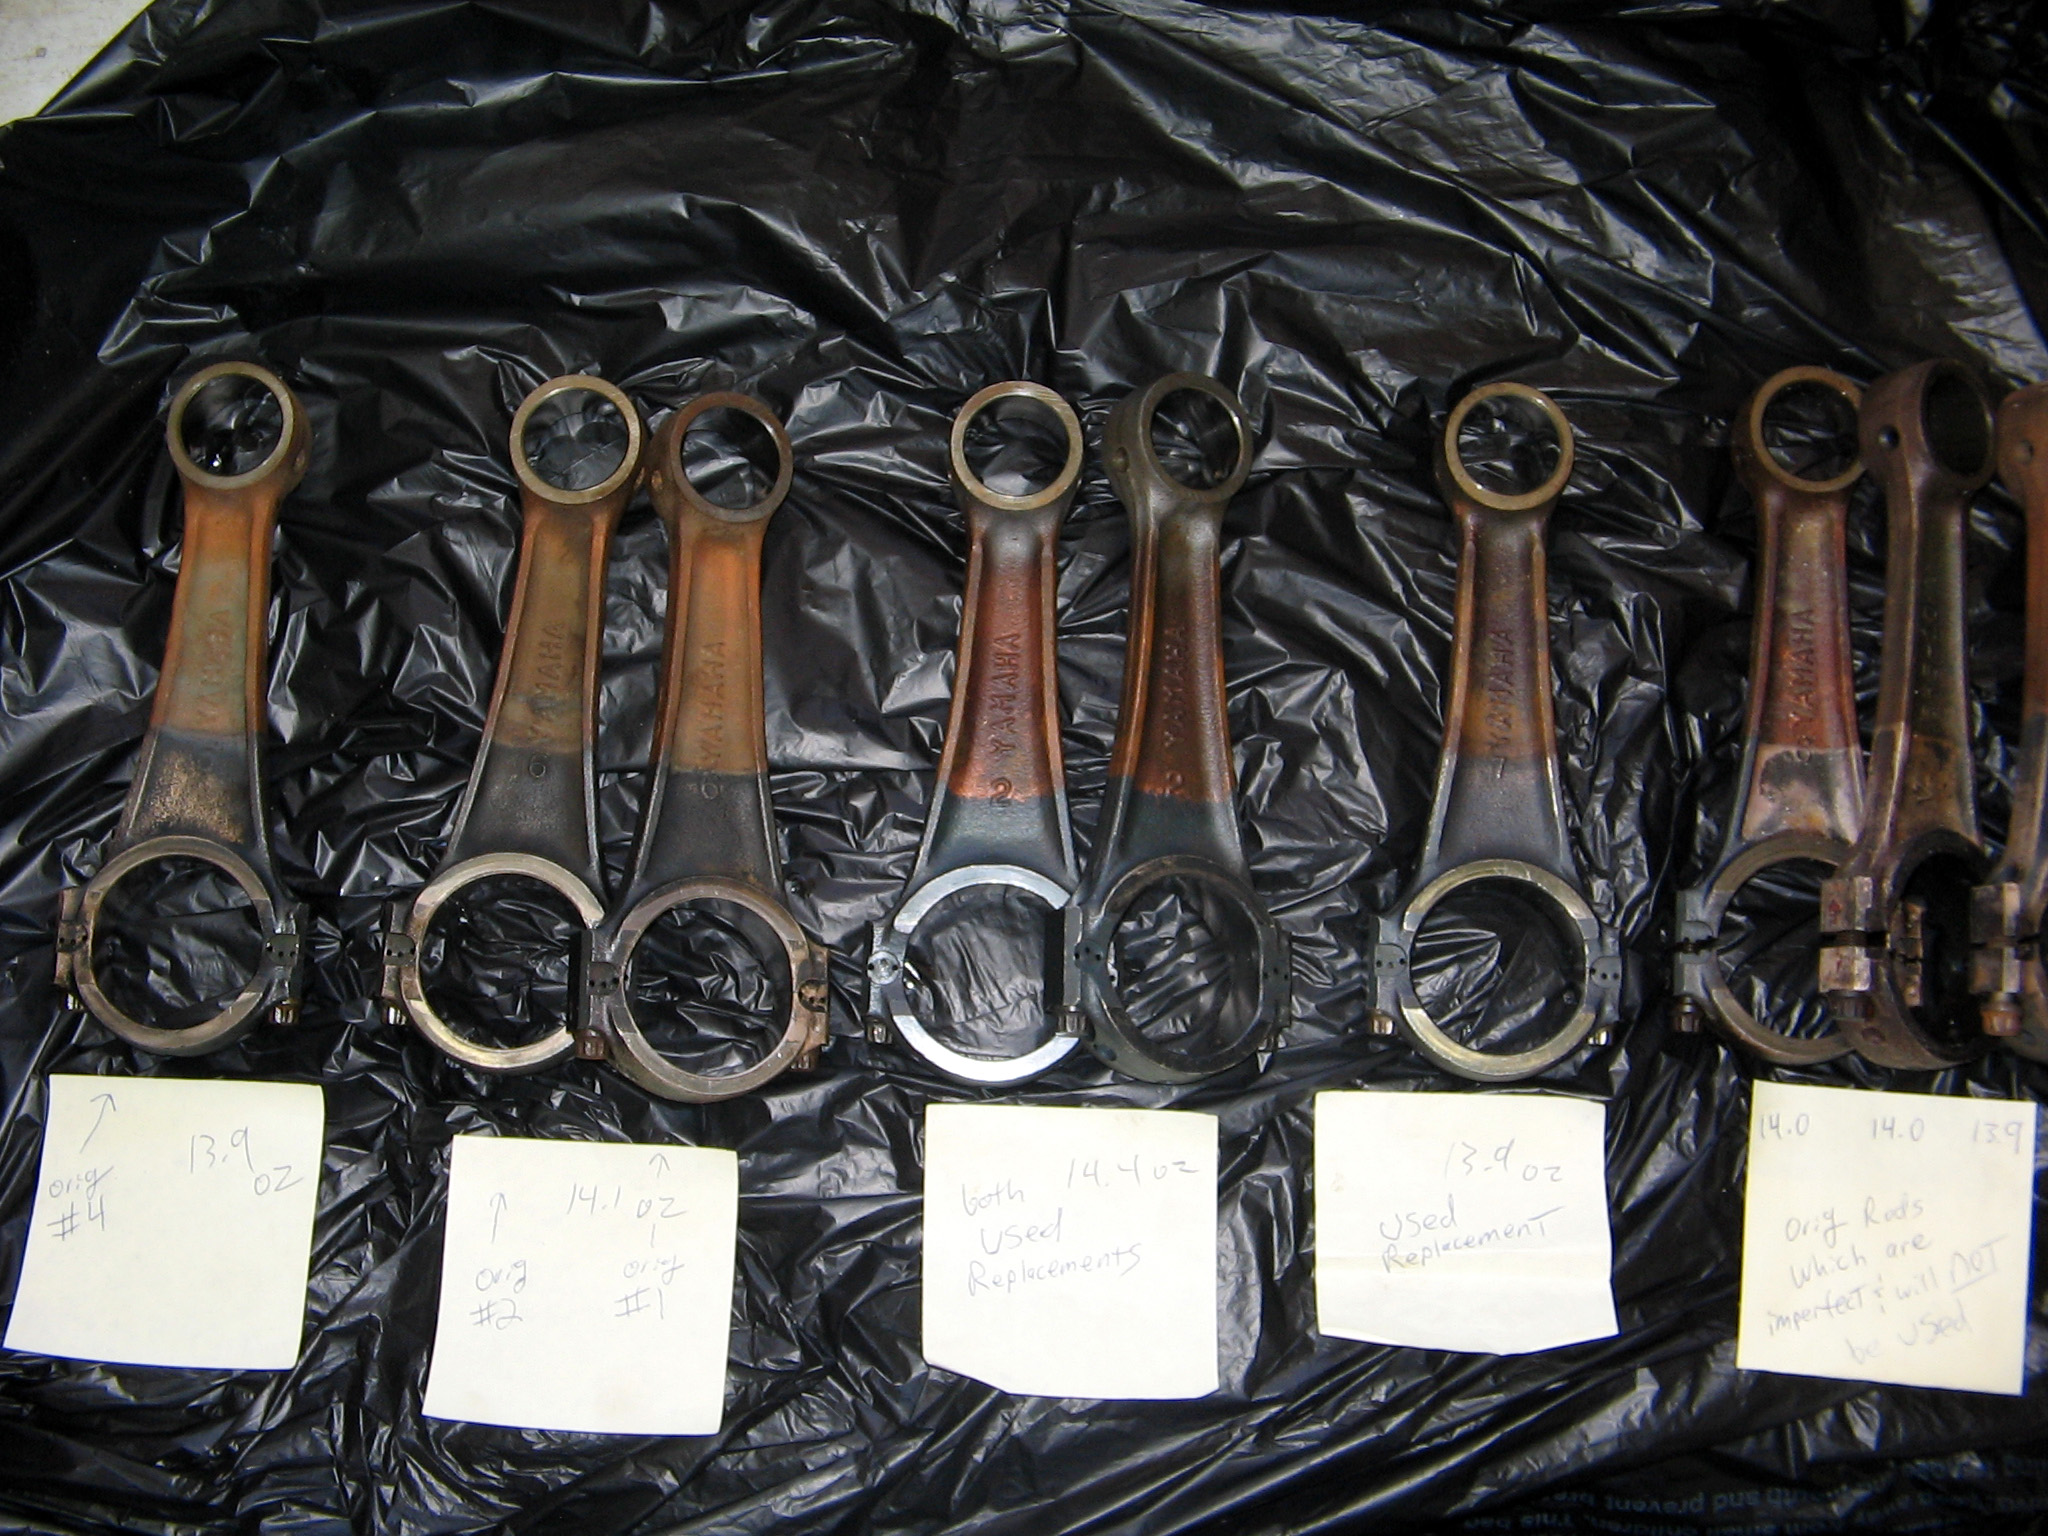
In ounces, my original rods currently weigh:
13.9 (I plan to put this rod back in service)
14.1 (I plan to put this rod back in service)
14.1 (I plan to put this rod back in service)
14.0 (Due to imperfection, rod will be removed from service and replaced with
a used one)
14.0 (Due to imperfection, rod will be removed from service and replaced with
a used one)
13.9 (Due to imperfection, rod will be removed from service and replaced with
a used one)
The 3 replacement rods measure in ounces as follows:
14.0 For the two rods that indicate a # 2 on it.
13.9 For the rod that indicates #7 on it.
What could the different stamped numbers mean, and what could the variations in weight mean, if anything? Other than that, all rods appear the same.
Update: SUN, MAY 6, 2006 - Second
Weld; Mating Surface Prep
Today my machinist graciously welded the second problem area
that was discovered yesterday. This guy's skill is
amazing with the torch and his machines.
I'm prepping the mating surfaces for new gaskets...
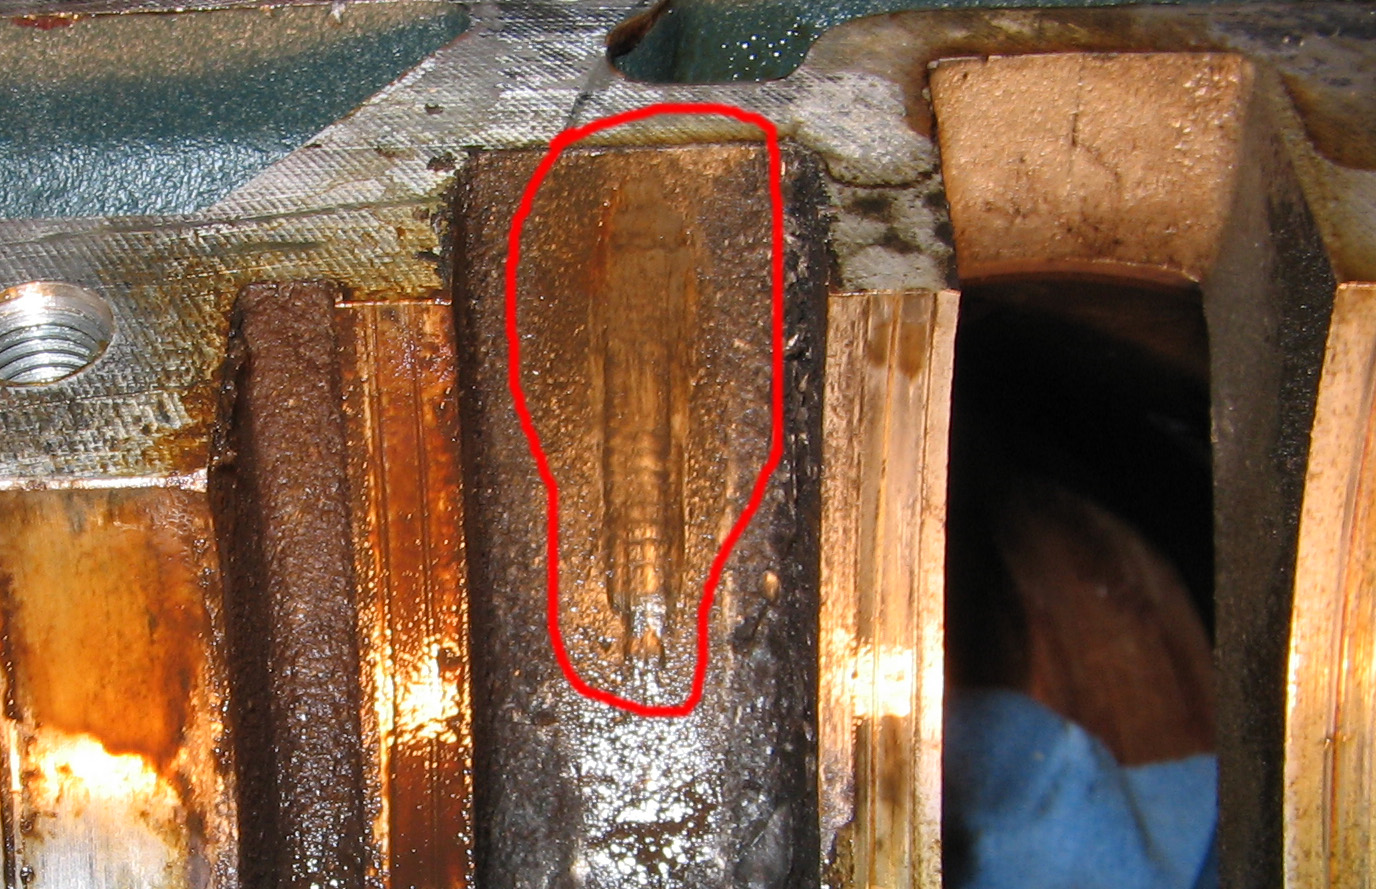
Update: SAT, MAY 6, 2006 - Picked
up all parts, cleaning parts, New problem
Today I picked up all the parts I need including new pistons,
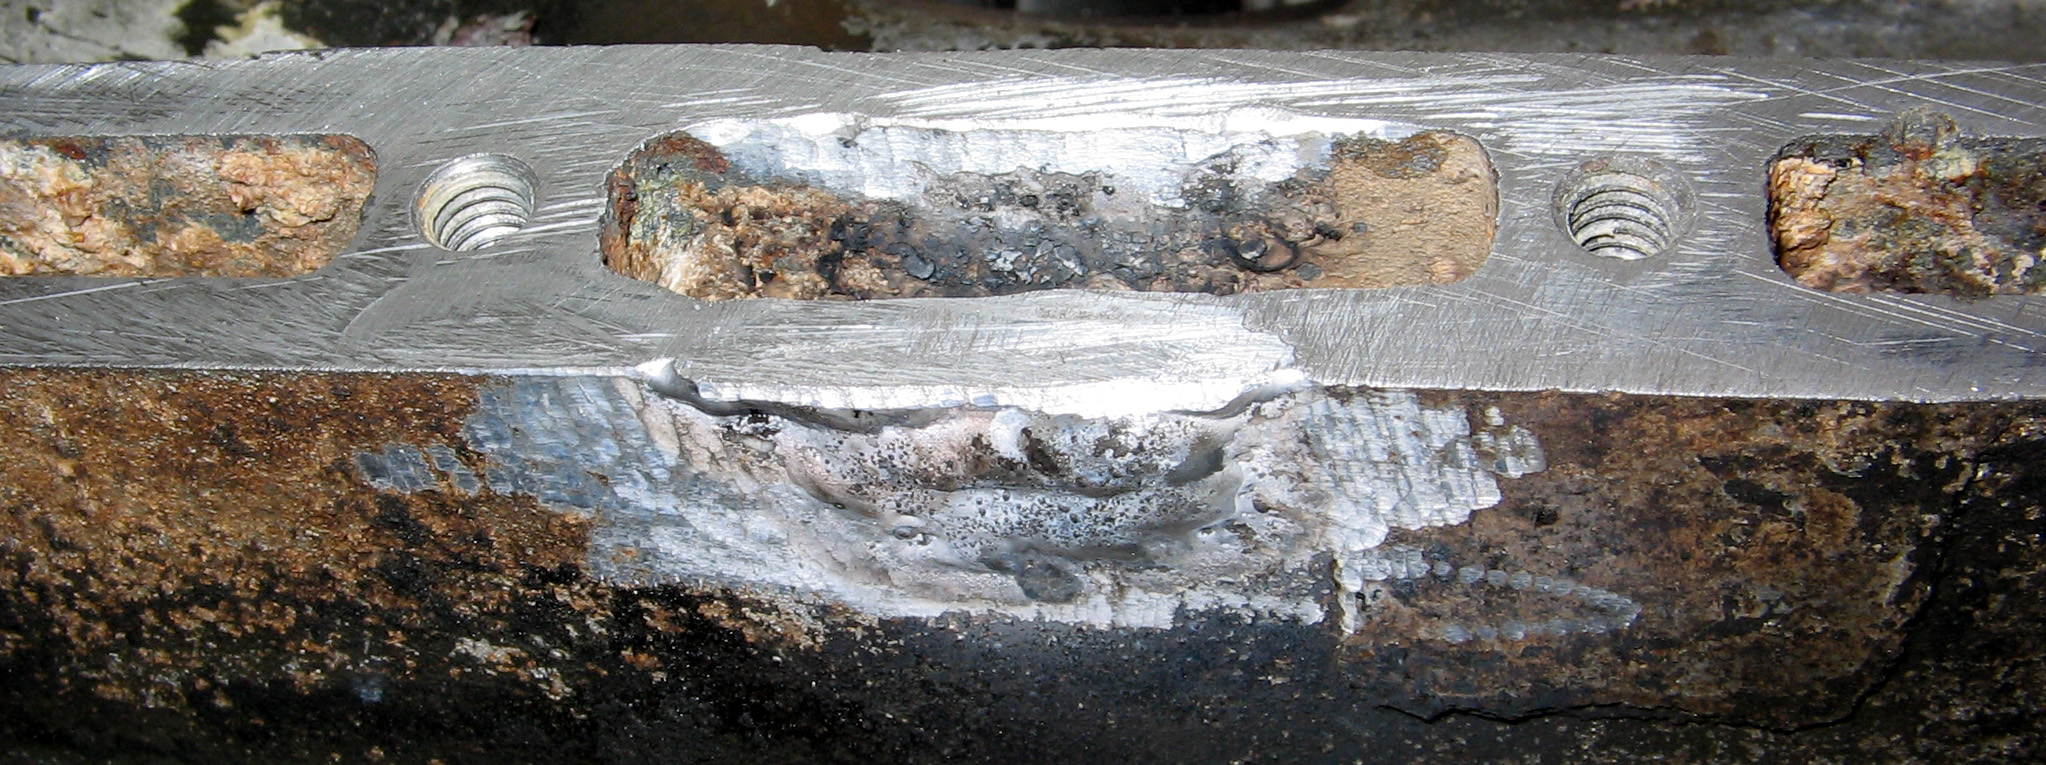
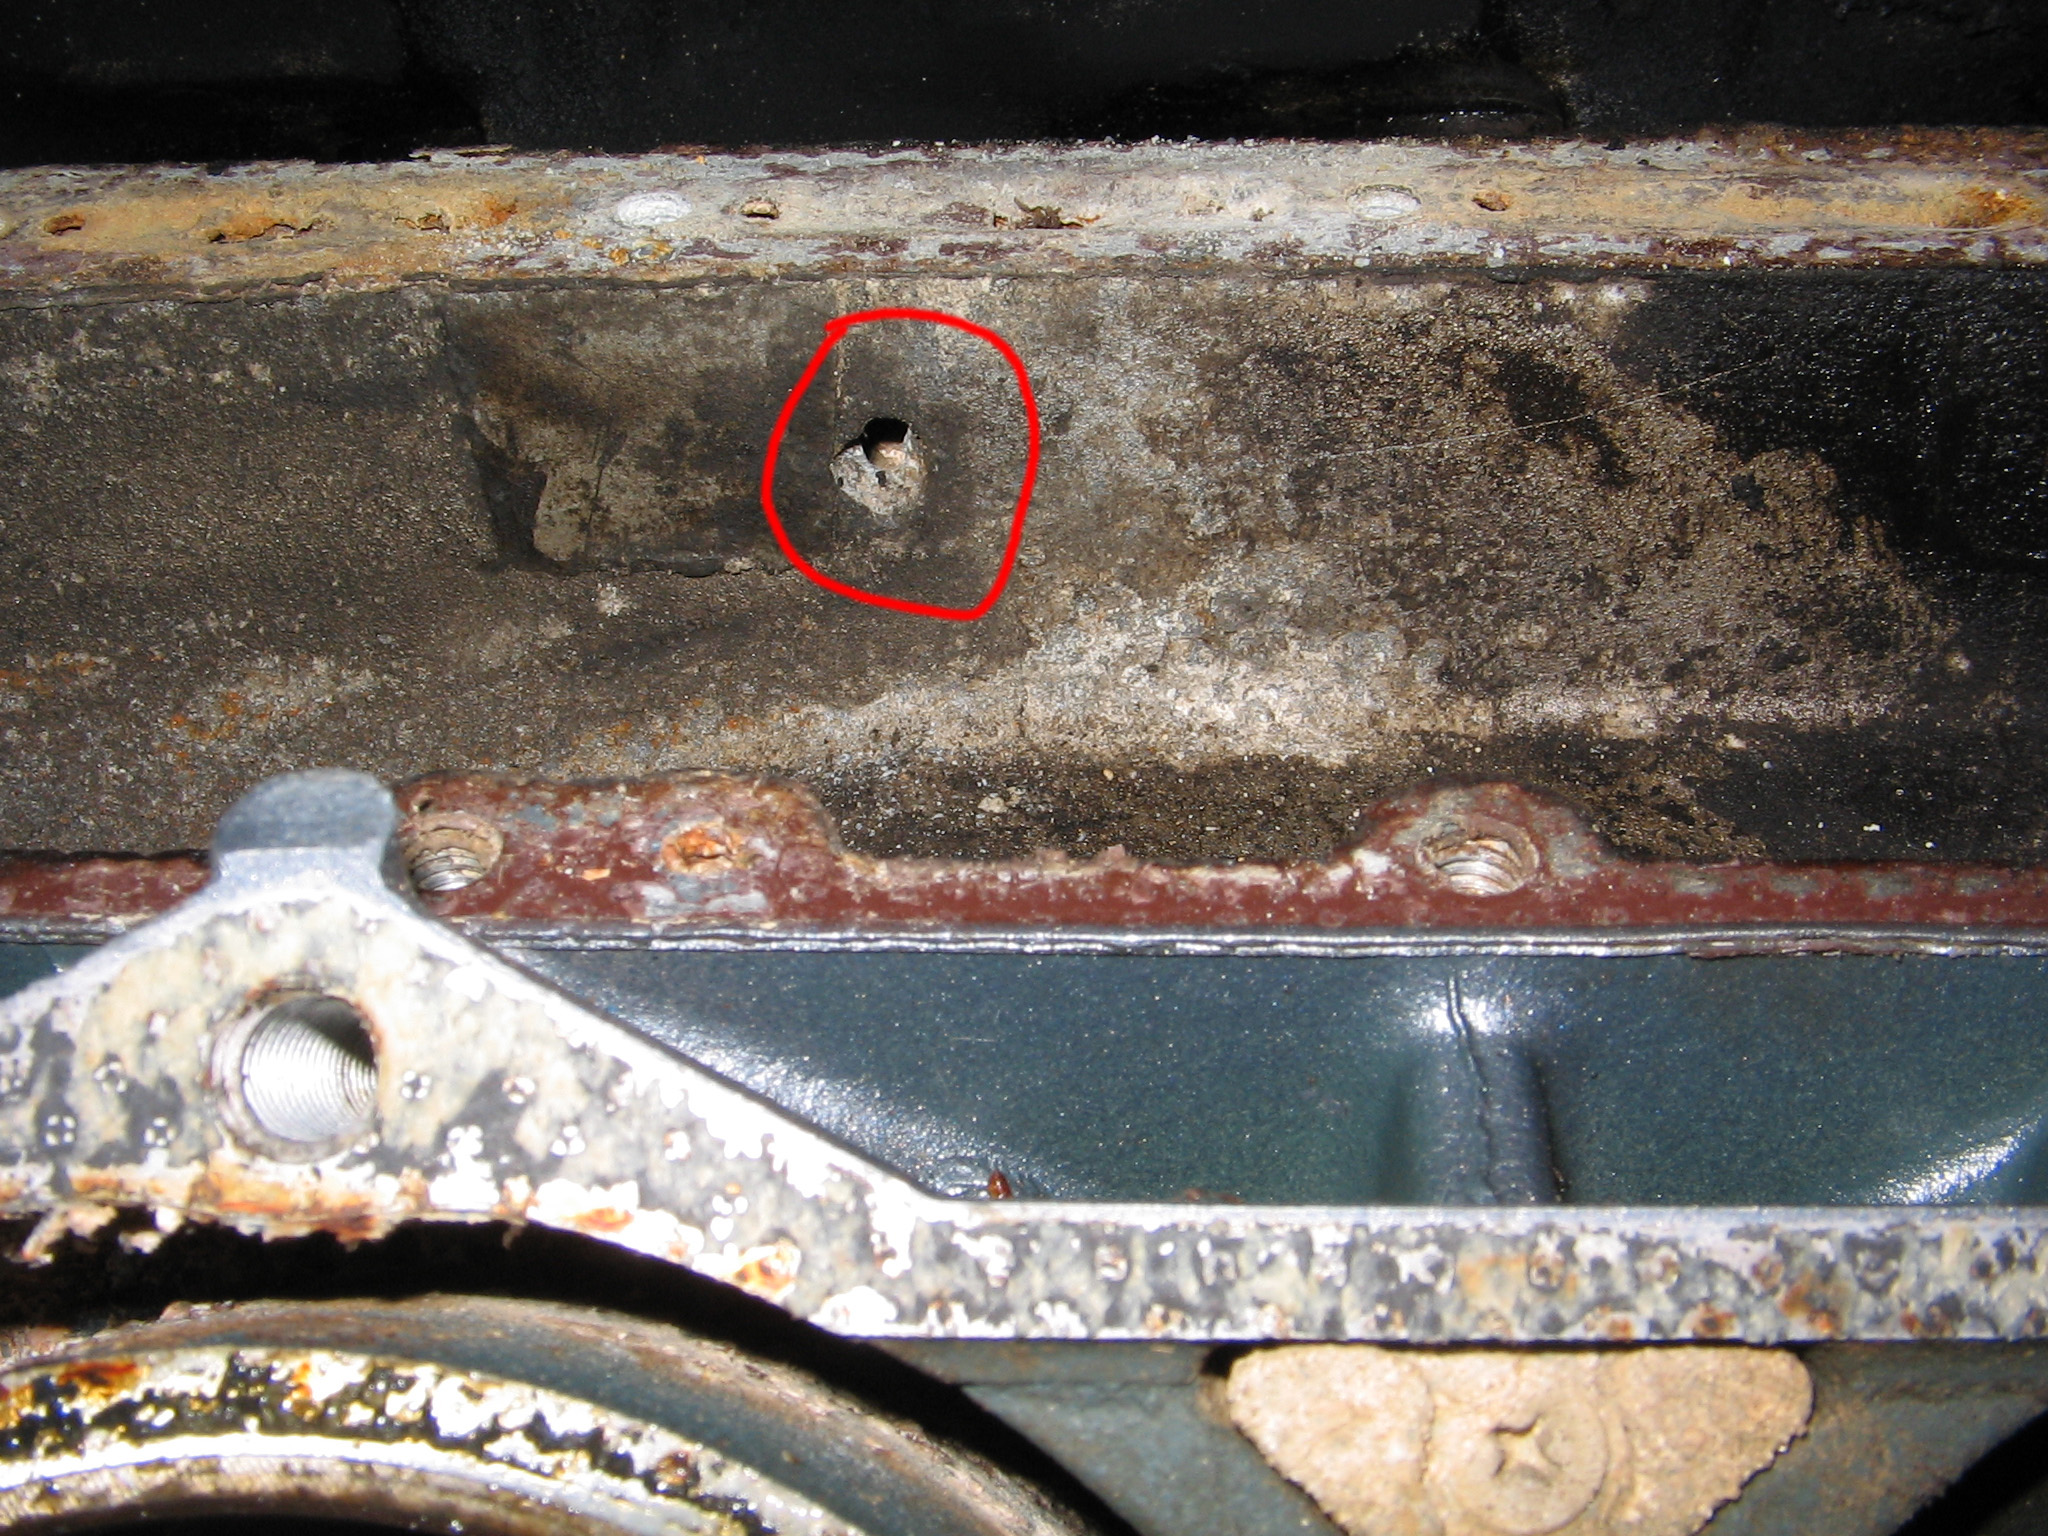
and a low-hour-beauty-of-a-crank. I began pressure cleaning the block, and while drying it off
noticed about a 1/4" chunk missing (pressure cleaning must have done
this):
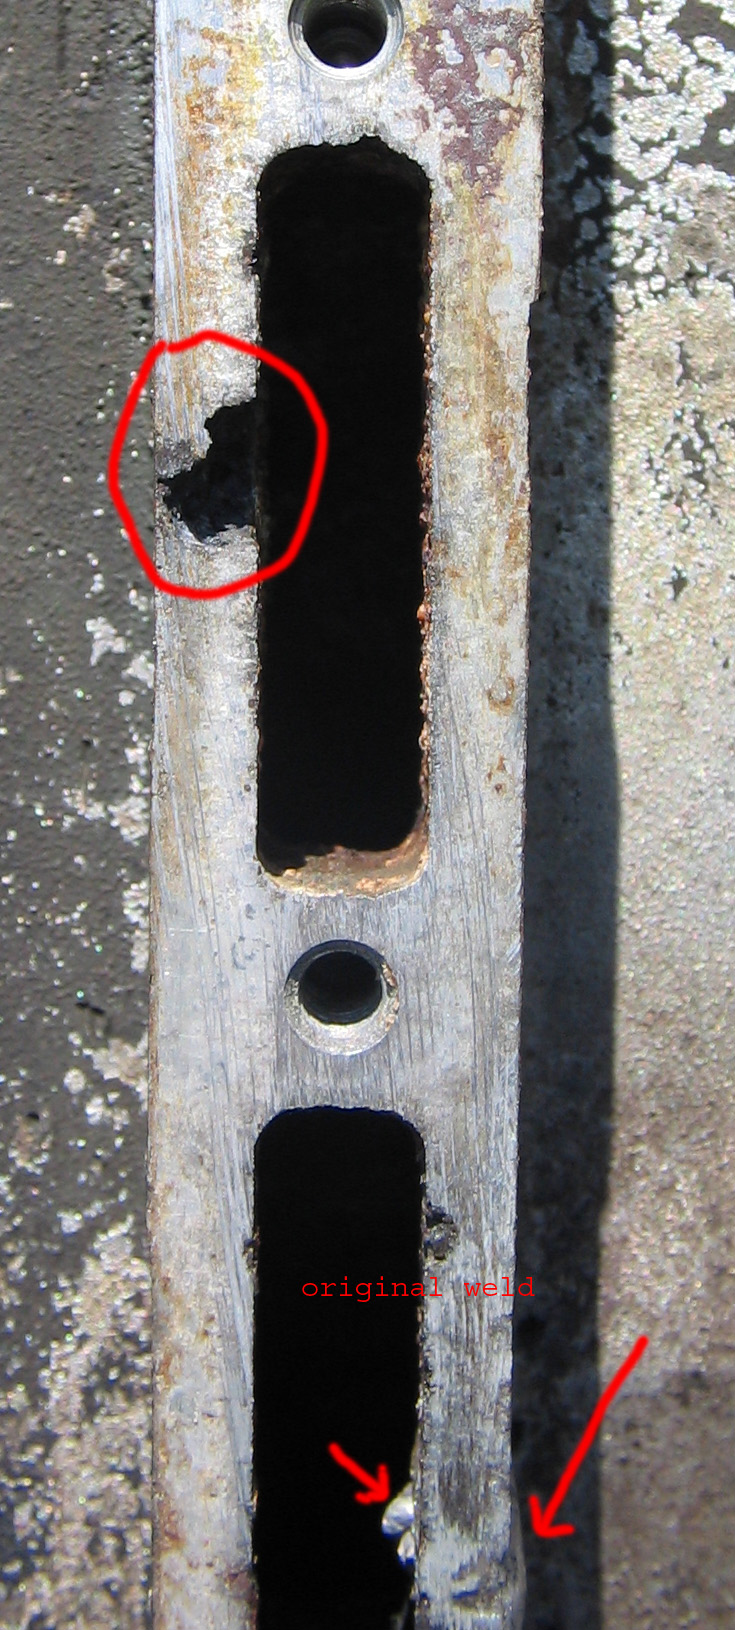
Lower area is where original weld was made (assumed cause of engine failure).
Upper circled area is where chunk was discovered missing today,
and presumably caused by today's water pressure cleaning.
The remainder of the day consisted of removing the water jackets from the heads:
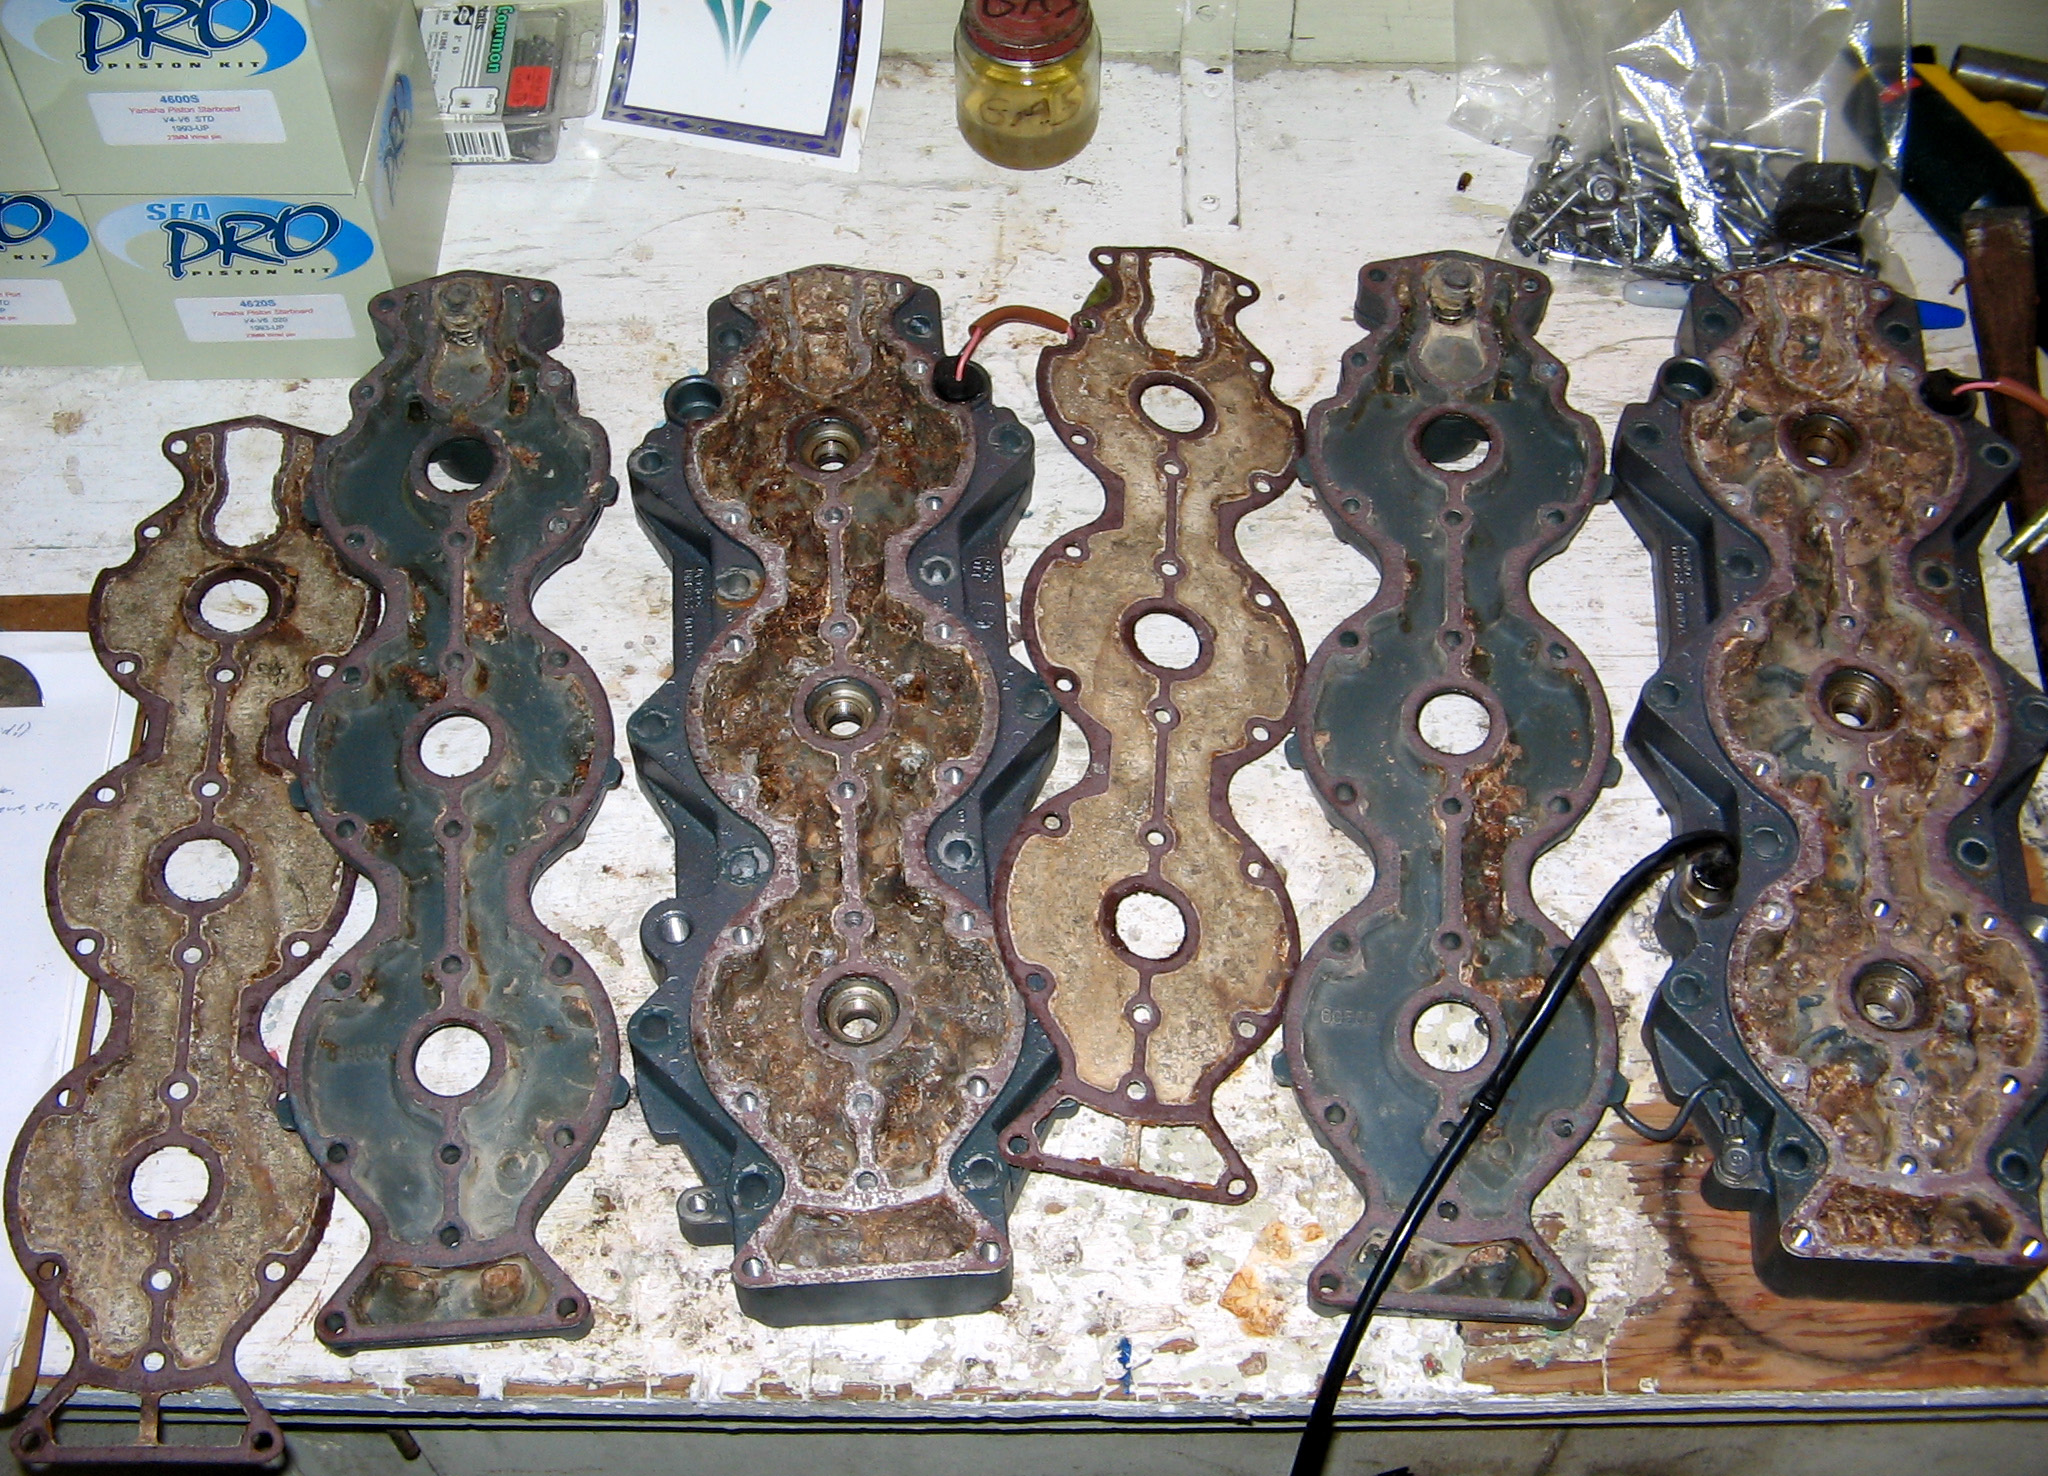
and removing the thermostats. Then pressure cleaned the heads, jackets, exhaust plates. Didn't lose anymore aluminum that I can tell...
Tomorrow my machinist will perform weld #2, and I will begin assembly after that point.
Update: FRI, May 5, 2006 - Misc
I picked up an Actron compression gauge today ( http://actron.com/product_detail.php?pid=16171
)
Update: THU, May 4, 2006 - Parts
Ordered
Ordered most parts today.
Update: WED, May 3, 2006 - Block
Back From Machinist
I received the block back from the machinist yesterday.
The machinist is very knowledgeable, and I recommend him to
anyone who needs marine machine work in Southwest Florida.
Update: MON, April 24, 2006 - Searching
For Parts & Inspection Of Reeds
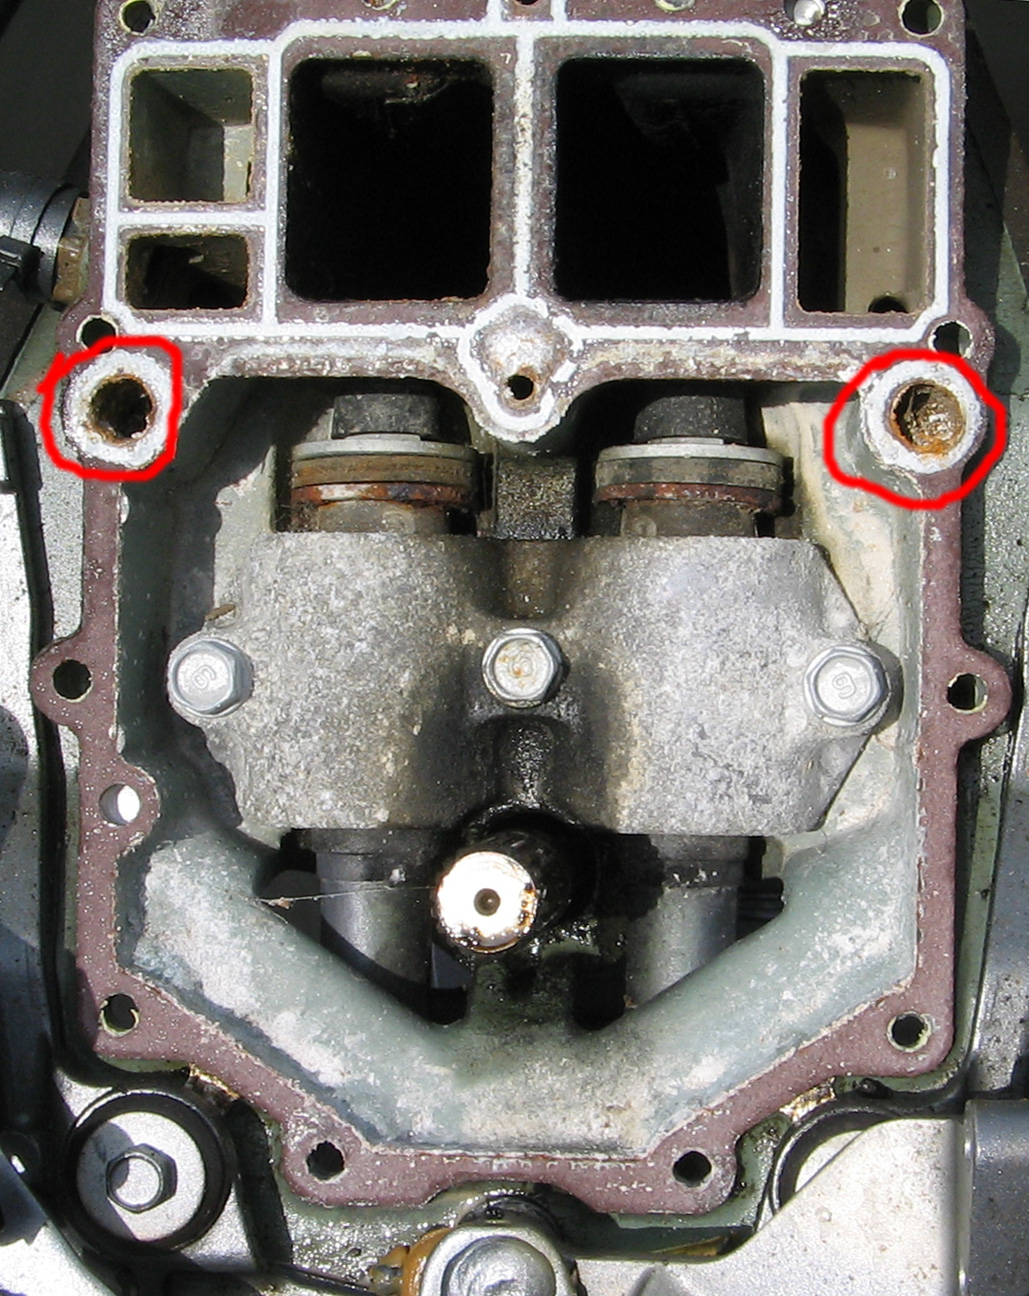
Tonight I inspected the reed stops and reed valves while
attached to the intake. The reed valves look shiny and blemish free,
mostly. All of the reed stops have some sort of surface blemish. I
removed 3 of the worst reed stops and corresponding reed valves from the
intake. You will see that there are very slight blemishes on the reed
valves, and surface rust on the reed stops:
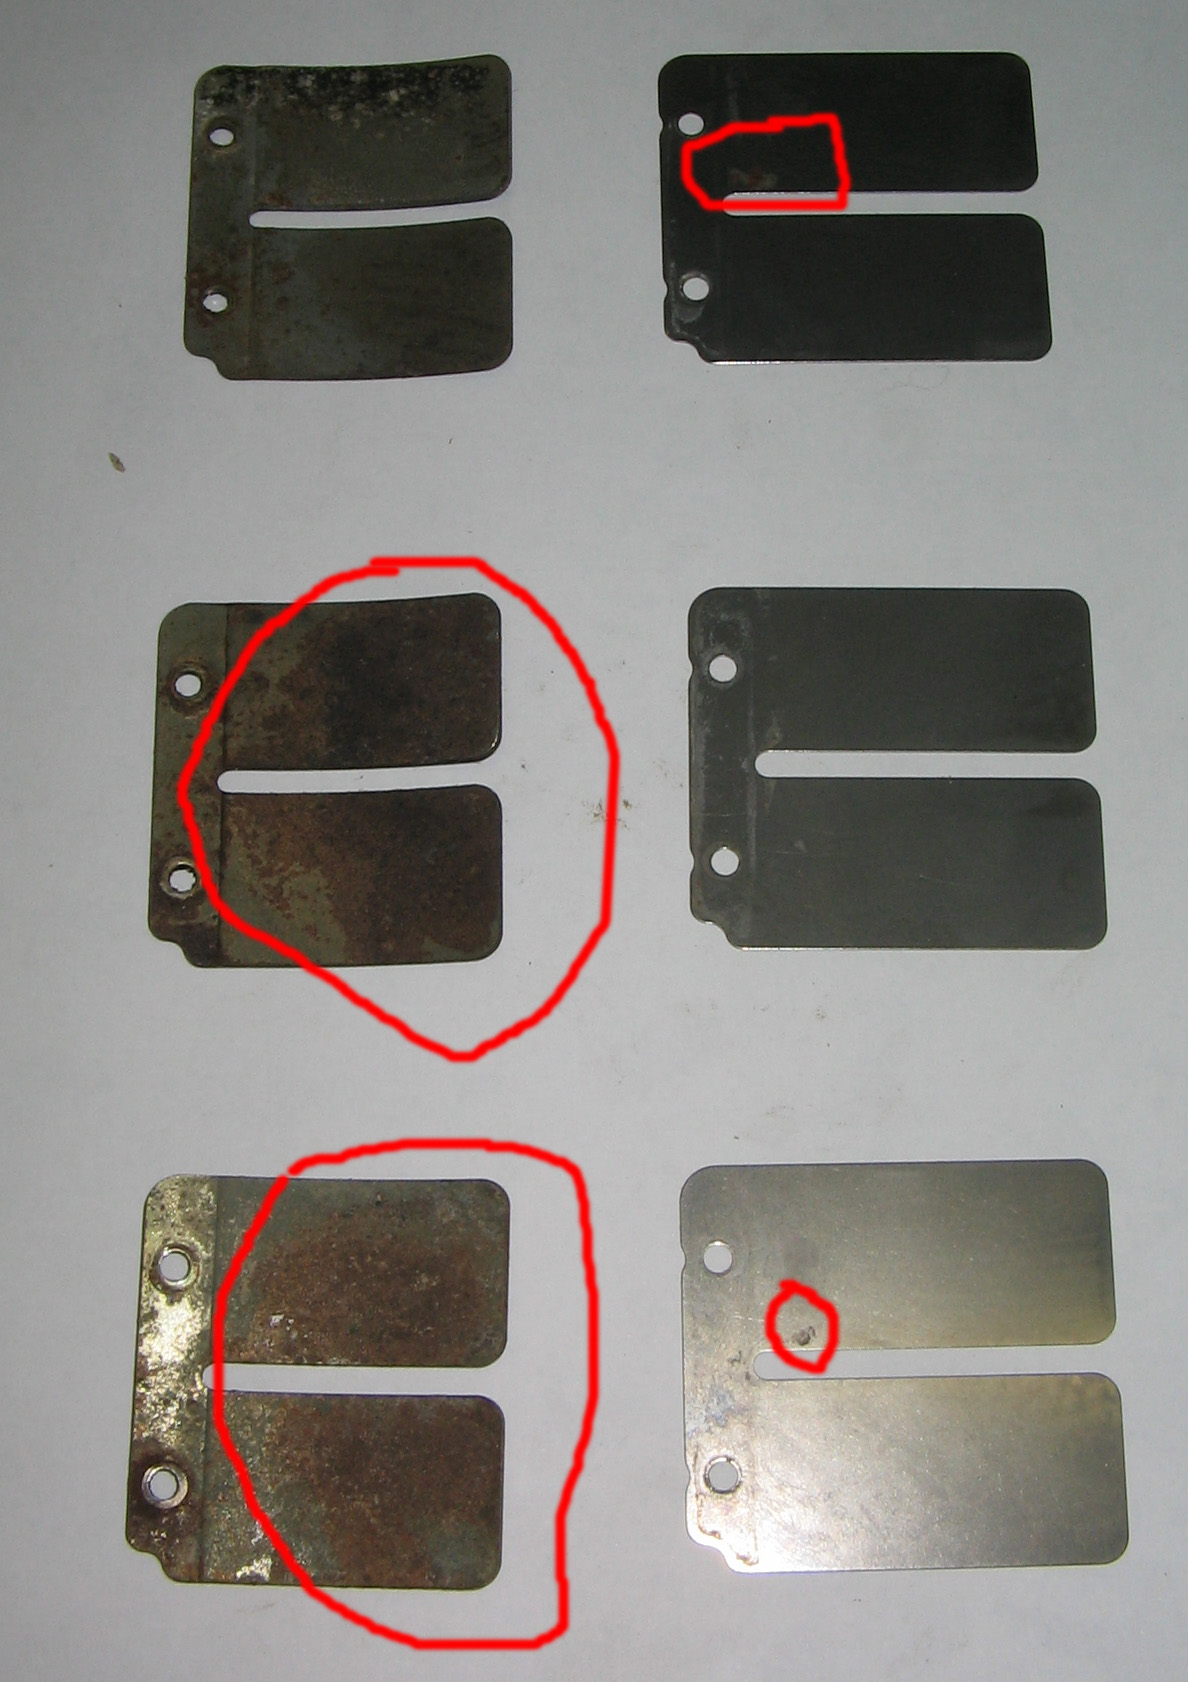
Circled areas indicate blemishes (surface rust).
I don't plan to take off any more reed valves. I'm not sure how to correct these blemishes. High grain sand paper?
Update: WED, APR 19, 2006 - Gave
Machinist "Go Ahead"
Stopped by the machinist's this afternoon and snapped some shots:
 Hole in block |
 Hole in block, view 2 |
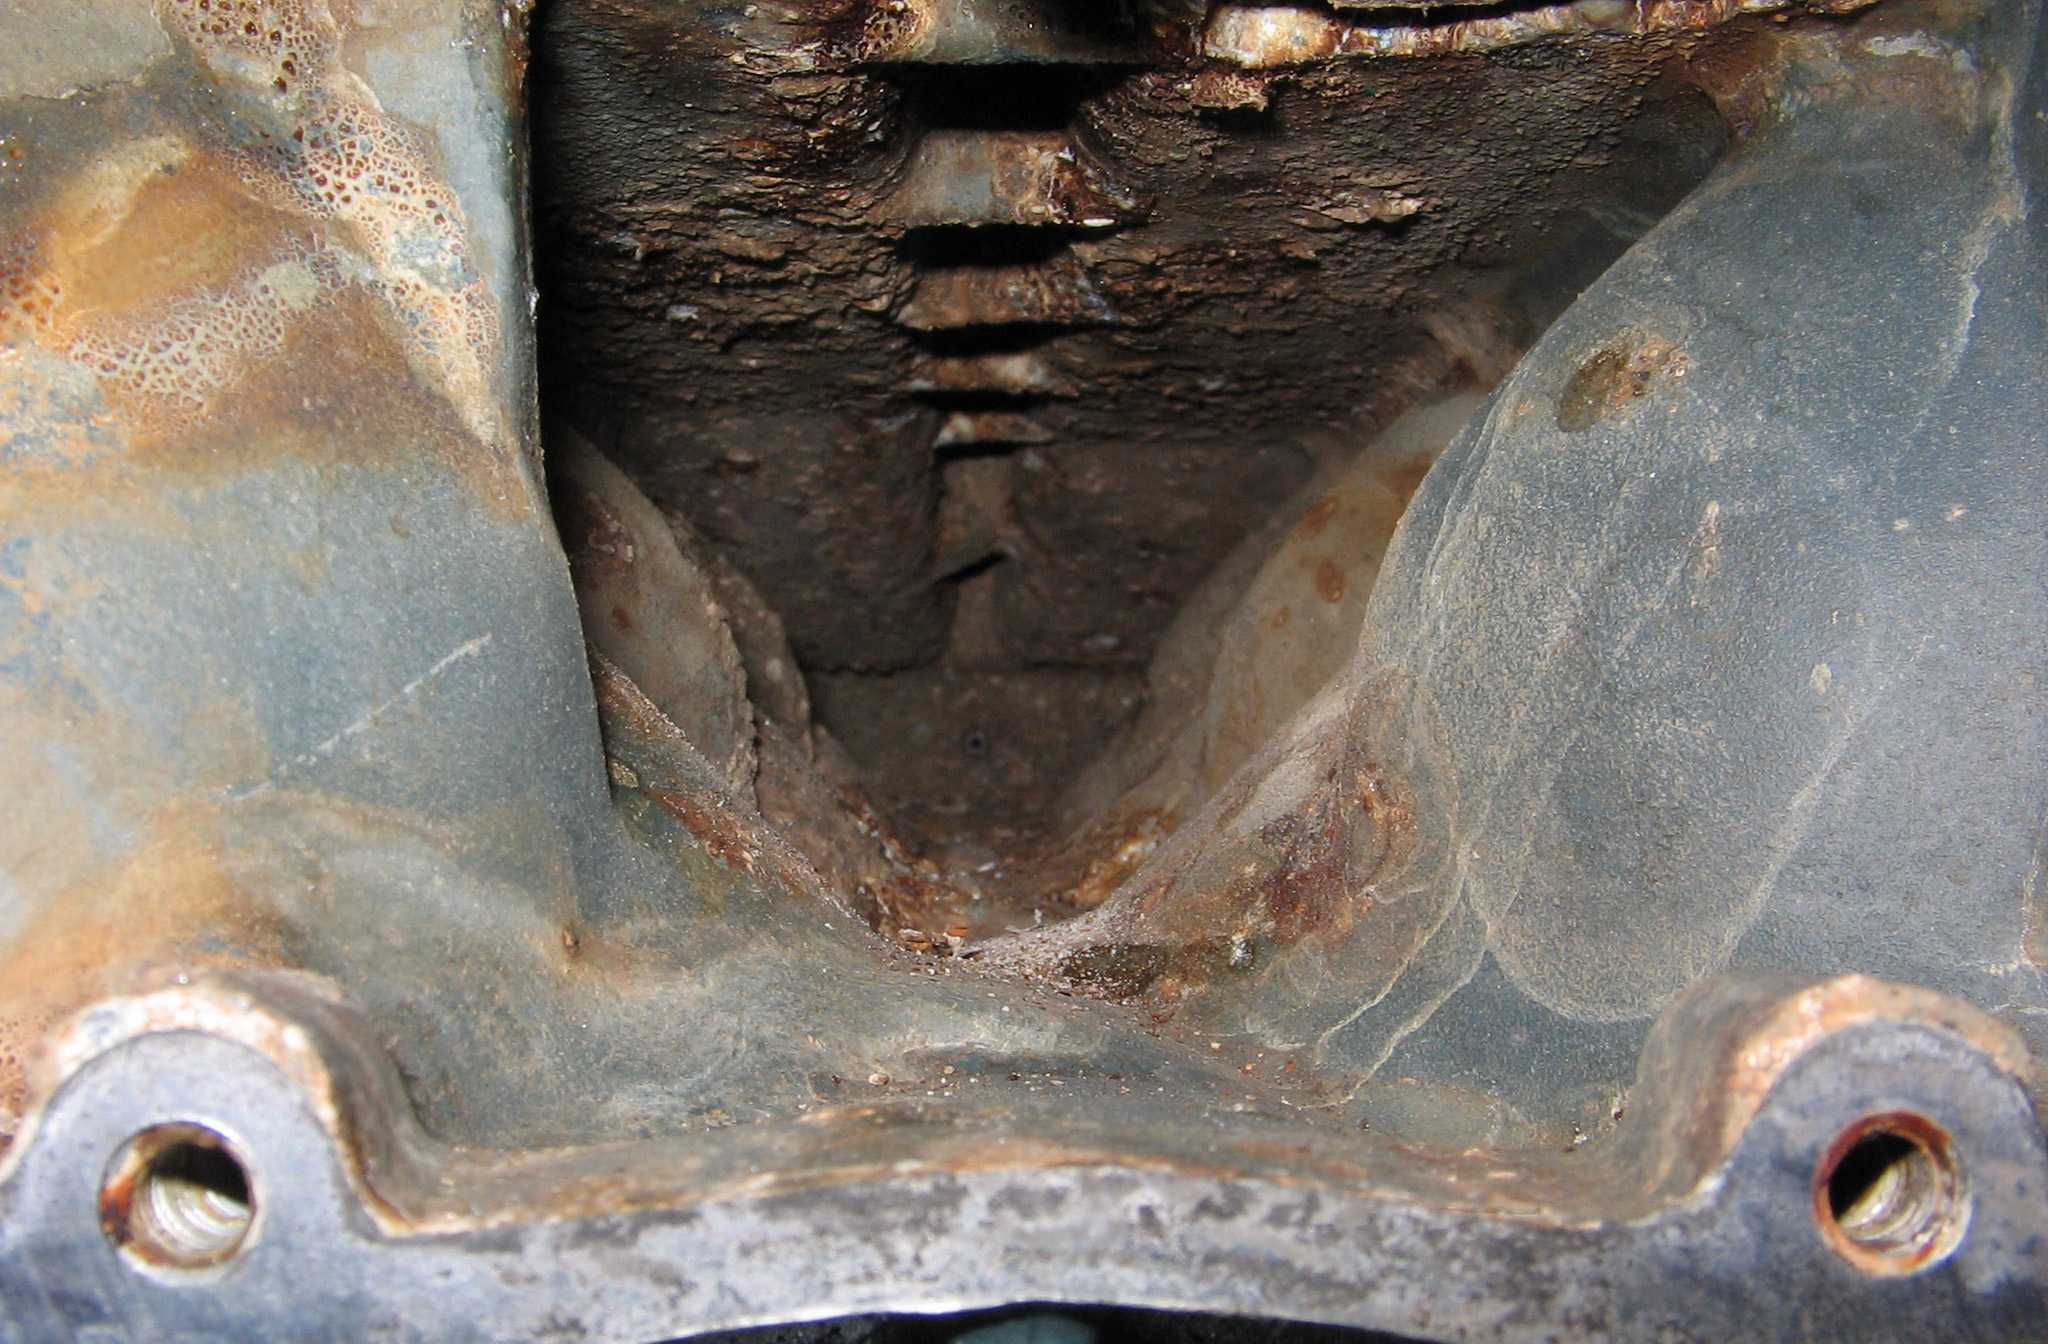 Water cavity, view 1 |
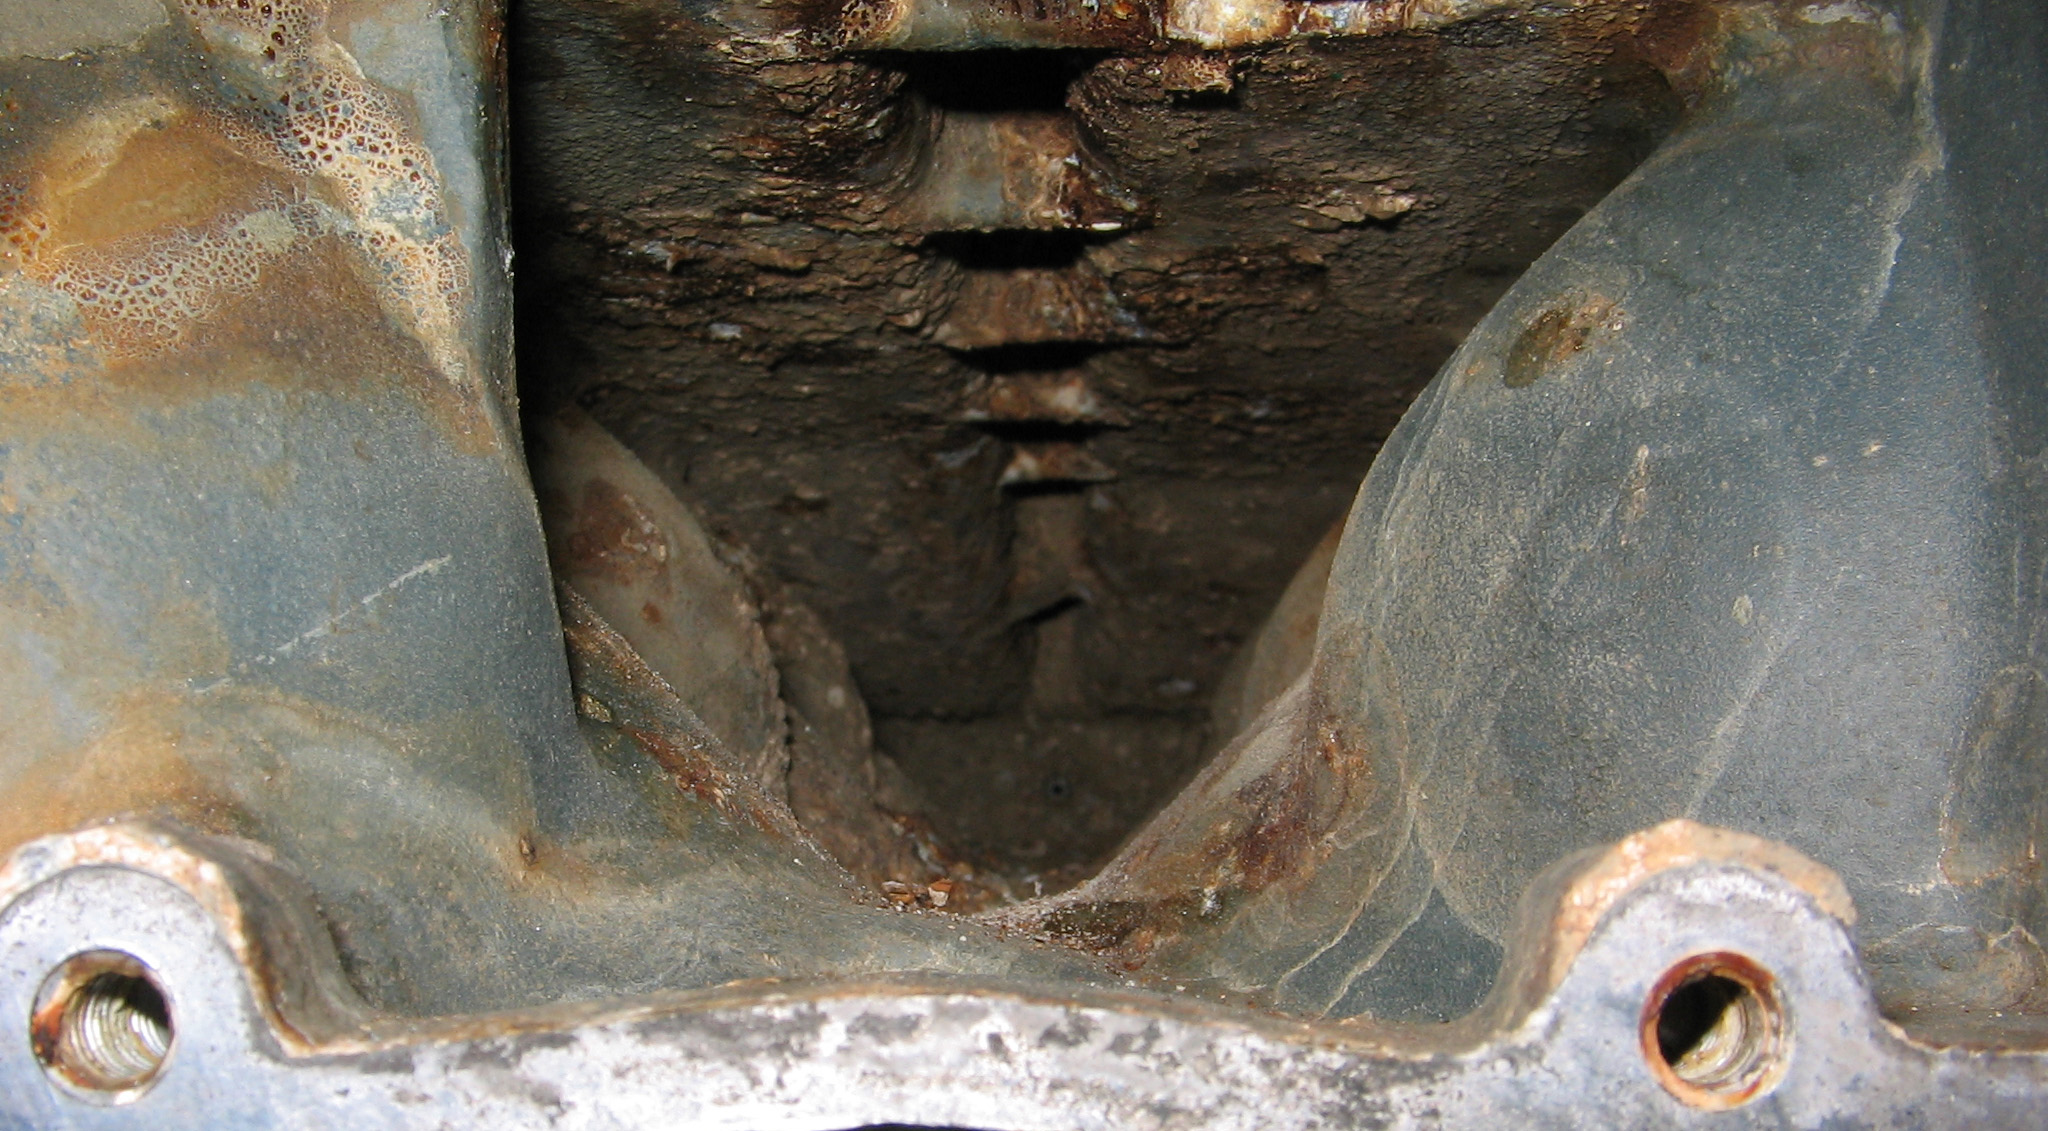 Water cavity, view 2 |
then gave him the go-ahead to bore #5 (no need to re-sleeve per his advice), hone the rest, weld the hole (above), and clean up the head (where piston 5 beat it up-picture below). Once again, he and a buddy said the block looks real good compared to some of the corroded blocks that come in for repair.
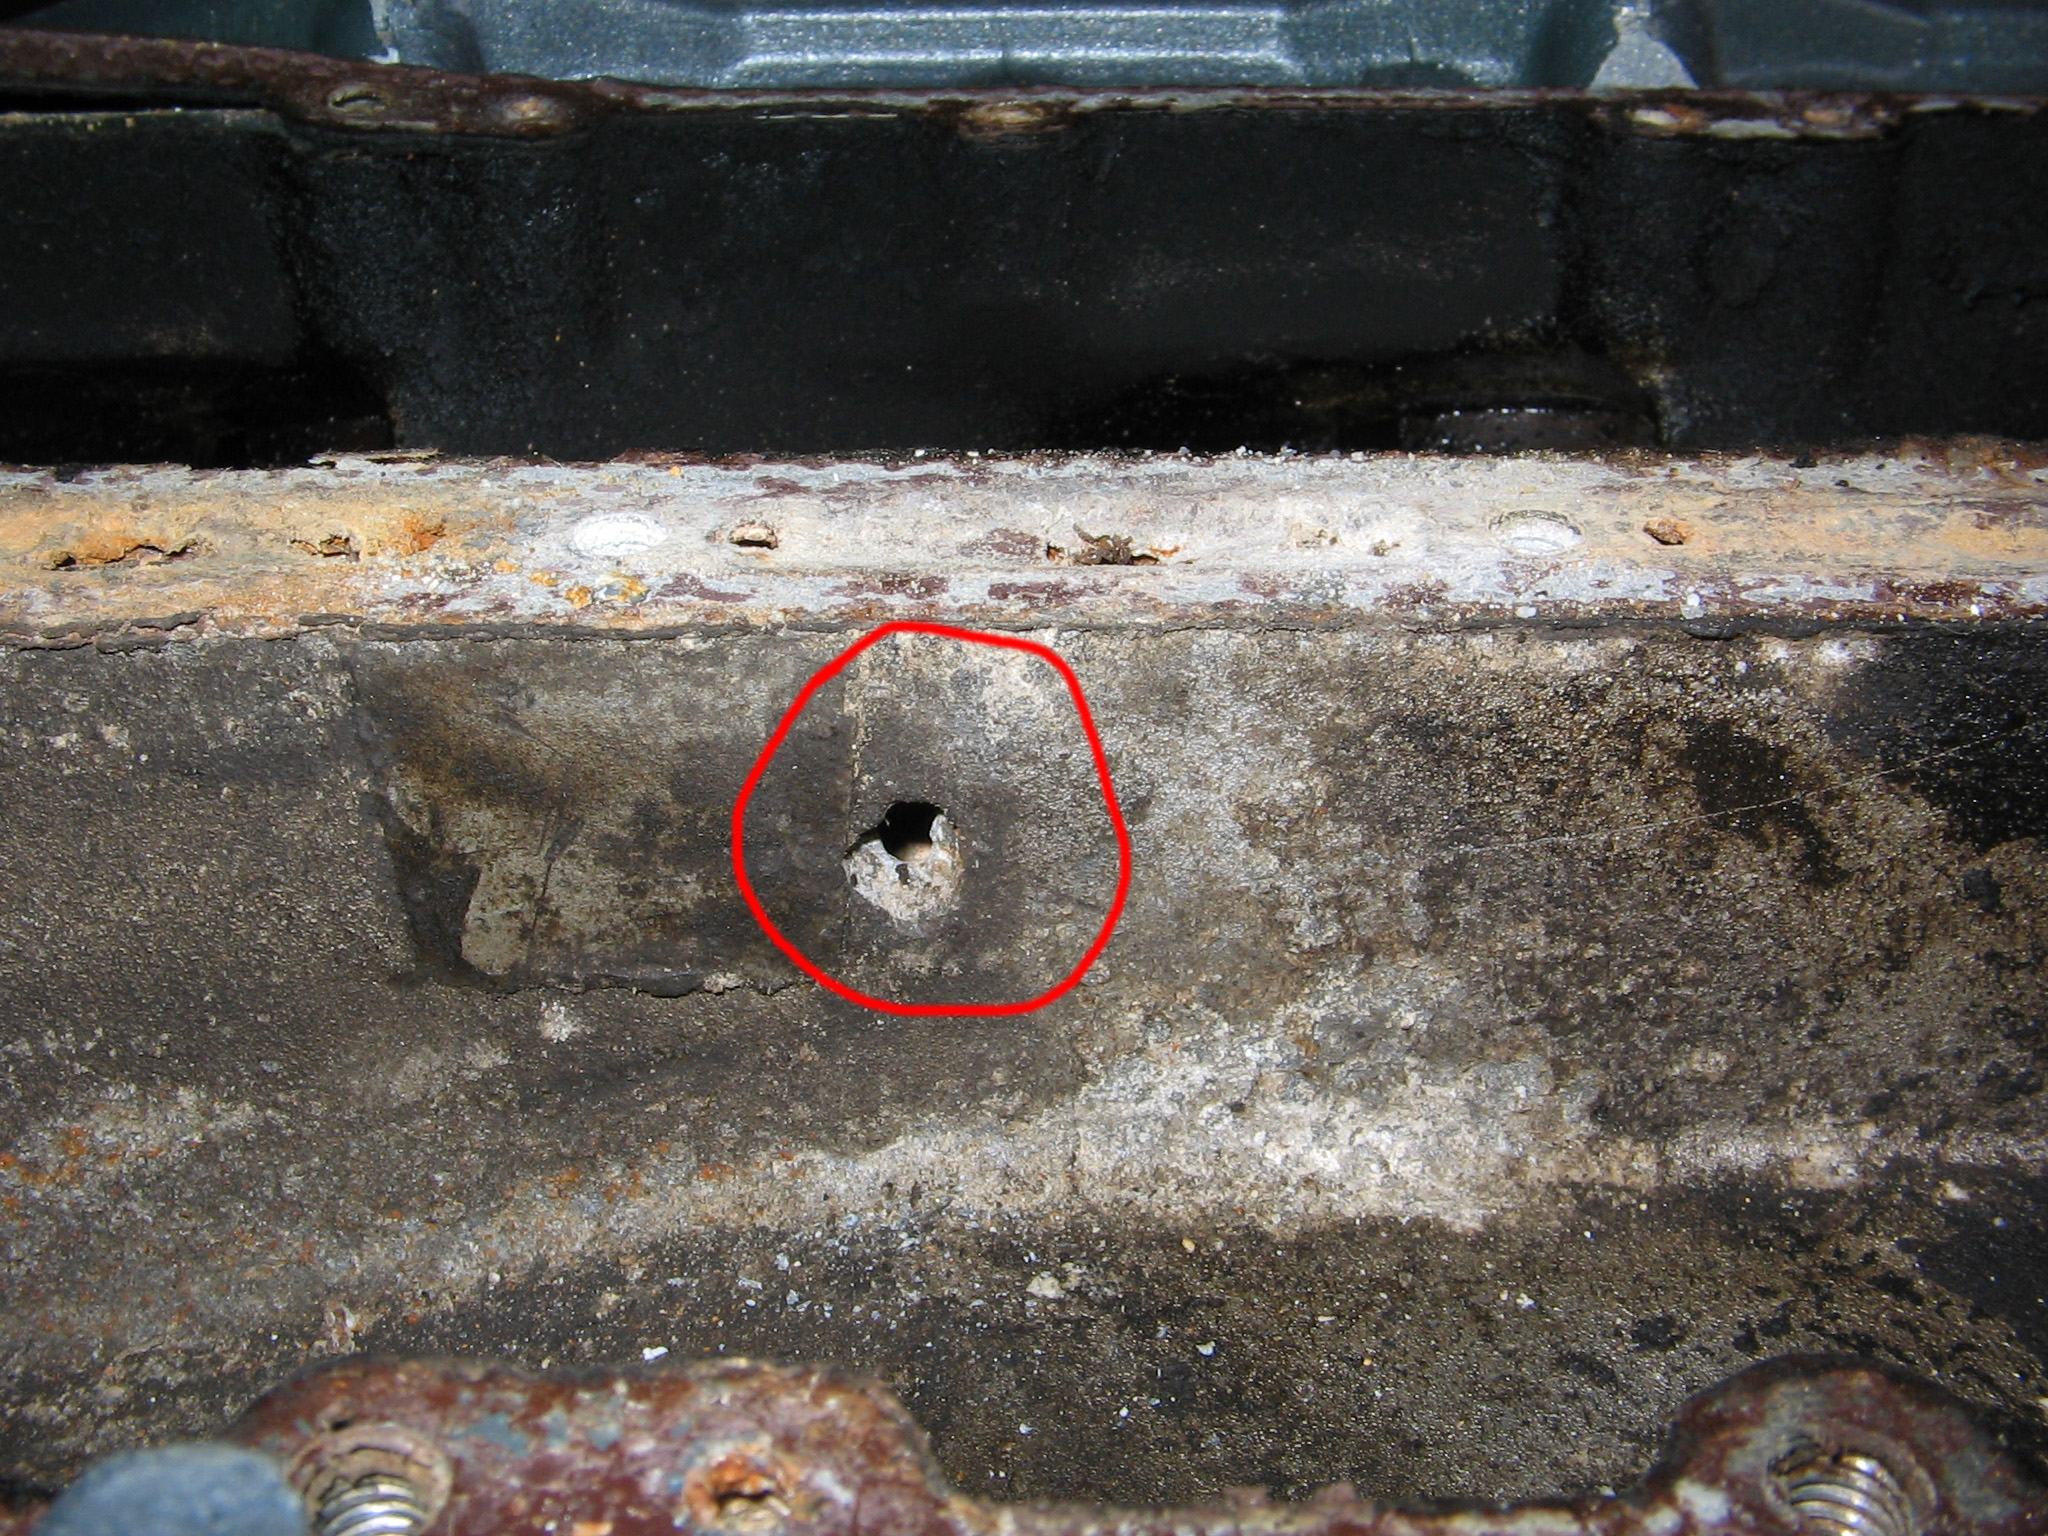
Update: TUE, APR 18, 2006 - Corroded
Hole In Block
My biggest concern at this time is what to do about the corrosion on the block
which seemed to have caused a hole. Weld it? How much time am I
buying if I weld it...
Update: SUN, APR 16, 2006
(Easter) - Inspection & Disassembly Of Piston/Rod Assemblies
Found that rod 3 will have to be replaced too. Here's the operating
table:
workbench
Update: Friday, APR 14, 2006 - Block
To Machinist
Today I delivered the block to a marine machinist. Several notes of interest:
1) A hole was discovered on the block on the exhaust divider. This hole is approximately across from cylinder 3, and above cylinder 5 (rod bearing 5 blew). The hole is a little smaller than 1/8 inch diameter. (Now it is all adding up, what happened). [ No picture of actual hole, but you can click here to see a picture of the exhaust area that was previously posted.. He advised he will be able to weld the hole.
2) The machinist determined my cylinders and pistons are stock size; that is, the cylinders have not been bored before.
3) The machinist recommends to bore cylinder 5, and hone the
others. Then he advised I should fit only cylinder 5 with an oversize
piston citing that it weighs the same as a stock piston. (This I am
having difficulty swallowing. I need some opinions on this). As an
alternative, and which will be more costly, he advised he could bore all 6 and
go with oversize pistons for all 6.
WHICH WAY DO I GO AND WHY?
4) He advised the crankshaft is bad. Mine can be rebuild for 70% the new price. Or, just buy a new one.
Failure was clearly due to water leaking into exhaust ports for cylinders 3 and 5 through corroded hole, possibly combined with the fact that the water pressure valve was stuck SHUT, again by corrosion. This explains the problem I had from day 1 "Lazy Cylinder(s)".
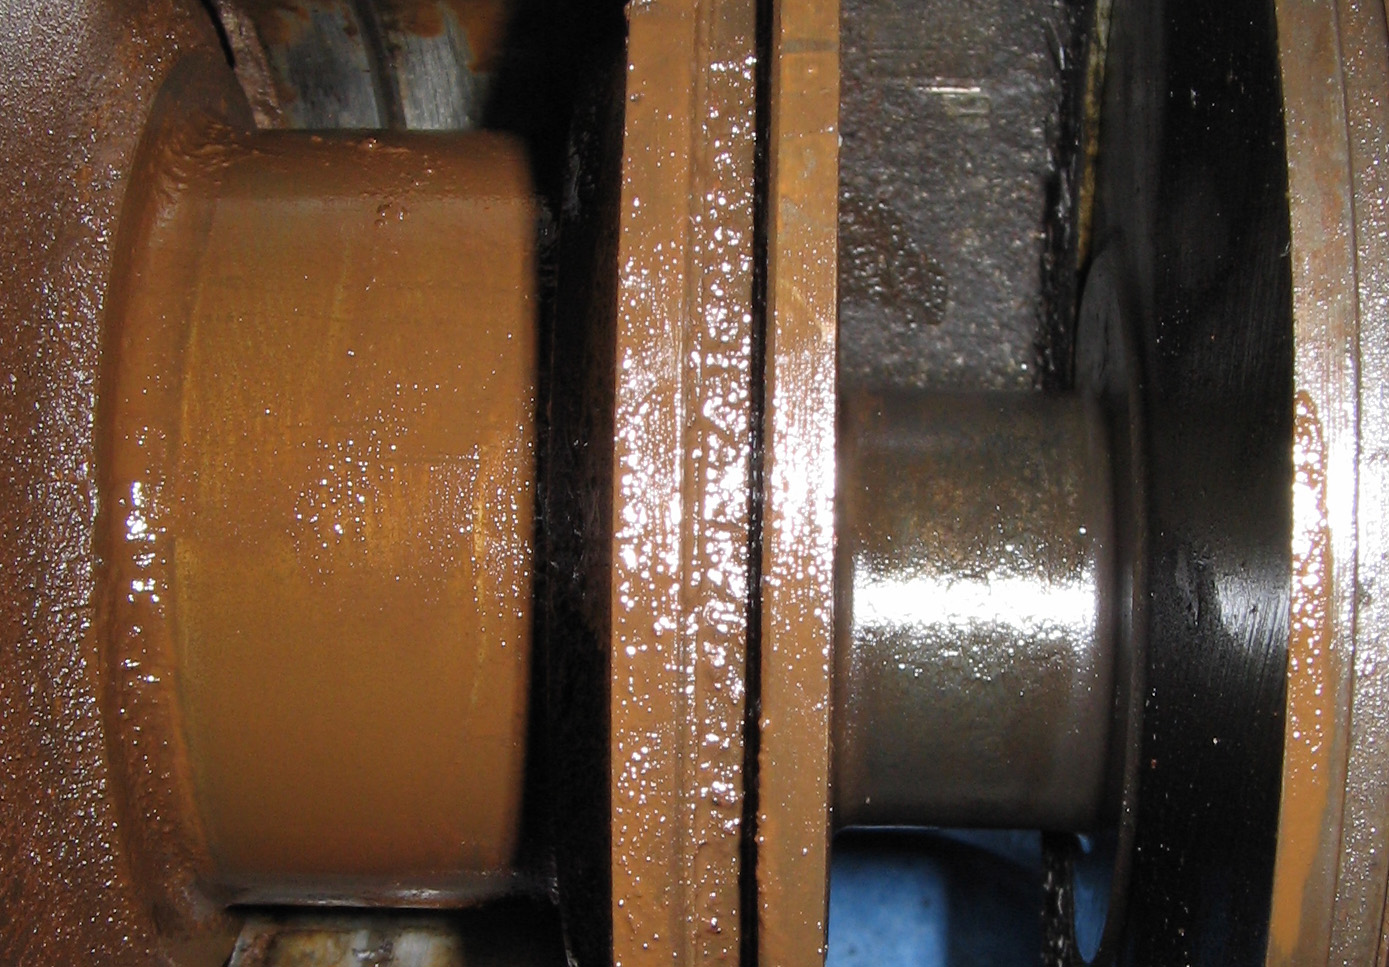
Update: Wednesday, APR 12, 2006 - Crankshaft
Solvent Washing
I fully solvent washed the crank today to allow for accurate inspection:
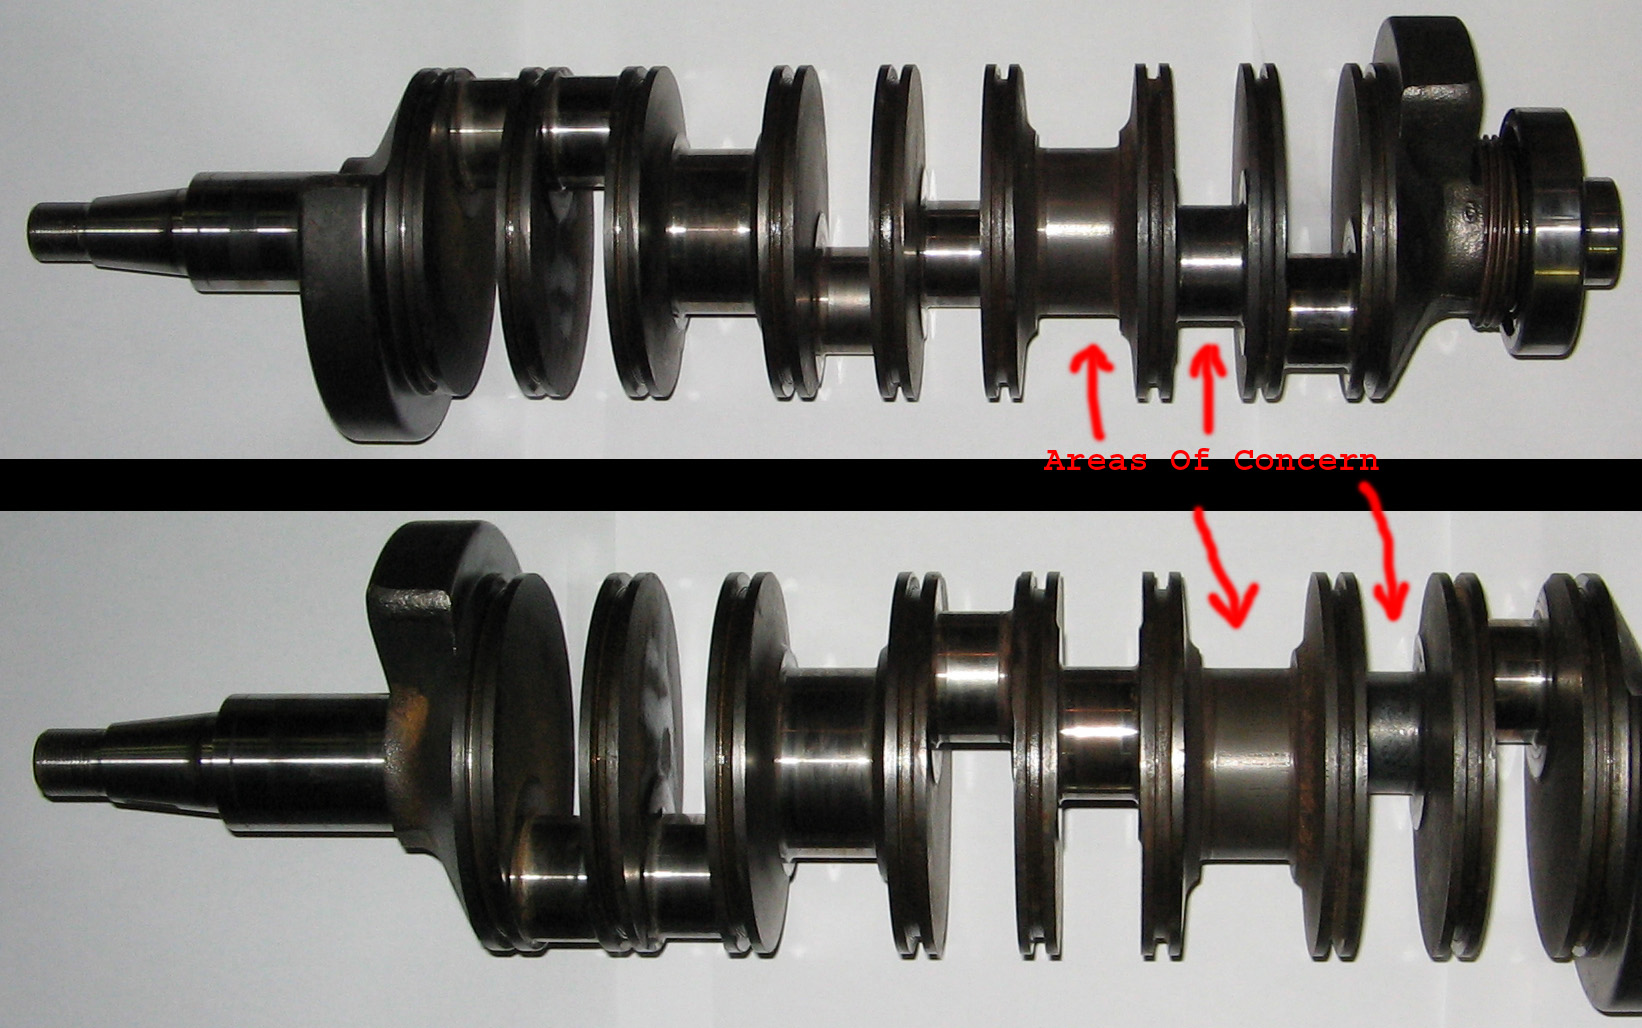
Please click here and send me your opinion on the re-usability of this crankshaft.
Update: Monday, APR 10, 2006 - Removal
Of All Crank Components
After 2 days of searching, I finally found both a 5/16 as
well as 8mm 12 point sockets, and they were at Home Depot. Careful
observation of both sockets show that the 8mm was a slightly better fit.
I removed all rod caps and all piston/rod/bearing assemblies.
 When I removed #5, this fell out of cylinder |
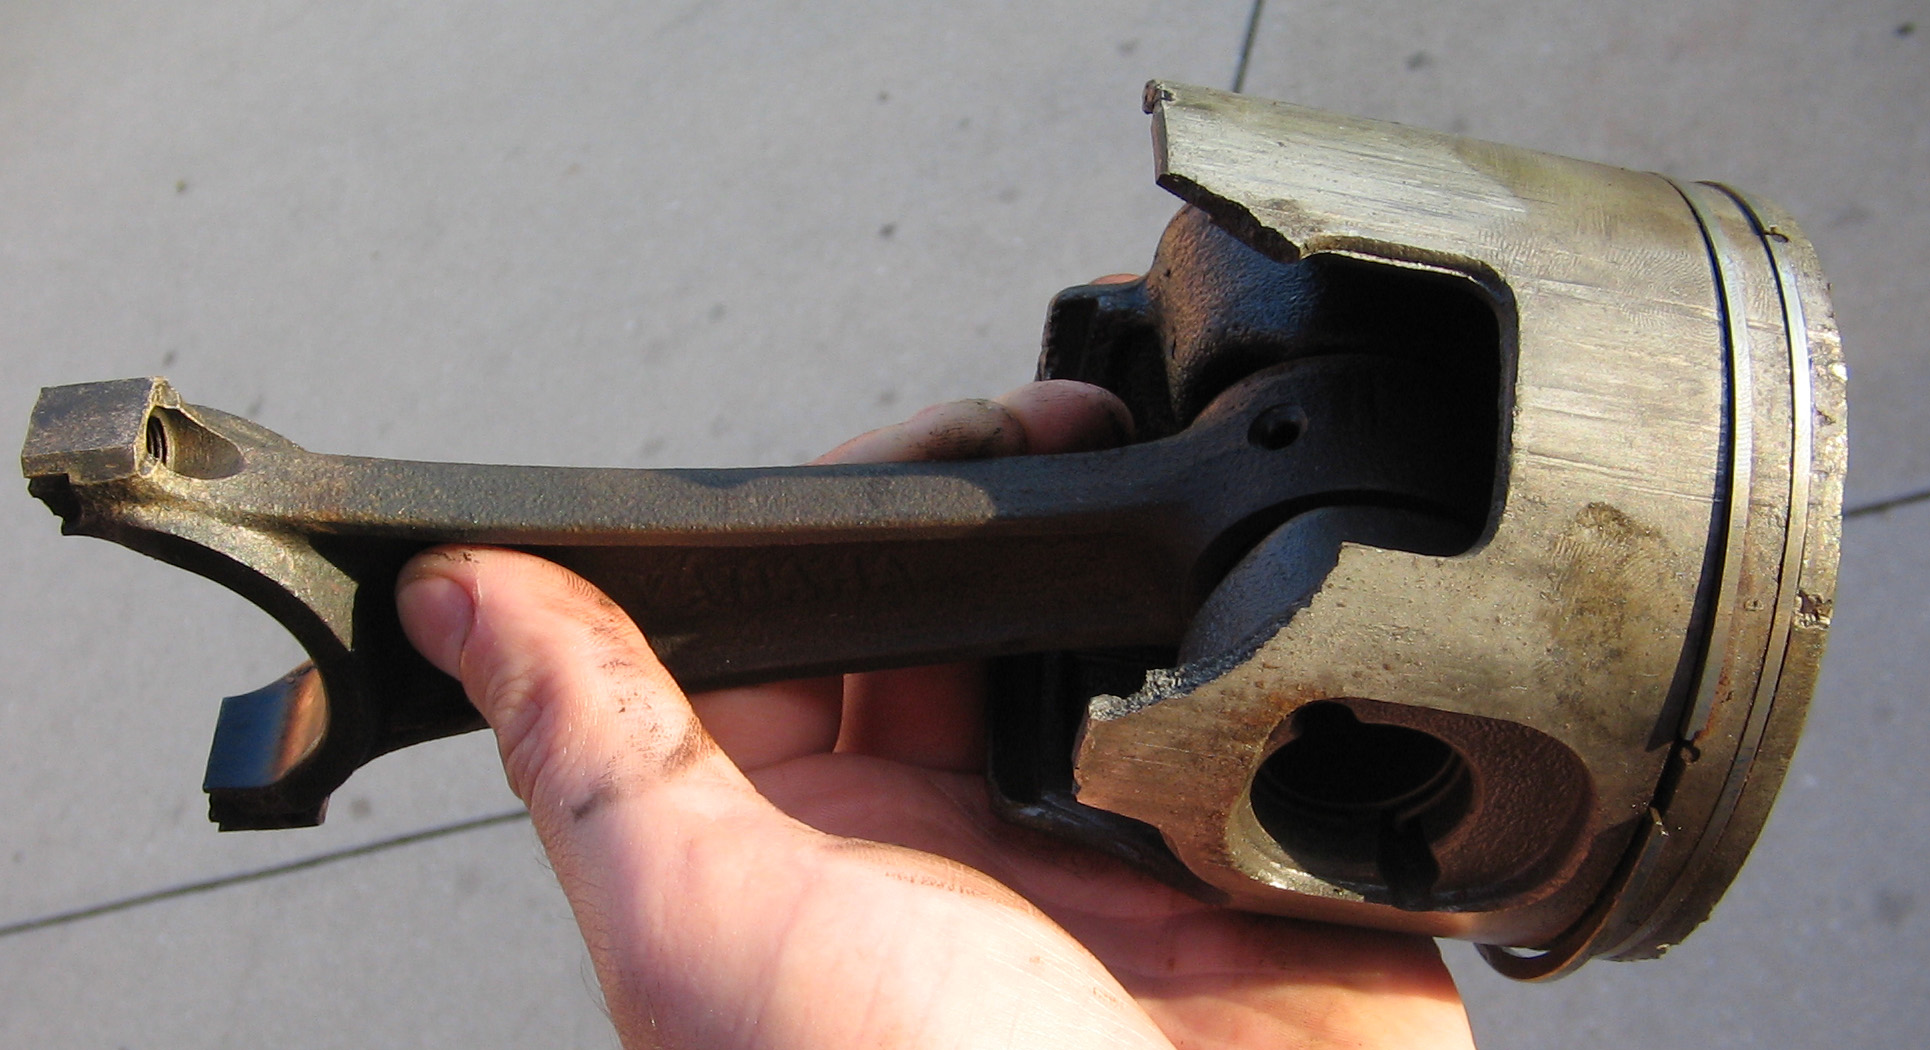 #5 Piston is missing a whole section |
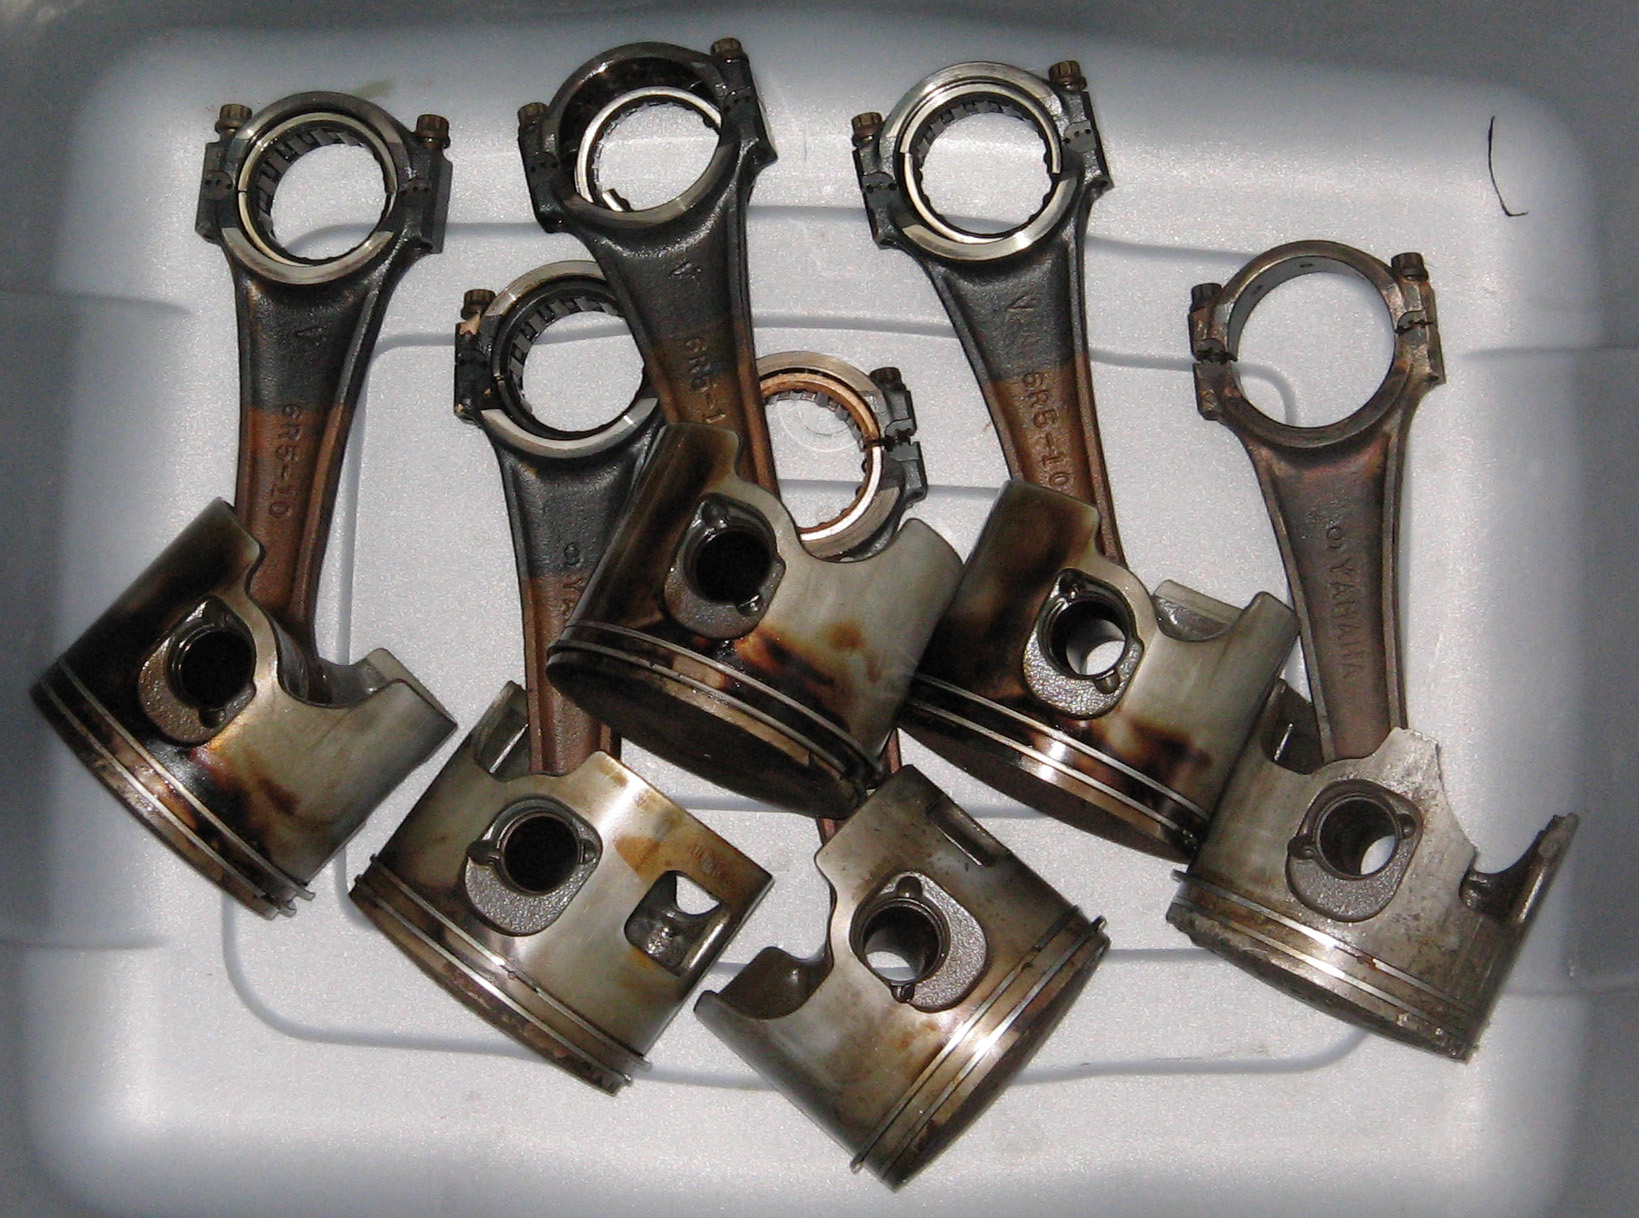 All pistons. #5 is far right |
On the crank the center main bearing (lower) was missing half the retainer:
I also noticed a deep head groove that rod cap or bolt 5 seems to have warn into it:
The motor really beat the hell out of itself.
I have not cleaned any parts yet.
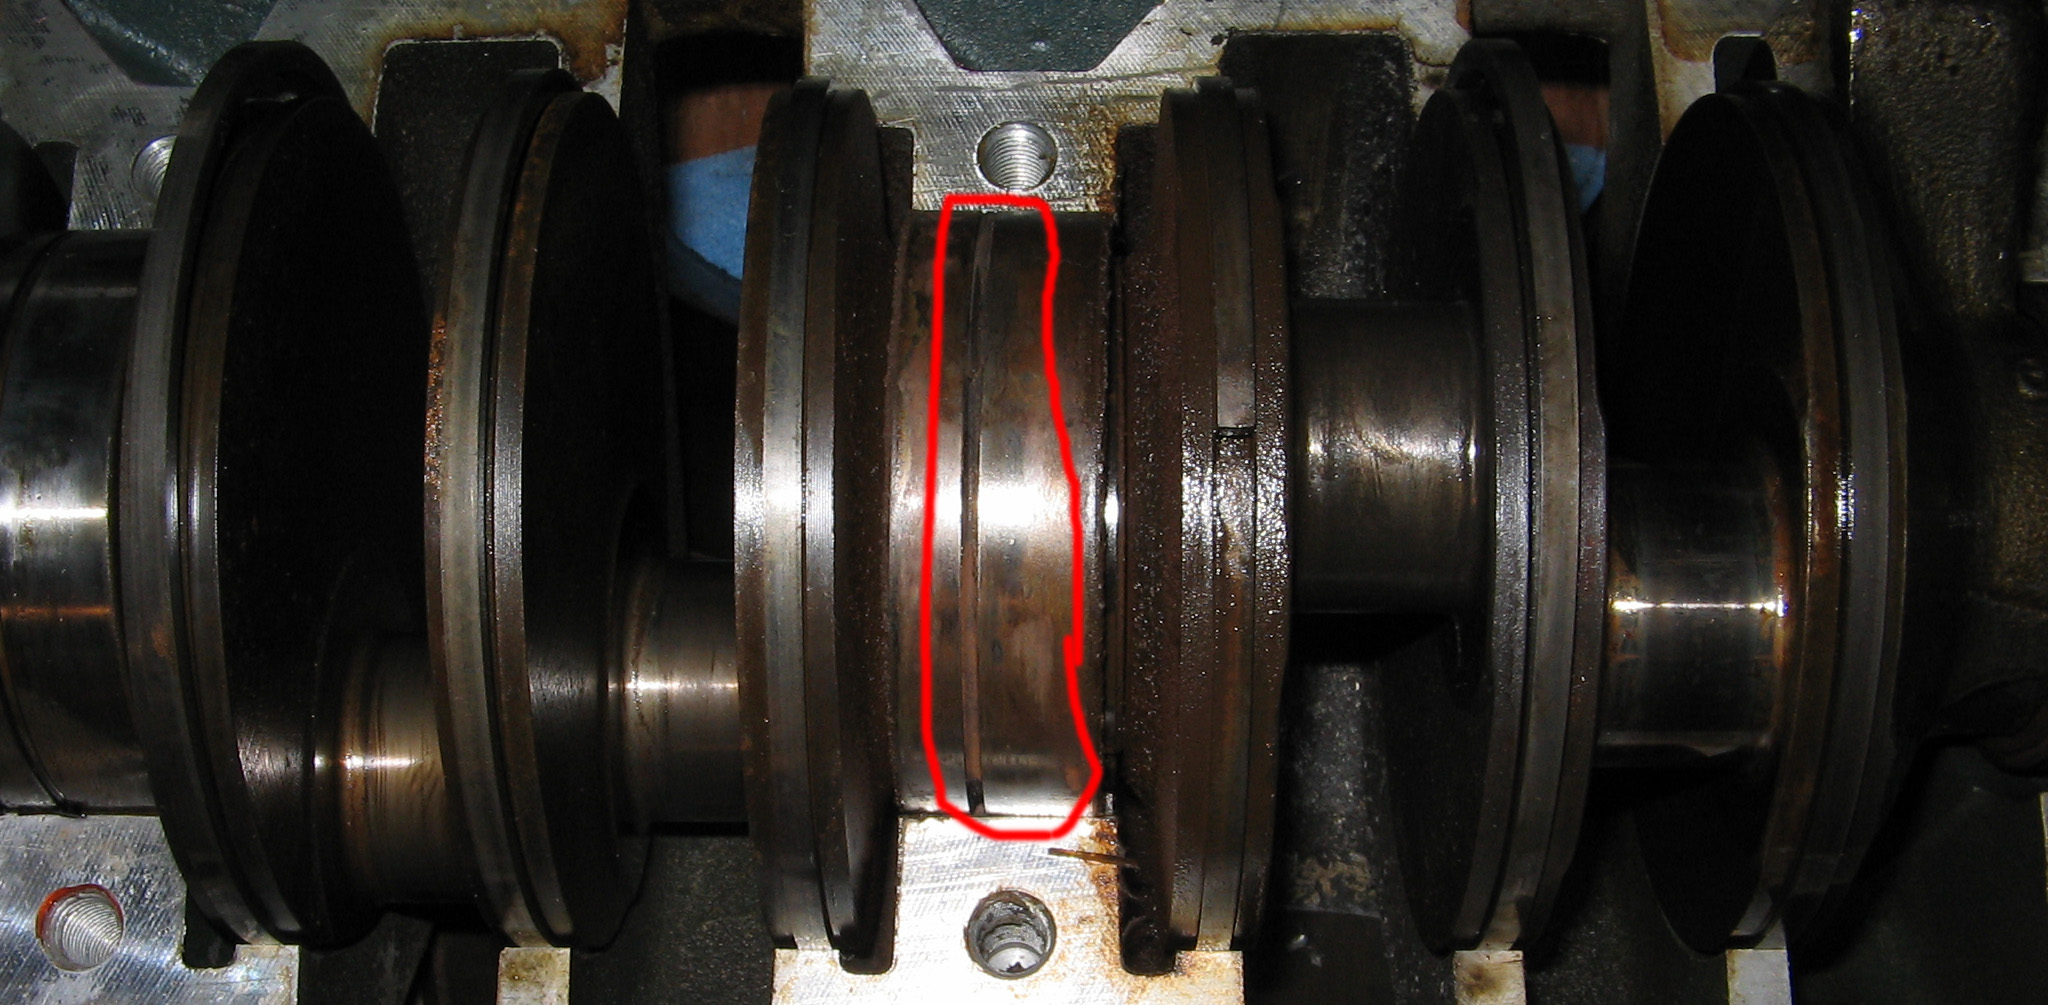
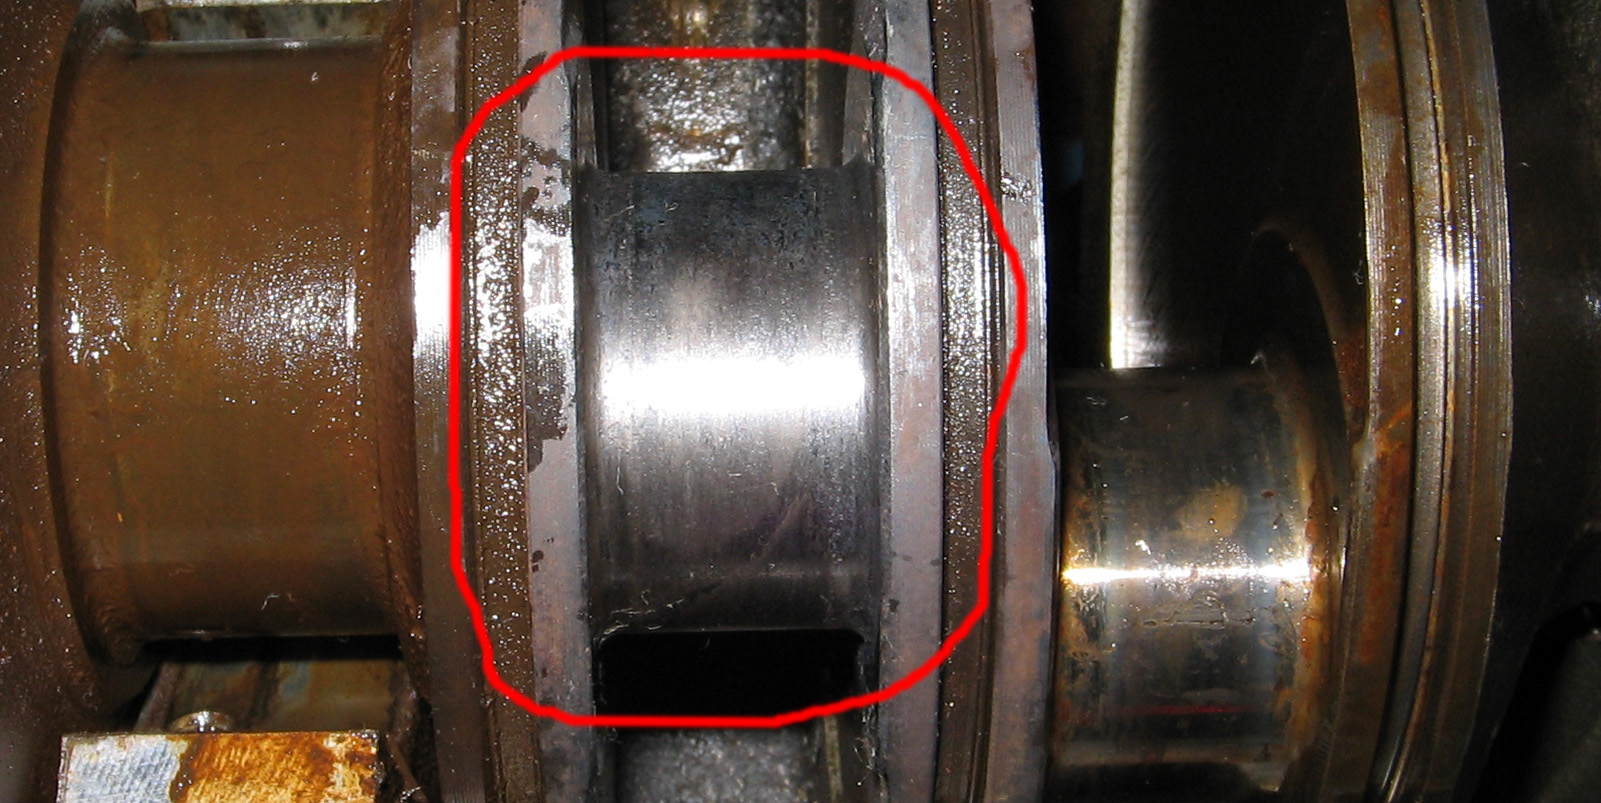
The part of the crank where rod 5's bearing disintegrated is rough on the "push" side (compression side) of the journal. It is not smooth and shiny like the others are. Rod 5's journal is also rough and deformed a bit near the edges:
 crank journal 5 (dirty)
|
rod 5 journal |
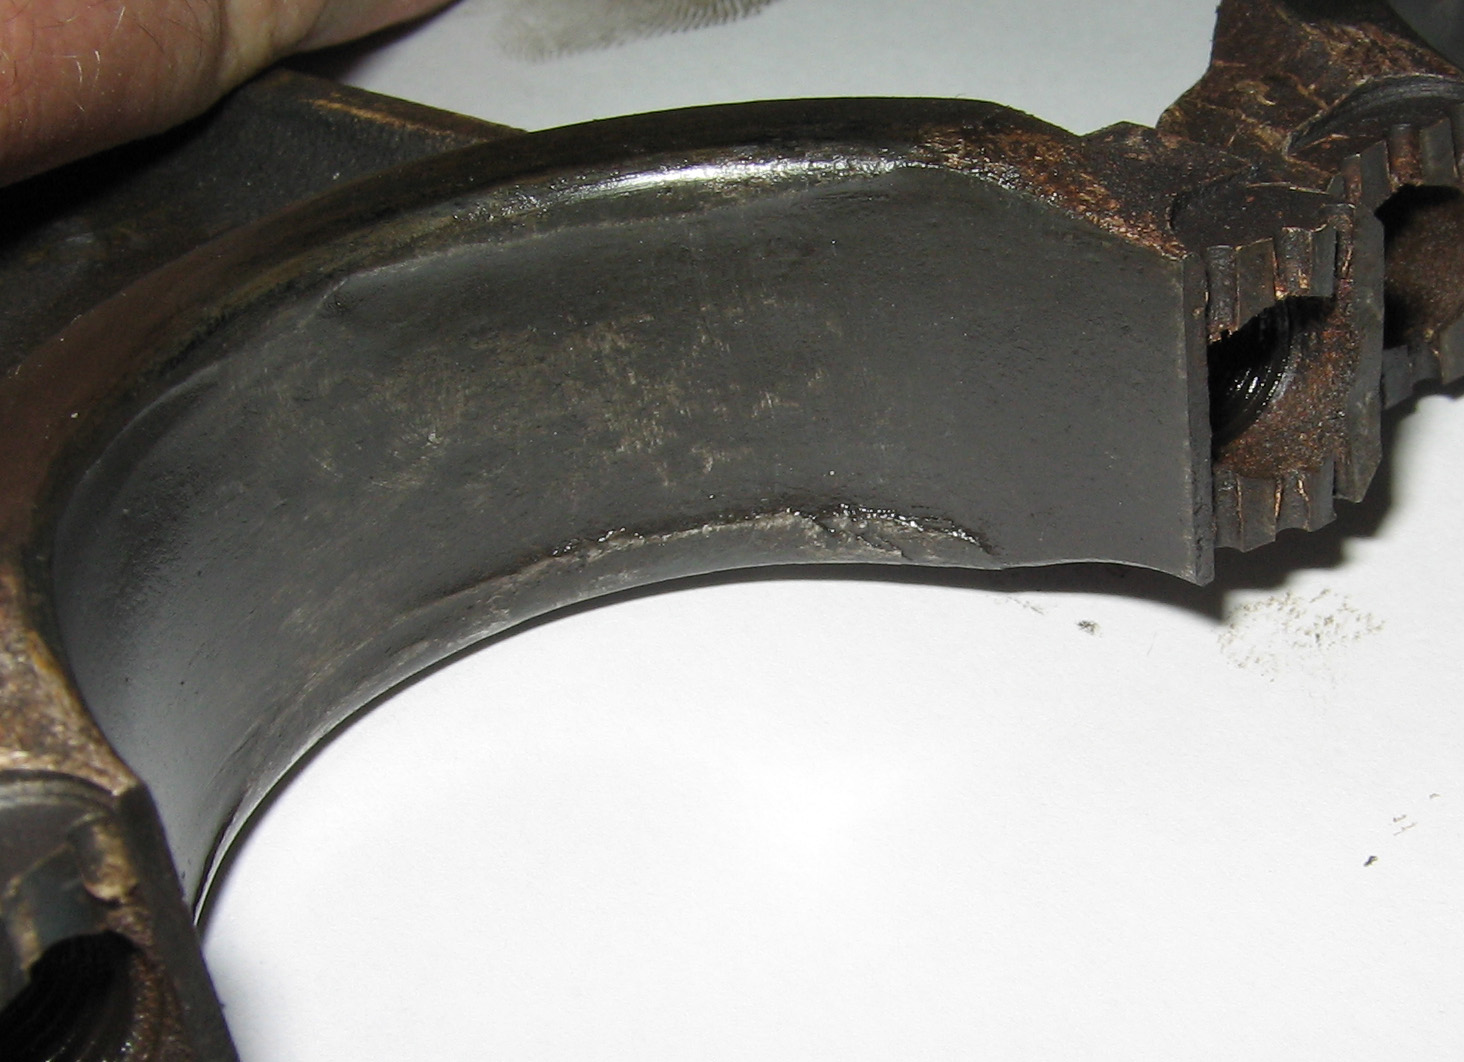 rod 5 journal |
Update: Sunday, APR 9, 2006
Some progress was made today...still trying to track down rod cap socket.
I did some scrubbing. Noticed a potential problem with the pressure valve:
 |
 |
Upon attempted removal of the valve, it would not budge without force. The corrosion on and around the hole was completely prohibiting it from moving.
Update: SAT, APR 8, 2006 - Removal
& Opening Of The Powerhead
Another great progress day.
First I attempted to remove the flywheel nut with an adjustable wrench. No cigar. Then I tried using a 30mm socket with a rachet. Still wouldn't budge. Then I tried with an electric impact wrench. Attempting with a ratchet was ridiculous compared to how easy the impact wrench "licked" off the nut (it took about a quarter-second). Then I used a puller I purchased at the local auto parts store and worked that flywheel until CRRRRACK, the flywheel popped off:

Next, I finished removing various components attached to the PH.
 Exhaust plate |
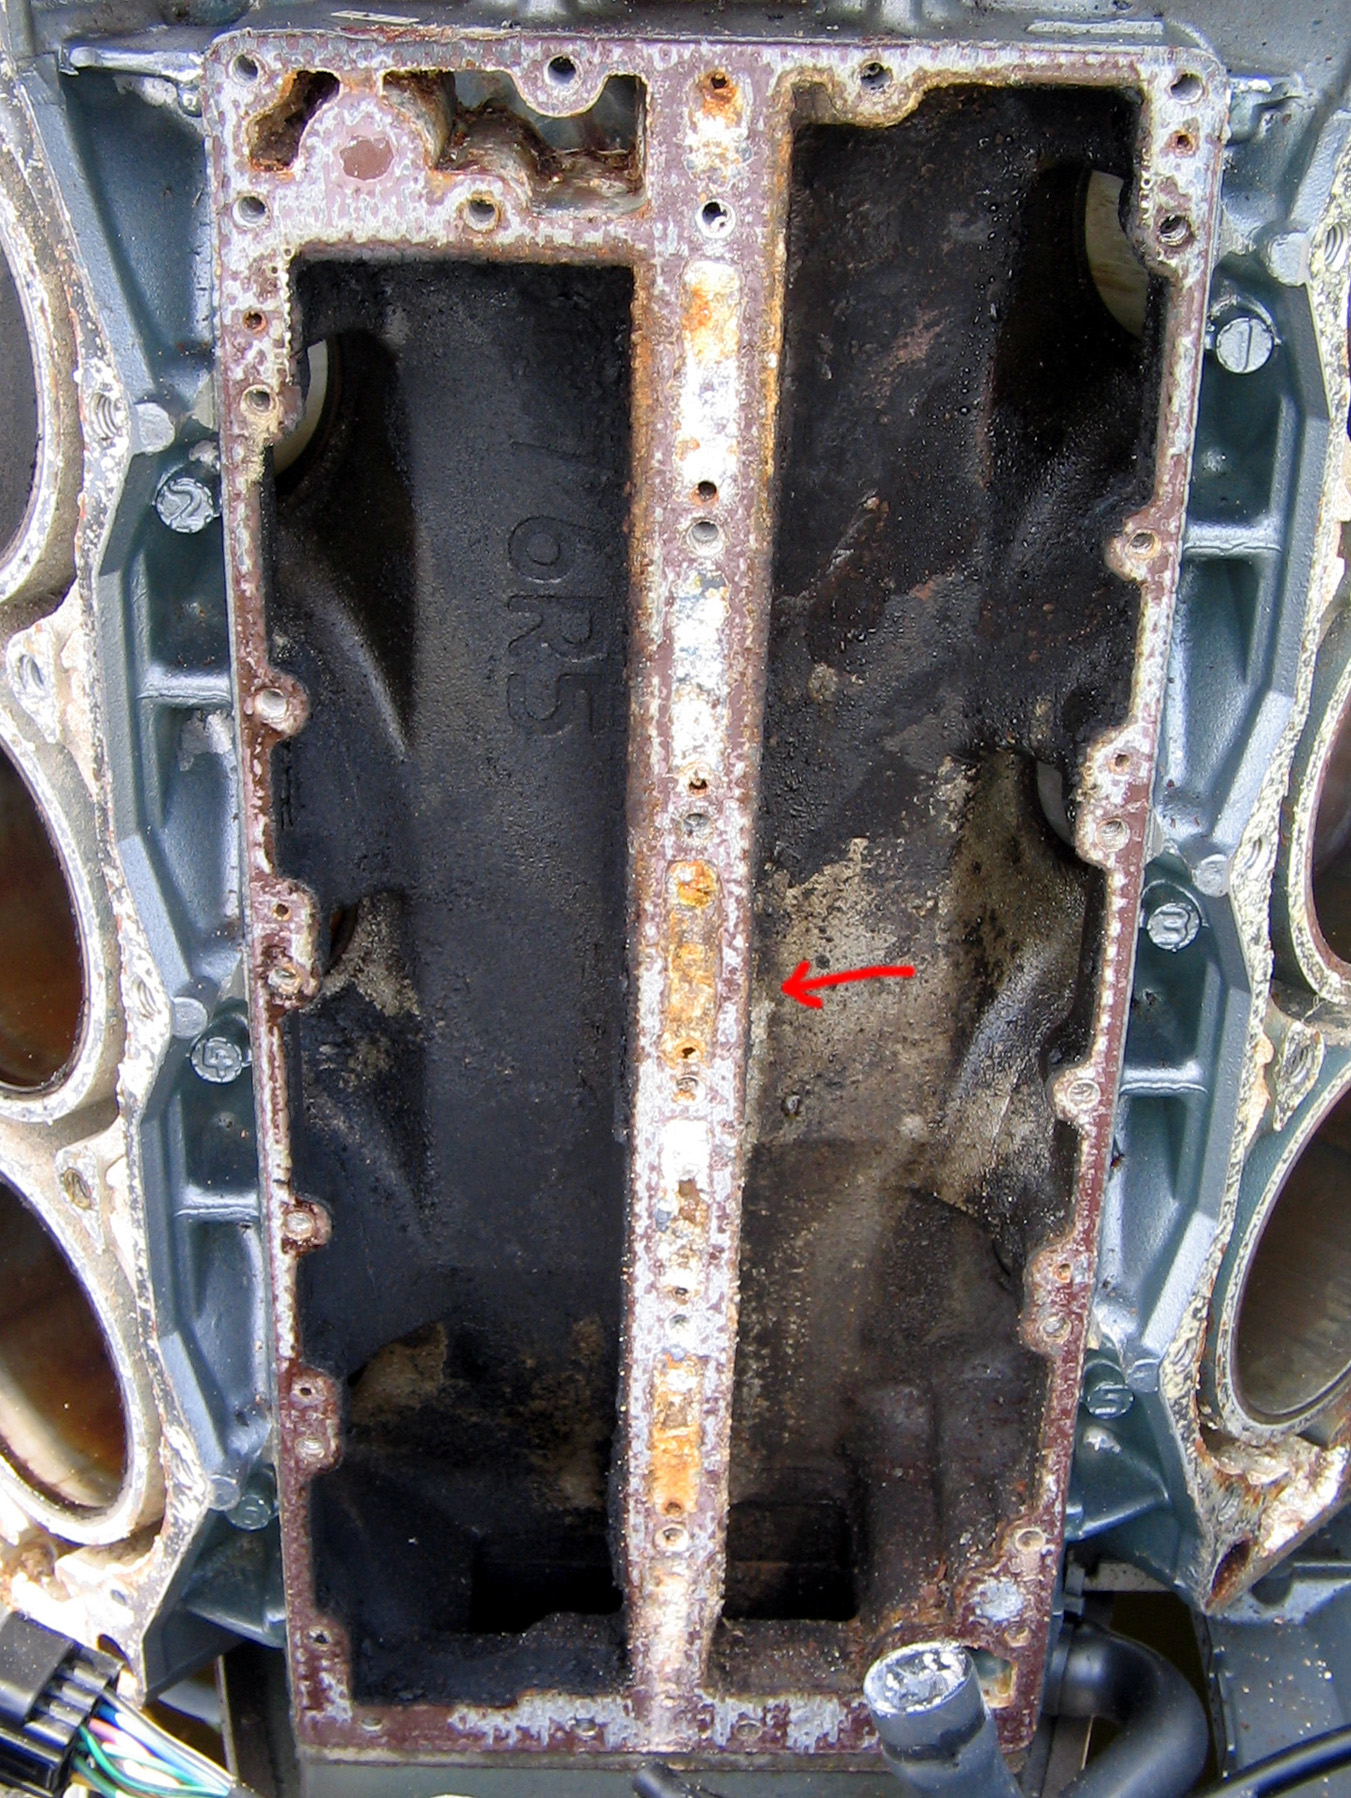 Exhaust Manifold. Red arrow is pointing to general area of 1/8" hole discovered on 4/14/06. |
Then the kids helped me remove the powerhead from the boat and place it on a wheeled cart. I'm told that it weighs about 150lbs:
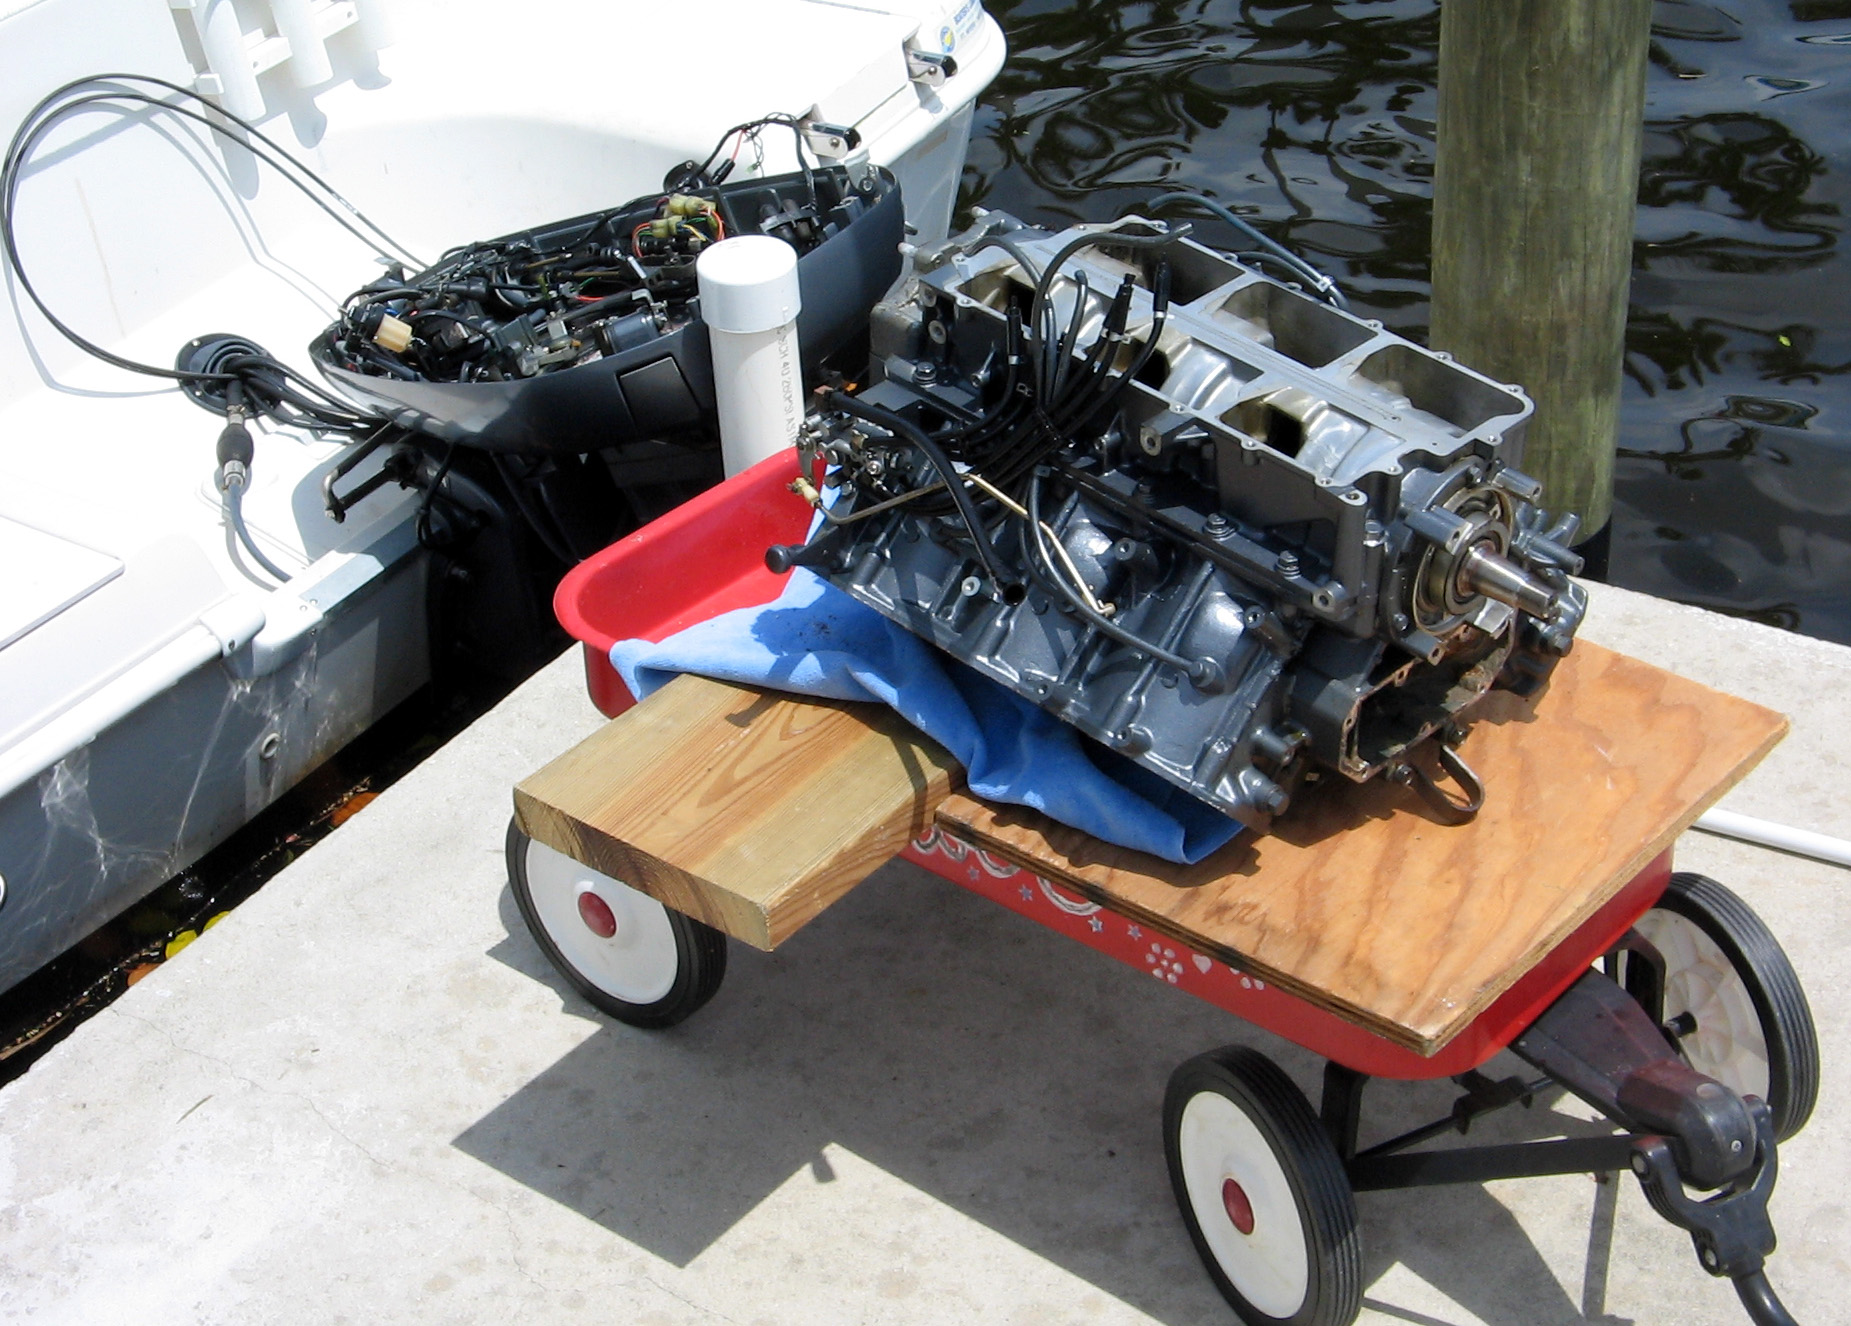
Here's where the PH sat:
Then I wheeled the PH to the garage.
It appears that my piston rings are indeed intact on the problem cylinder. So the theory about piston rings disintegrating is false.
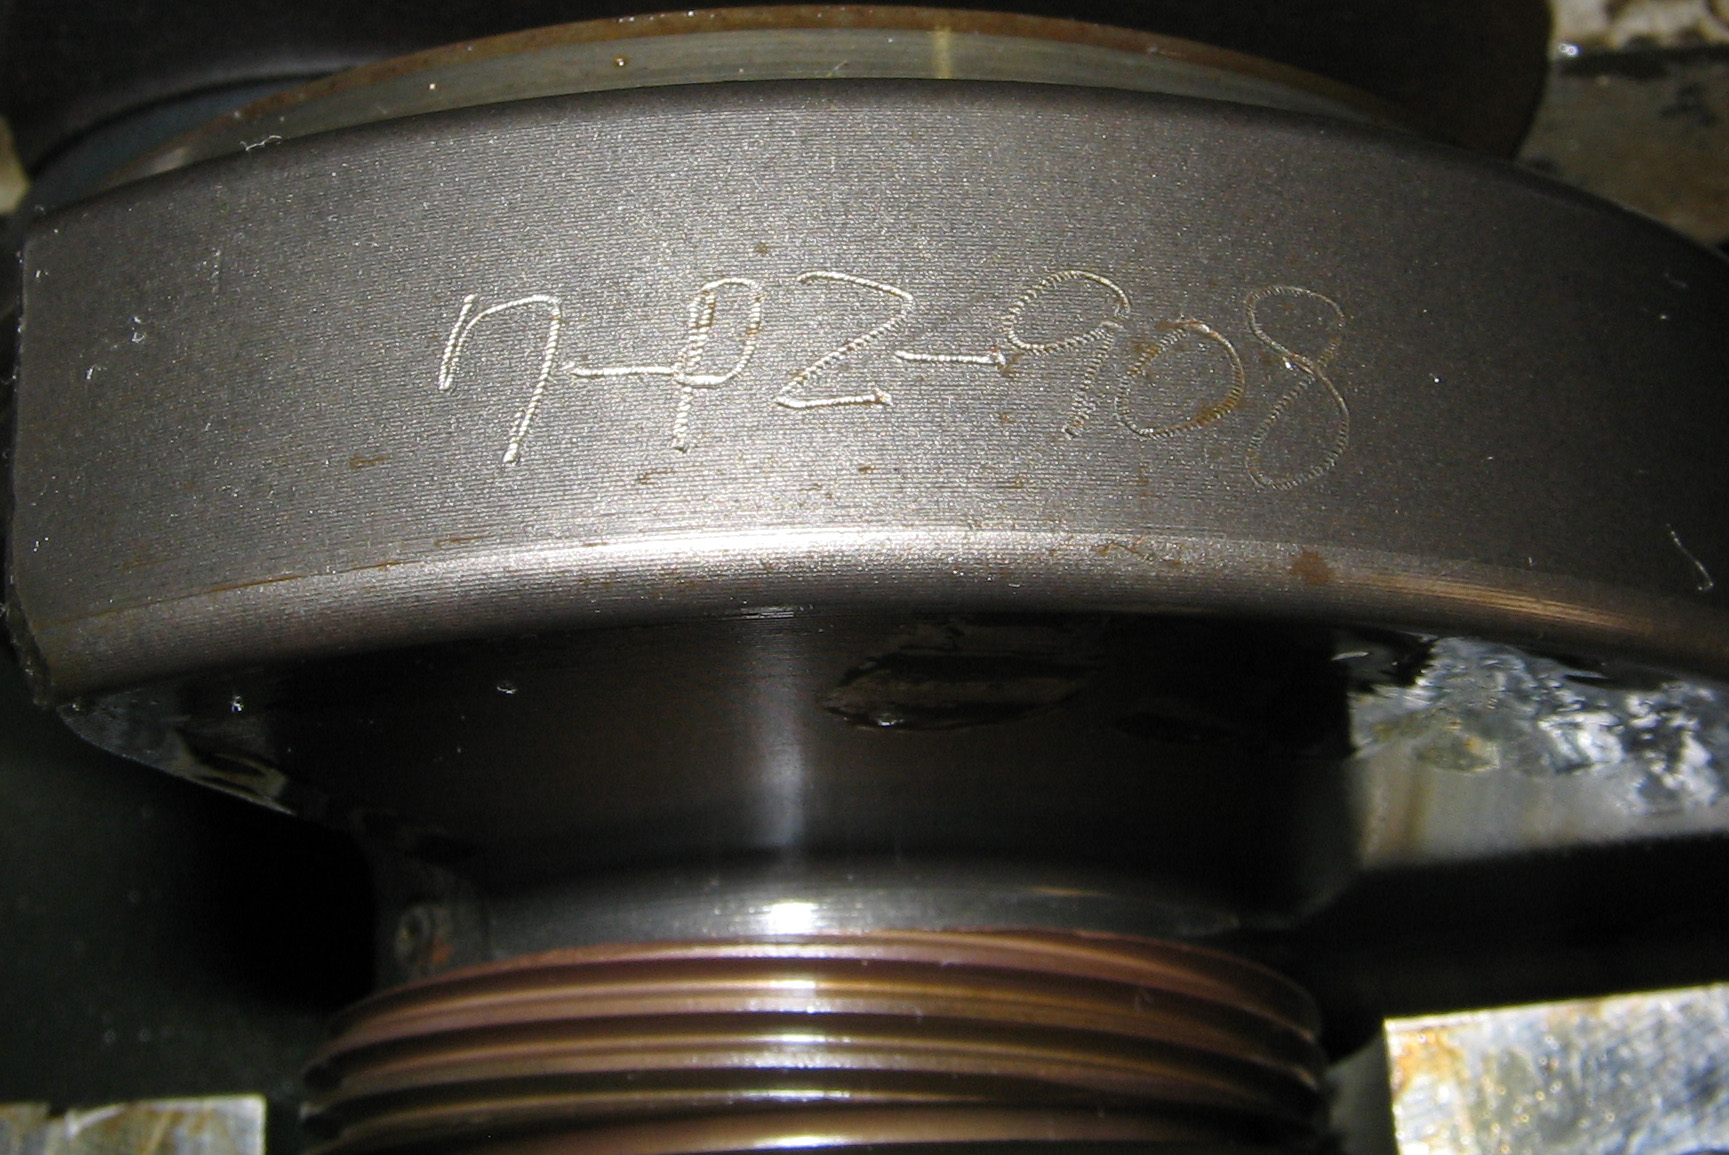
Next, I took off the crankshaft cover to expose the crankshaft:
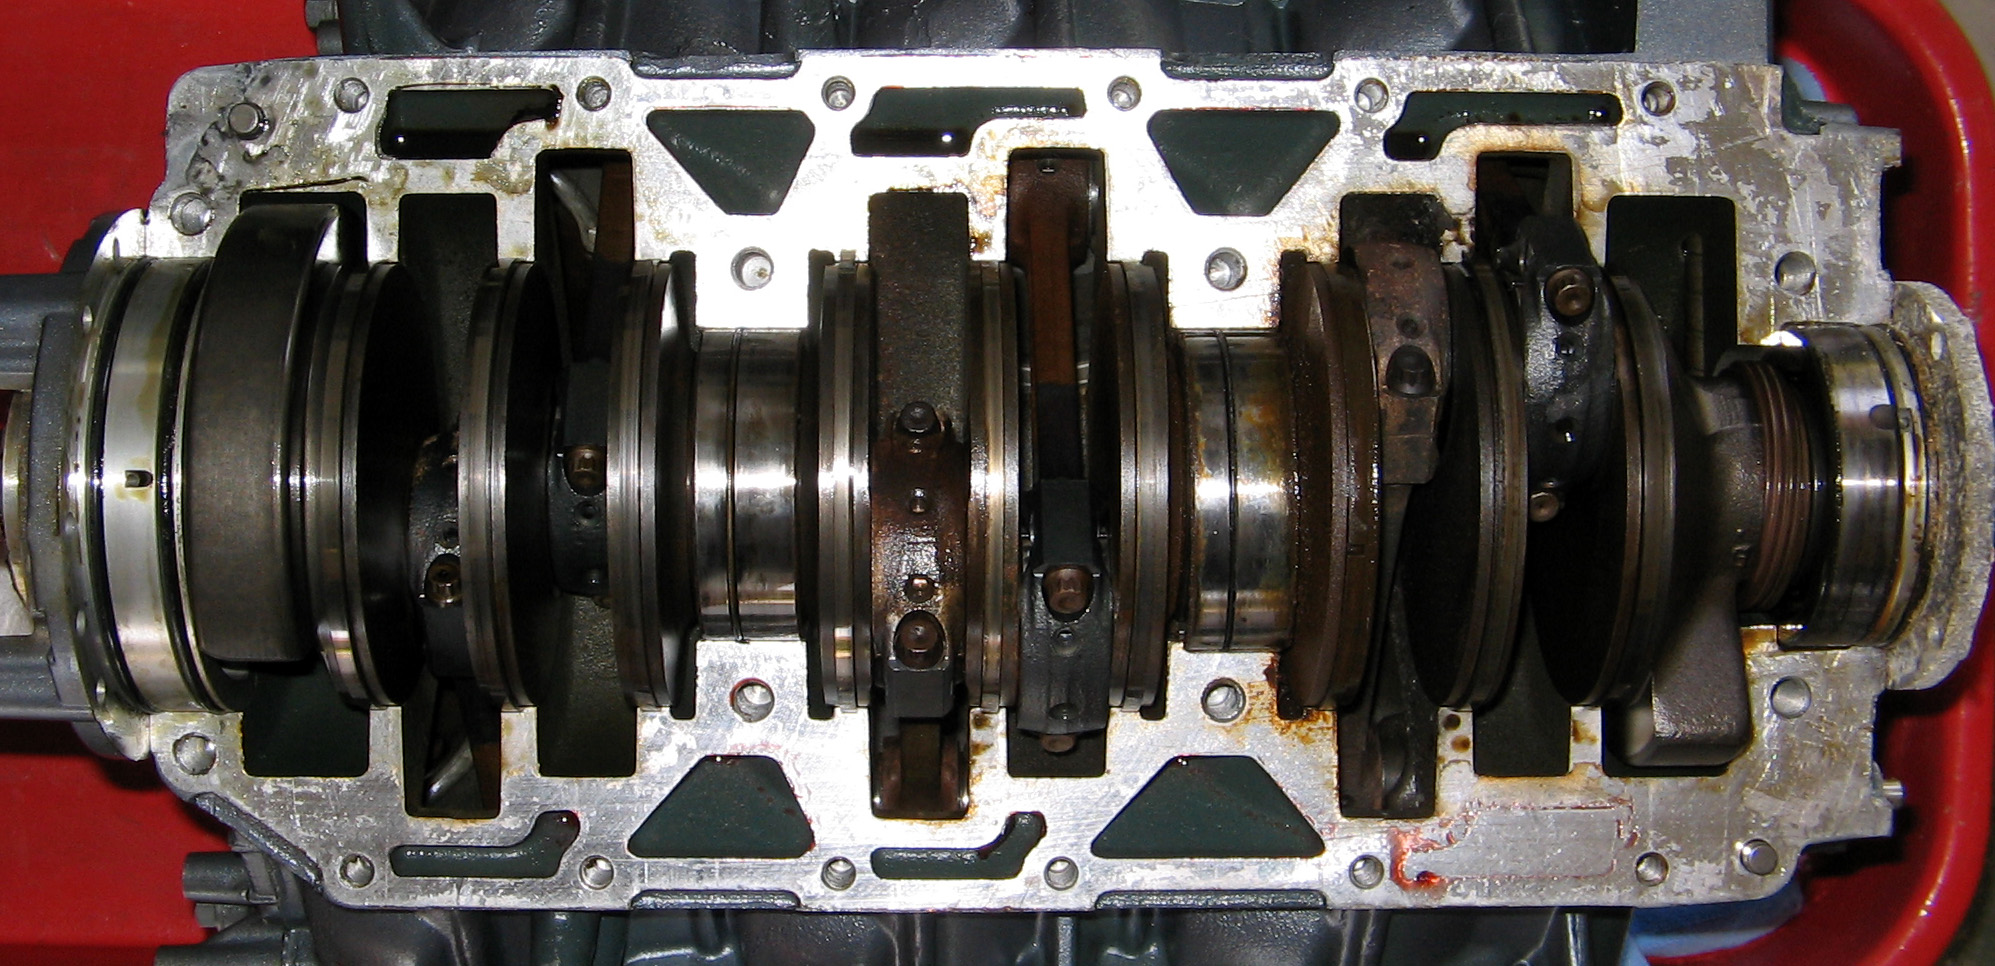
I found an some numbers hand etched into the bottom of the crankshaft: 7-P2-908. What could this mean?:
| Since I see that you all like to view videos, here's a video (non-dramatic) If that one doesn't work, try the |
|
Then off came the seals.
Now I am stuck at removing the rod cap bolts as I do not have the proper socket for this. Need to obtain a thin 5/16 or 8mm 12 point socket.
Update: Sunday, APR 2, 2006 - Removal
Of Components Attached To Powerhead
I made great progress today!
After quite a bit of postponing and thoughts of purchasing a new Yamaha engine by March 31st (to get that free 3 year extended warranty), then missing that March 31st deadline (I really was not prepared to spend $14,000 anyway & the wife had her own big ticket item she wanted if I was going to get a new engine, lol), and being sick all this past week, I finally mustered up enough energy & motivation to begin pulling bolts, and wow did I pull a lot off today. I got further than I could imagine I would have. I have completely disassembled all of the components attached to the powerhead, except for the flywheel; further, I have loosened the 6 powerhead mounting bolts. I need to pull the flywheel off and then the powerhead will be ready for removal and disassembly.
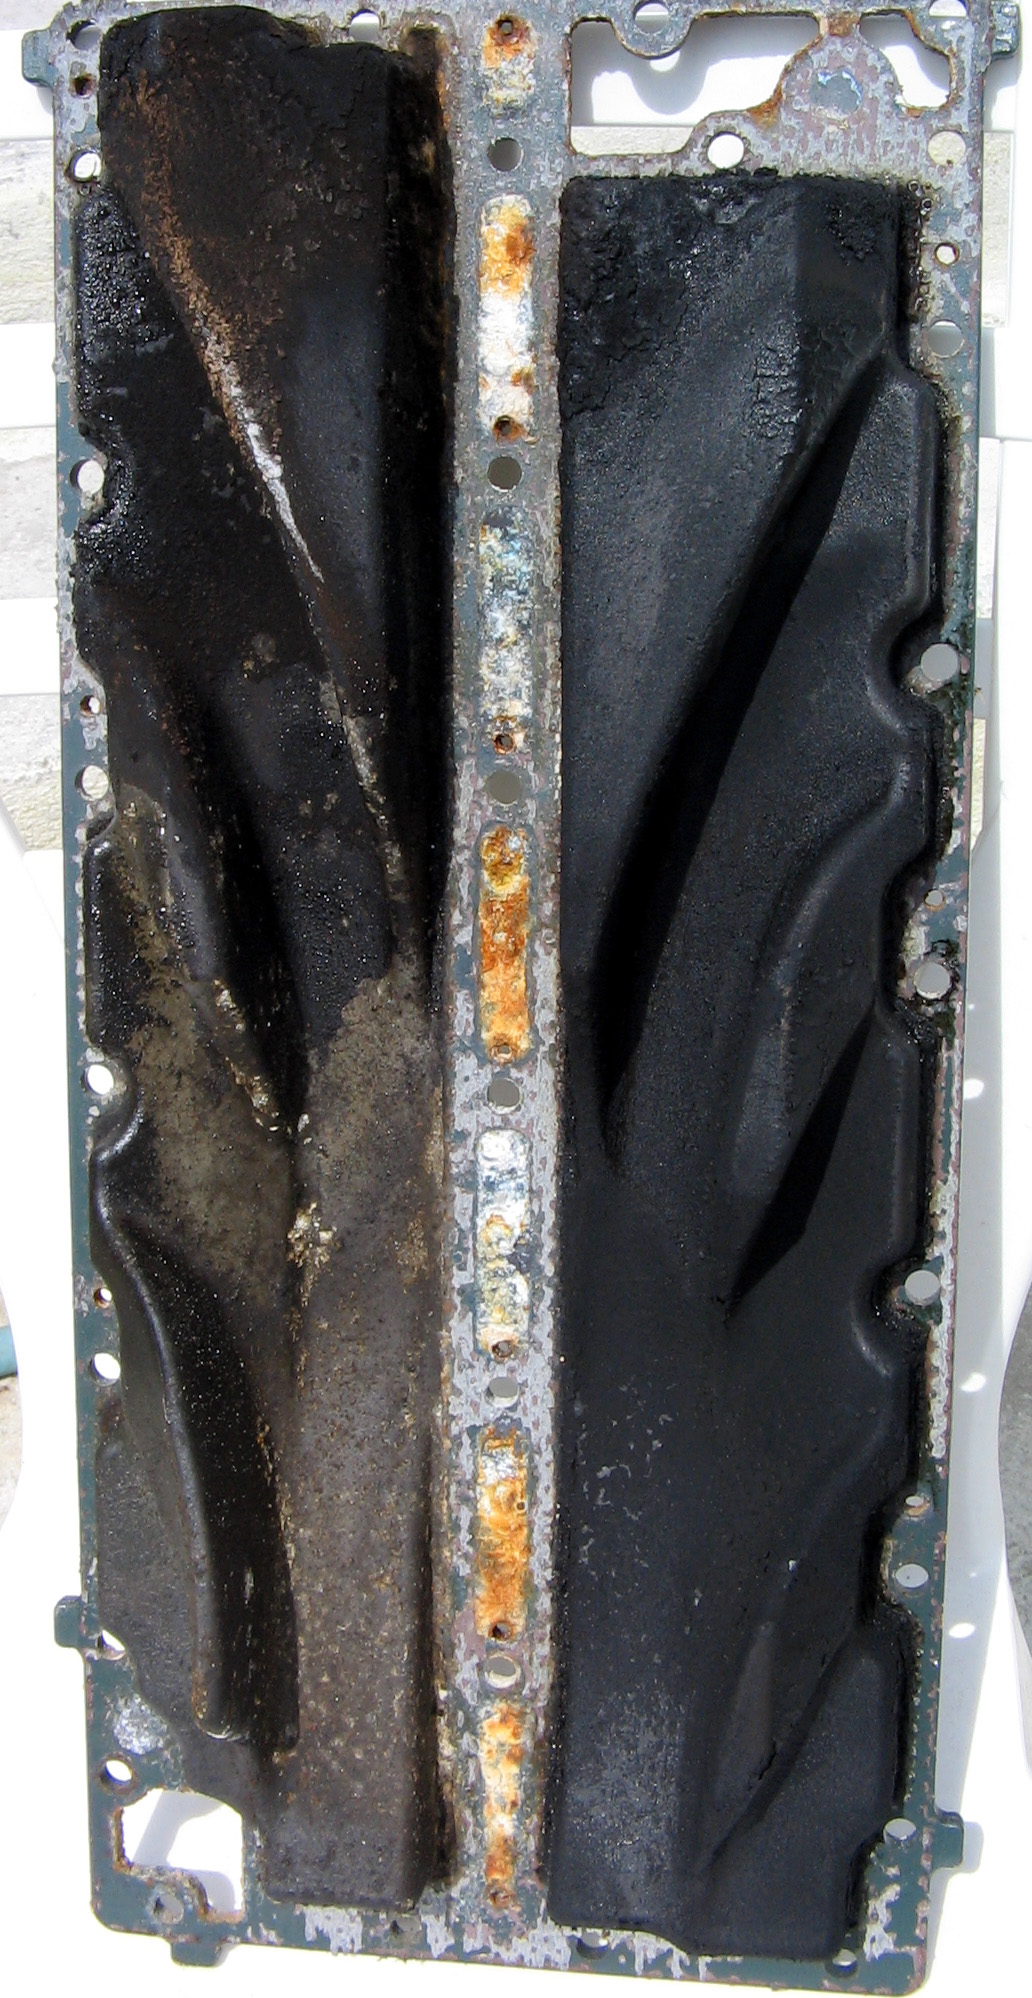
Here is the exhaust side of the engine.
 Exhaust Cover |
 Exhaust Plate |
Here is the intake:
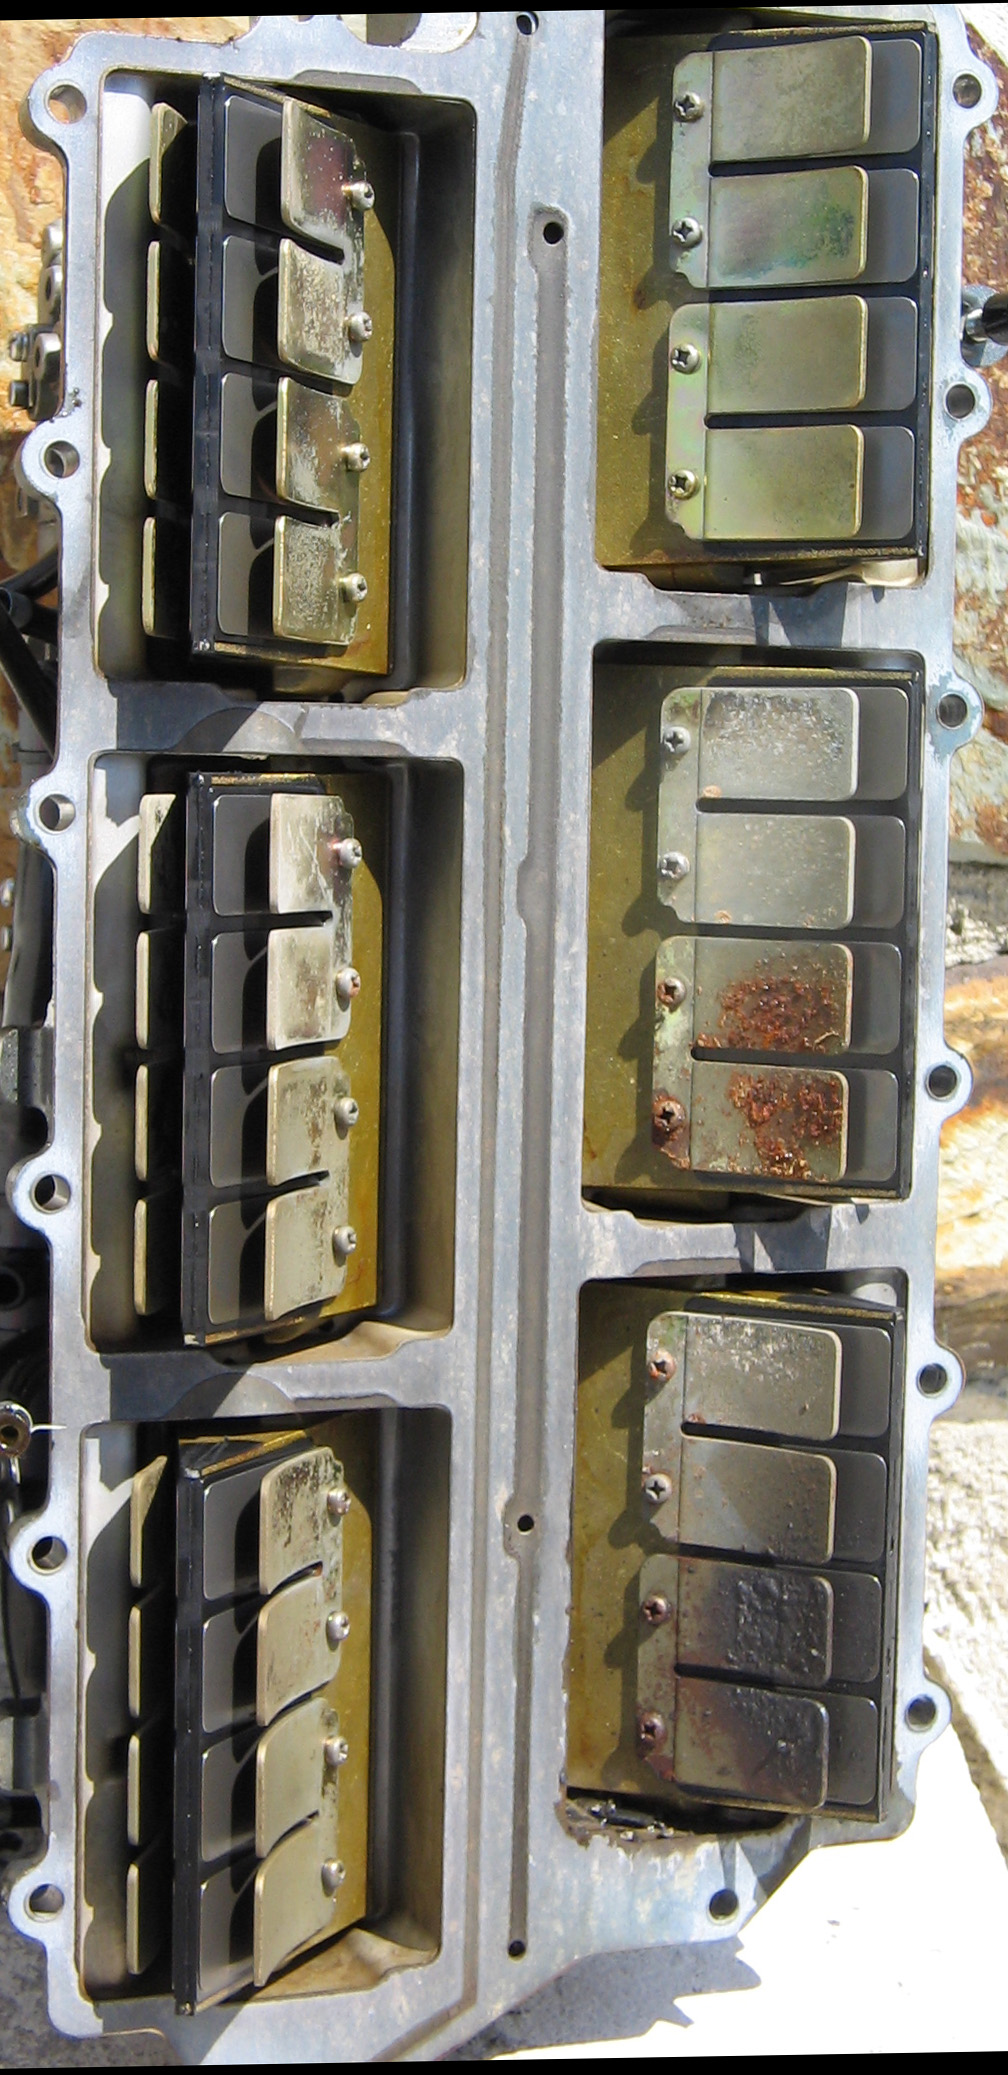 Reeds Notice rust on the middle right set. I think this has to do with a possible leaking head gasket. The lower right set is where the failure occurred. |
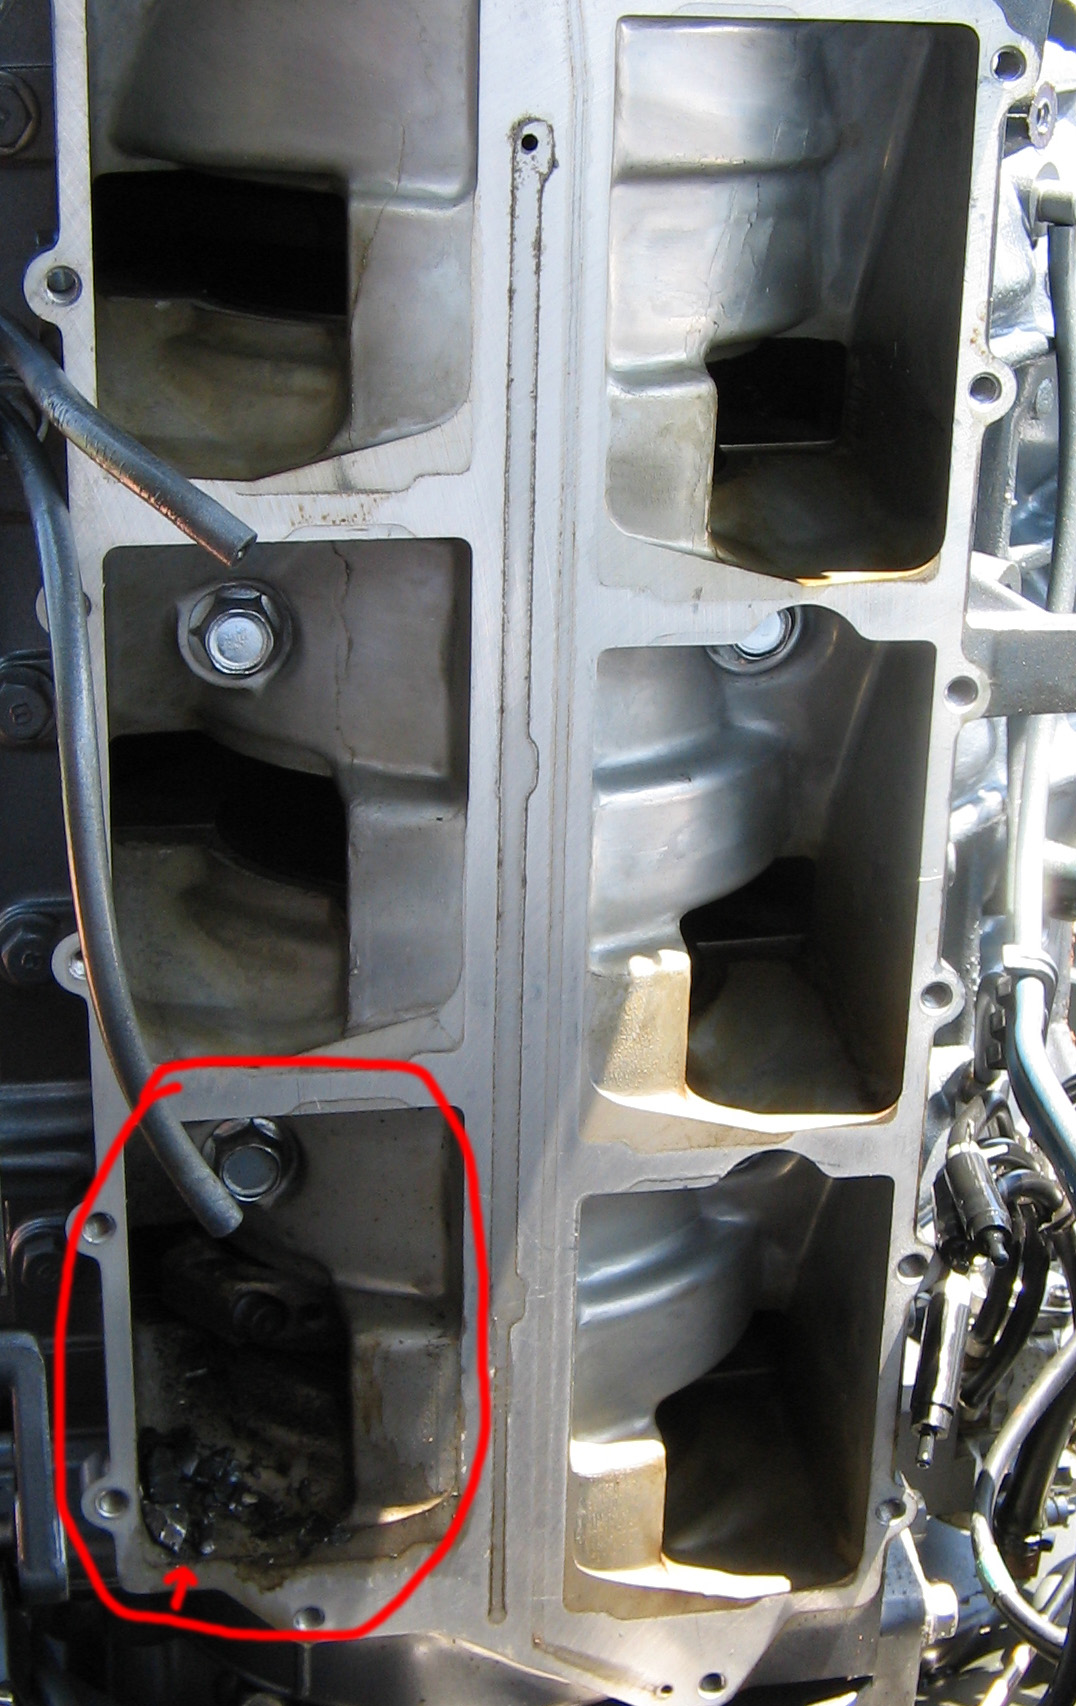 Crankcase Intake Note the metal pieces in the circled area. |
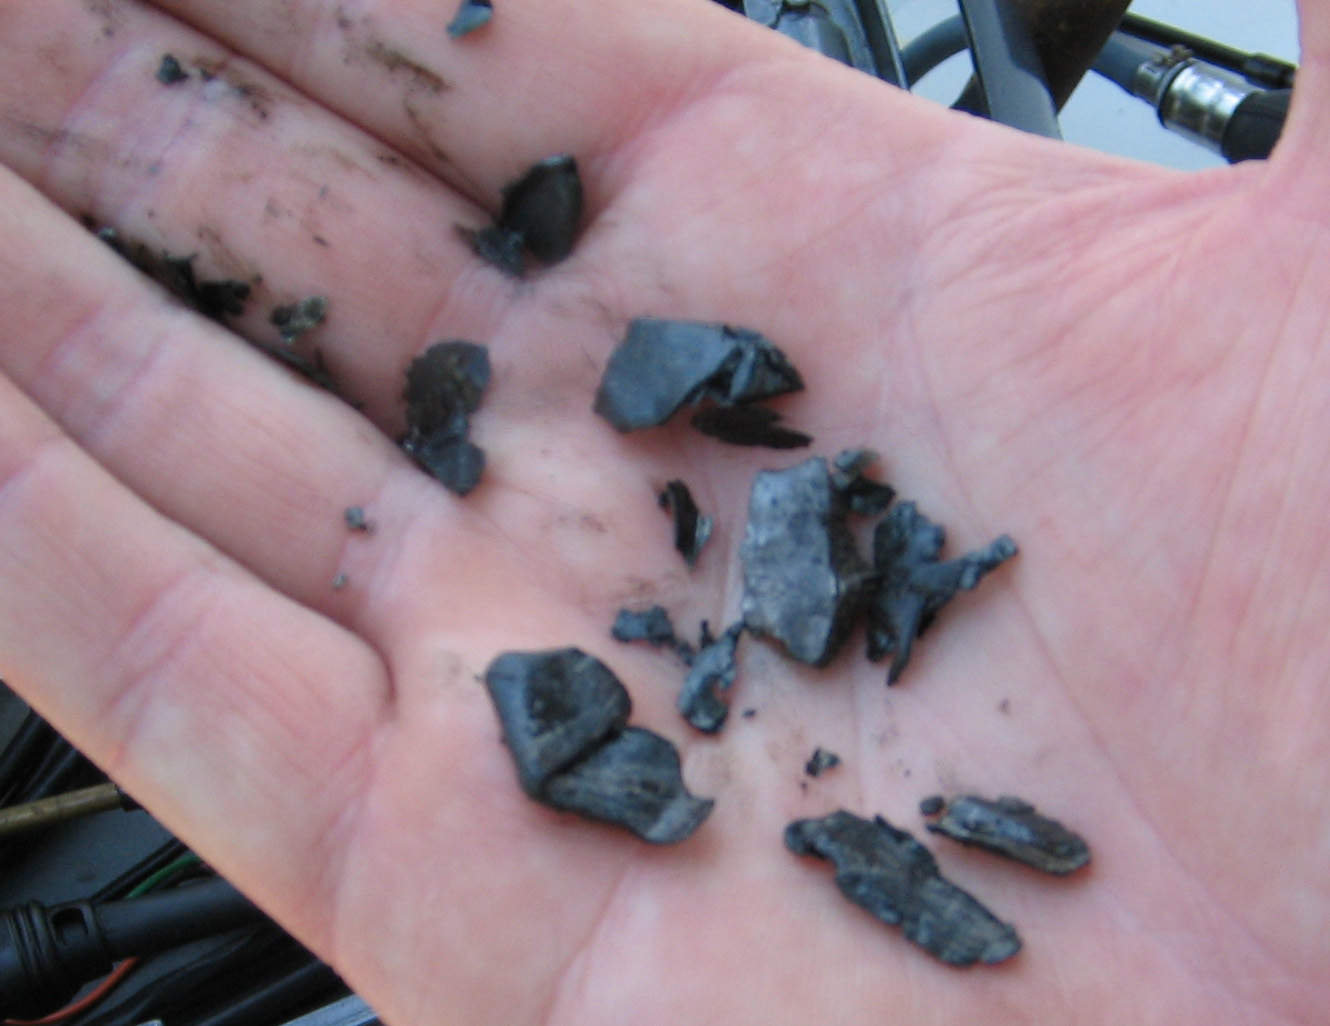 Pieces removed from the intake side of the crankcase. |
Now I have evidence of what my failure is. It was just as I thought. The lower starboard
rod to crankshaft bearing has disintegrated. But why?
|
CLICK HERE FOR A VIDEO TO SEE THE ROD END-PLAY WHERE IT CONNECTS TO THE CRANKSHAFT If that doesn't work, try the low bandwidth video option. |
|
In this video you will see the significant amount of play where the rod connects to the crank.
Here is another picture of the corresponding cylinder. Note the rough edge of the port, and slight scoring of the cylinder:
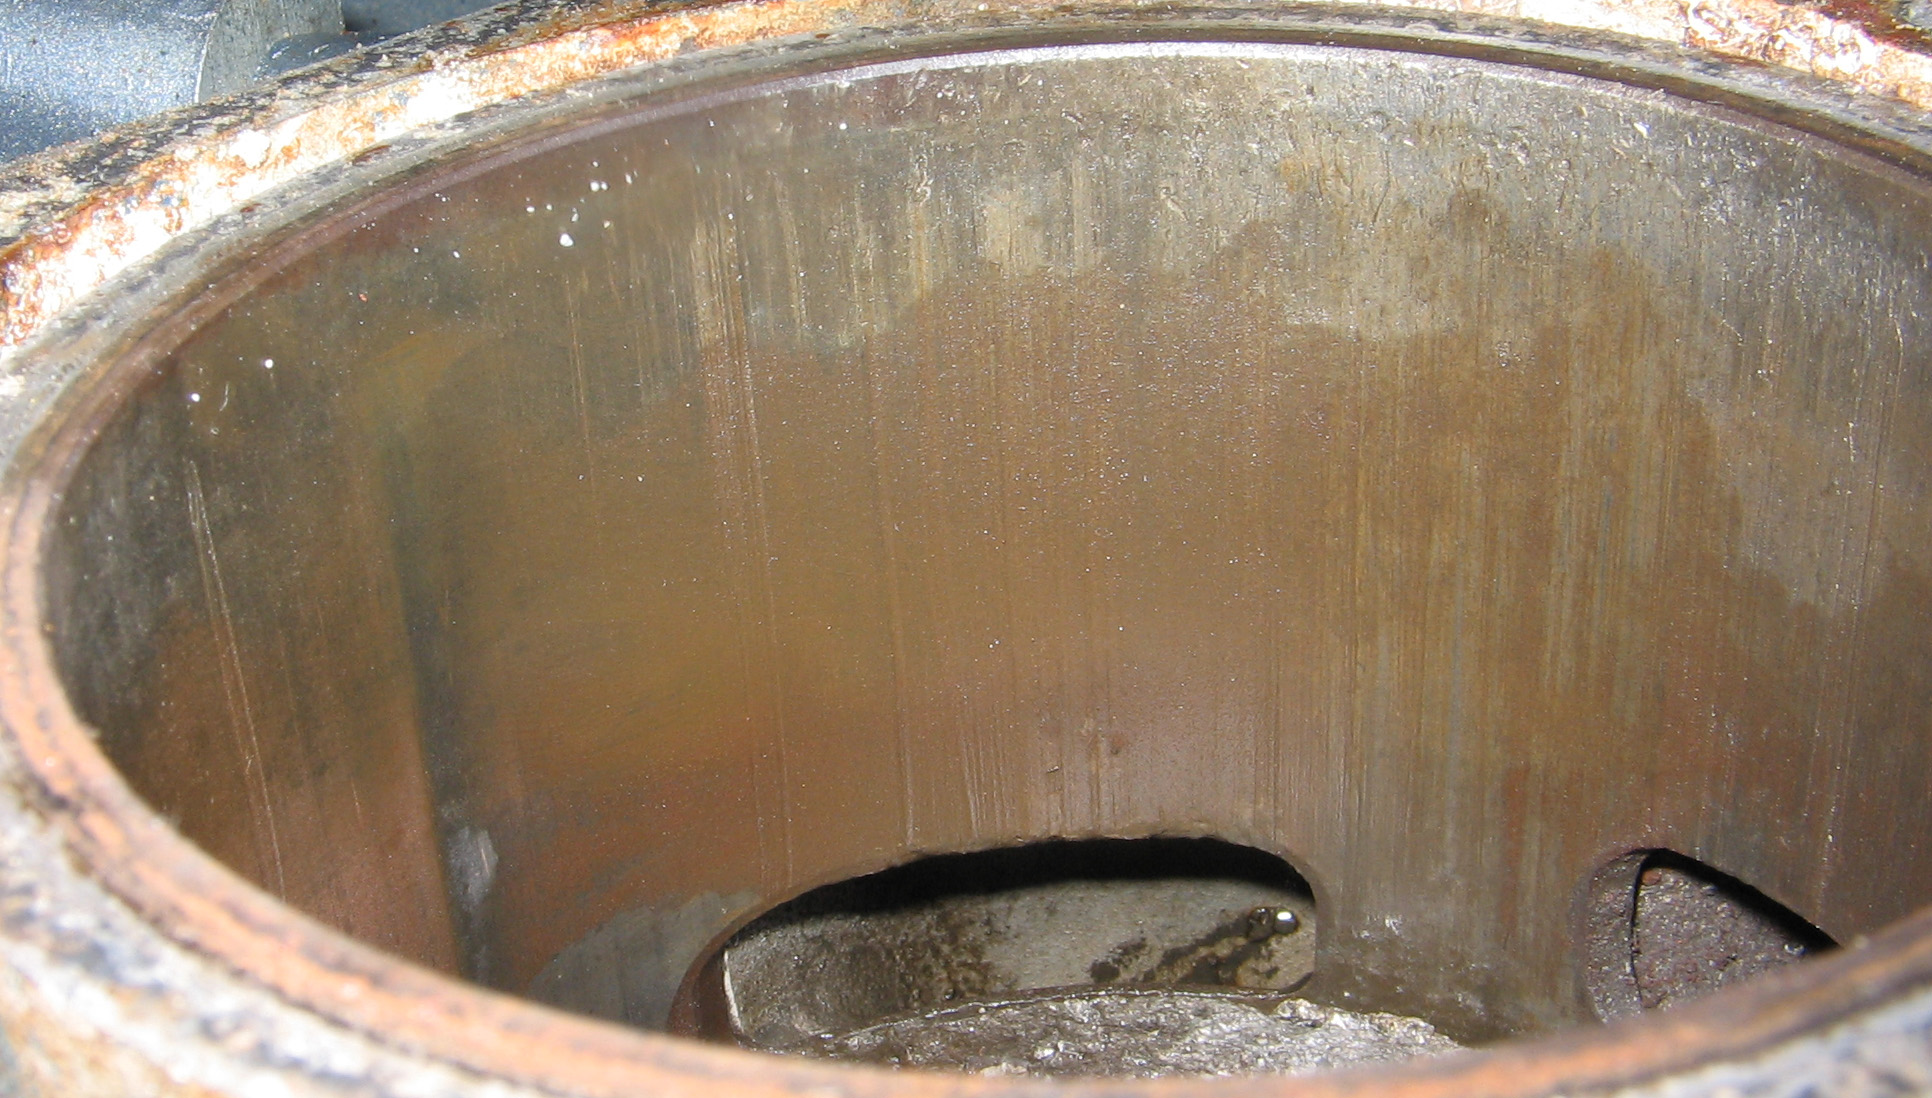
Cylinder Scoring & Port Edge Chipping
Will this need to be corrected, and will it be able to be corrected?
I wonder if I will have problems with the chipping ( rough edge ) of these ports.
Next, I need to obtain a tool to remove the flywheel (or manufacture one), and then I will attempt to pull the powerhead off.
Many of the bolts came off easily. Some seemed finger tight.
I am now thinking that the root cause of this failure was a slow leaking gasket allowing water to enter the cylinders (head gasket or water jacket gasket...not sure) (also, Rodbolt suggested this) as opposed to any of my previous conclusions. This makes sense because of the loss of power I experienced since 2004 after running hard then shutting off for a while. Upon startup again, I would have a significant loss of power (apparently, 1 or 2 cylinders were flooded, and wouldn't fire, until the water was exhausted out of the cylinder), until eventually the cylinders kicked in again.
I had previously thought that perhaps water was sucked in through the intake but I'm not so sure of that now.
Update: Thursday, March 23, 2006
After getting a taste of what it is going to cost to have my engine
professionally repaired (up to $5500 or so), and finding out how much
repowering is going to cost ($12000 or more), I am now starting to look into
tearing down this motor myself. What can I lose? Last night I took
off the air silencer. Soon I will attempt to take off more of the
intake.
Update: Tuesday, January 31, 2006
Someone suggested that the piston ring may have disintegrated. This
makes the most sense to me at this point. But why? He suggested
due to carbon build up. I have never had the engine decarboned but he
says it should be decarboned every 75 hours (about). I don't know alot
from a little carbon build up but it seems I don't have that much looking at
the pictures below...hummmm.
Update: Sunday, January 29, 2006
Today I took a crowbar and pried off the starboard cylinder head. The
lower cylinder bore has light scratches on the bottom half of the bore.
The upper 2 bores are smooth all around. There is significant "chipping"
to both the lower piston, around the edge, and the corresponding area on the
cylinder head. It looks like someone took a screwdriver and beat the
heck out of both the piston and the corresponding area on the head.
I also cranked the engine once the cylinder head was off and cranking was very smooth (no clunking whatsoever). It seems that the lack of compression (and lack of the piston slamming the head) is allowing the parts of the engine to move freely.
I also hand pushed the lower piston in a slight amount - maybe 1/8 inch. I was not able to push the upper 2 pistons in - they were firm. So there is some play in the lower piston.
The only think I can think of is It seems that this particular piston has been slamming the head (I cannot think of any other reason it is this way). Not being an engine expert by any means, it seems that the cause could be a problem with the connecting rod for this piston. Now if so, why did the connecting rod fail...oil delivery issue?
Here are some pictures. What does it look like to you?:
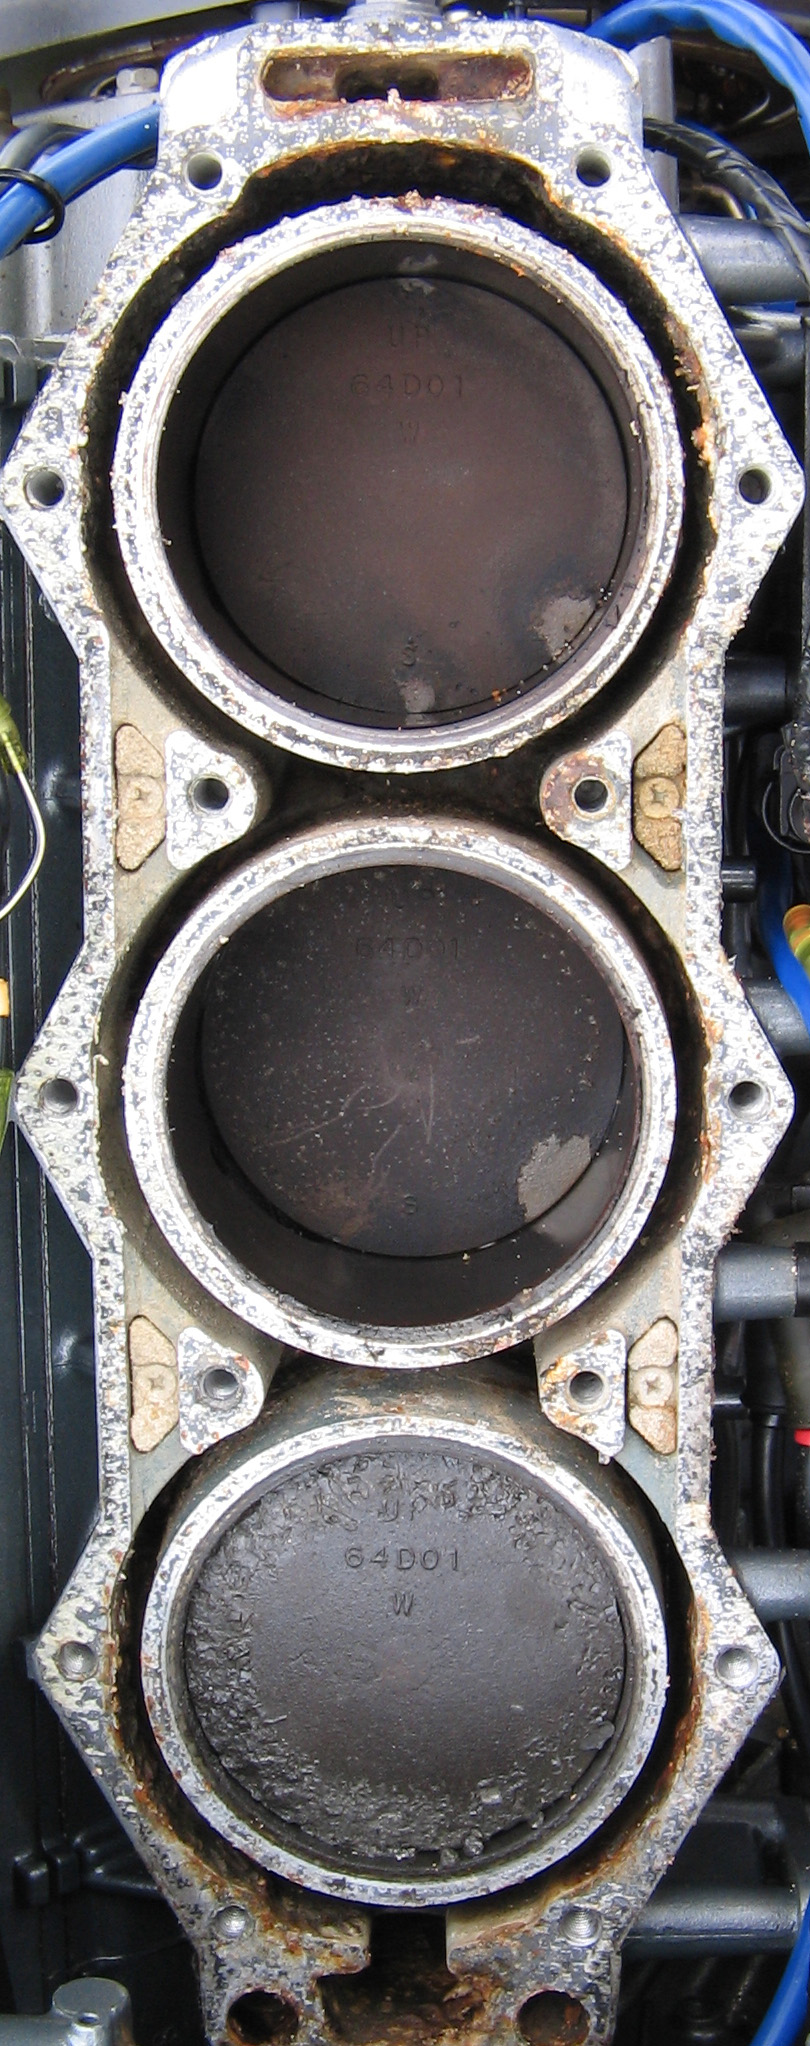 starboard cylinder Notice the bottom piston is not smooth. |
 starboard cylinder head Notice the lower cylinder head area is not smooth. |
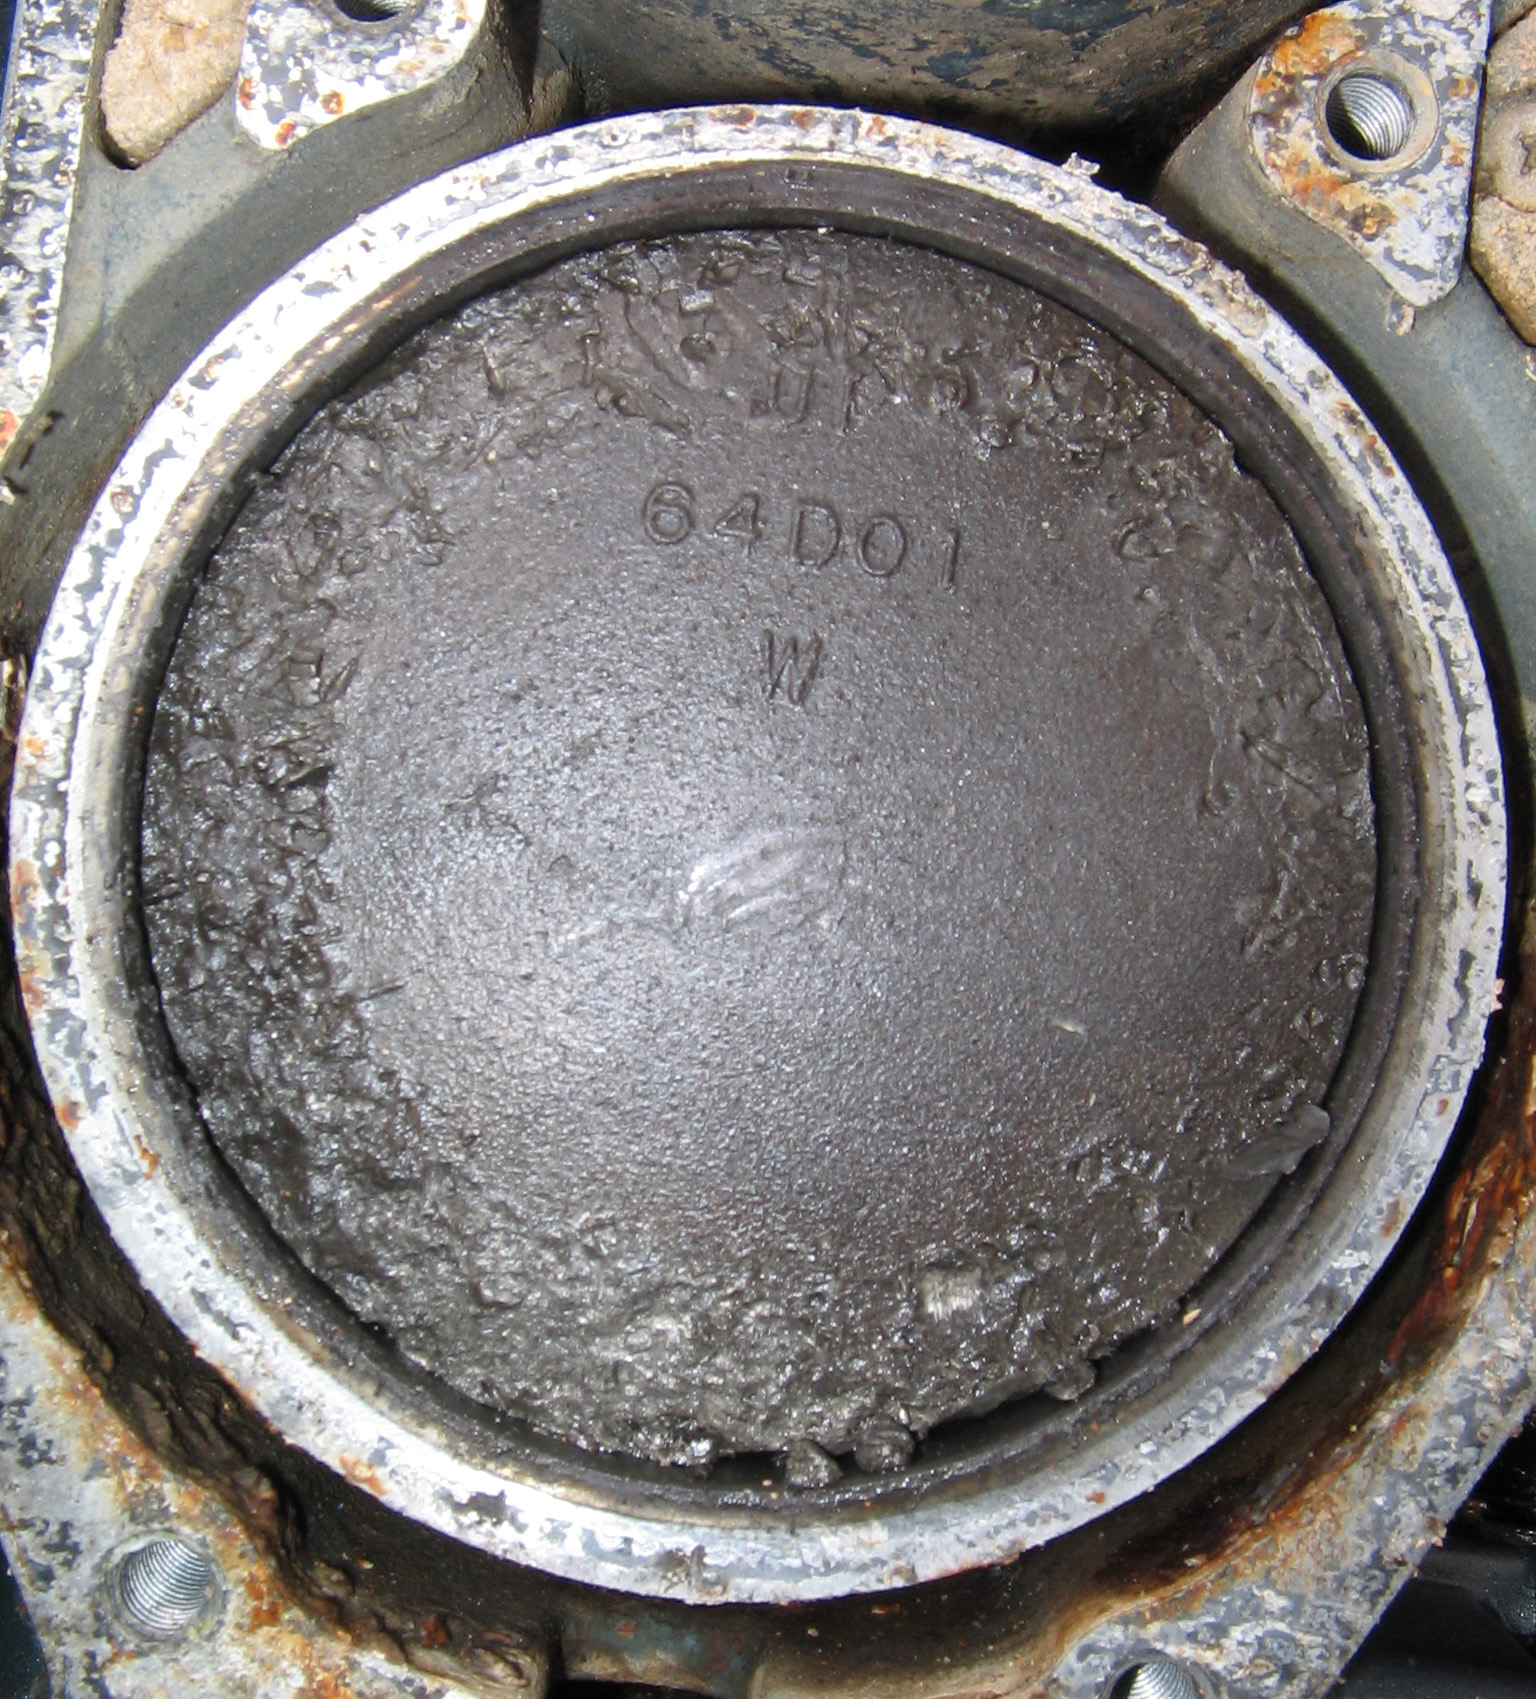 Bottom piston Notice the severe chipping around the circumference of the piston. |
 Bottom cylinder & piston Notice the scoring along the bottom half of the cylinder bore. |
Update: SAT, January 28, 2006
Today I pulled all 14 mount bolts from the starboard cylinder
head. It was relatively easy; I used a small ratchet and the bolts
came right out. Then, I tried pulling the cylinder head off the block
and it wouldn't budge. I tried prying a bit, as well as smacking the
head with a hard rubber mallet. It did not budge.
Here are some pictures of the engine (bolts still in):
 engine: Port Side |
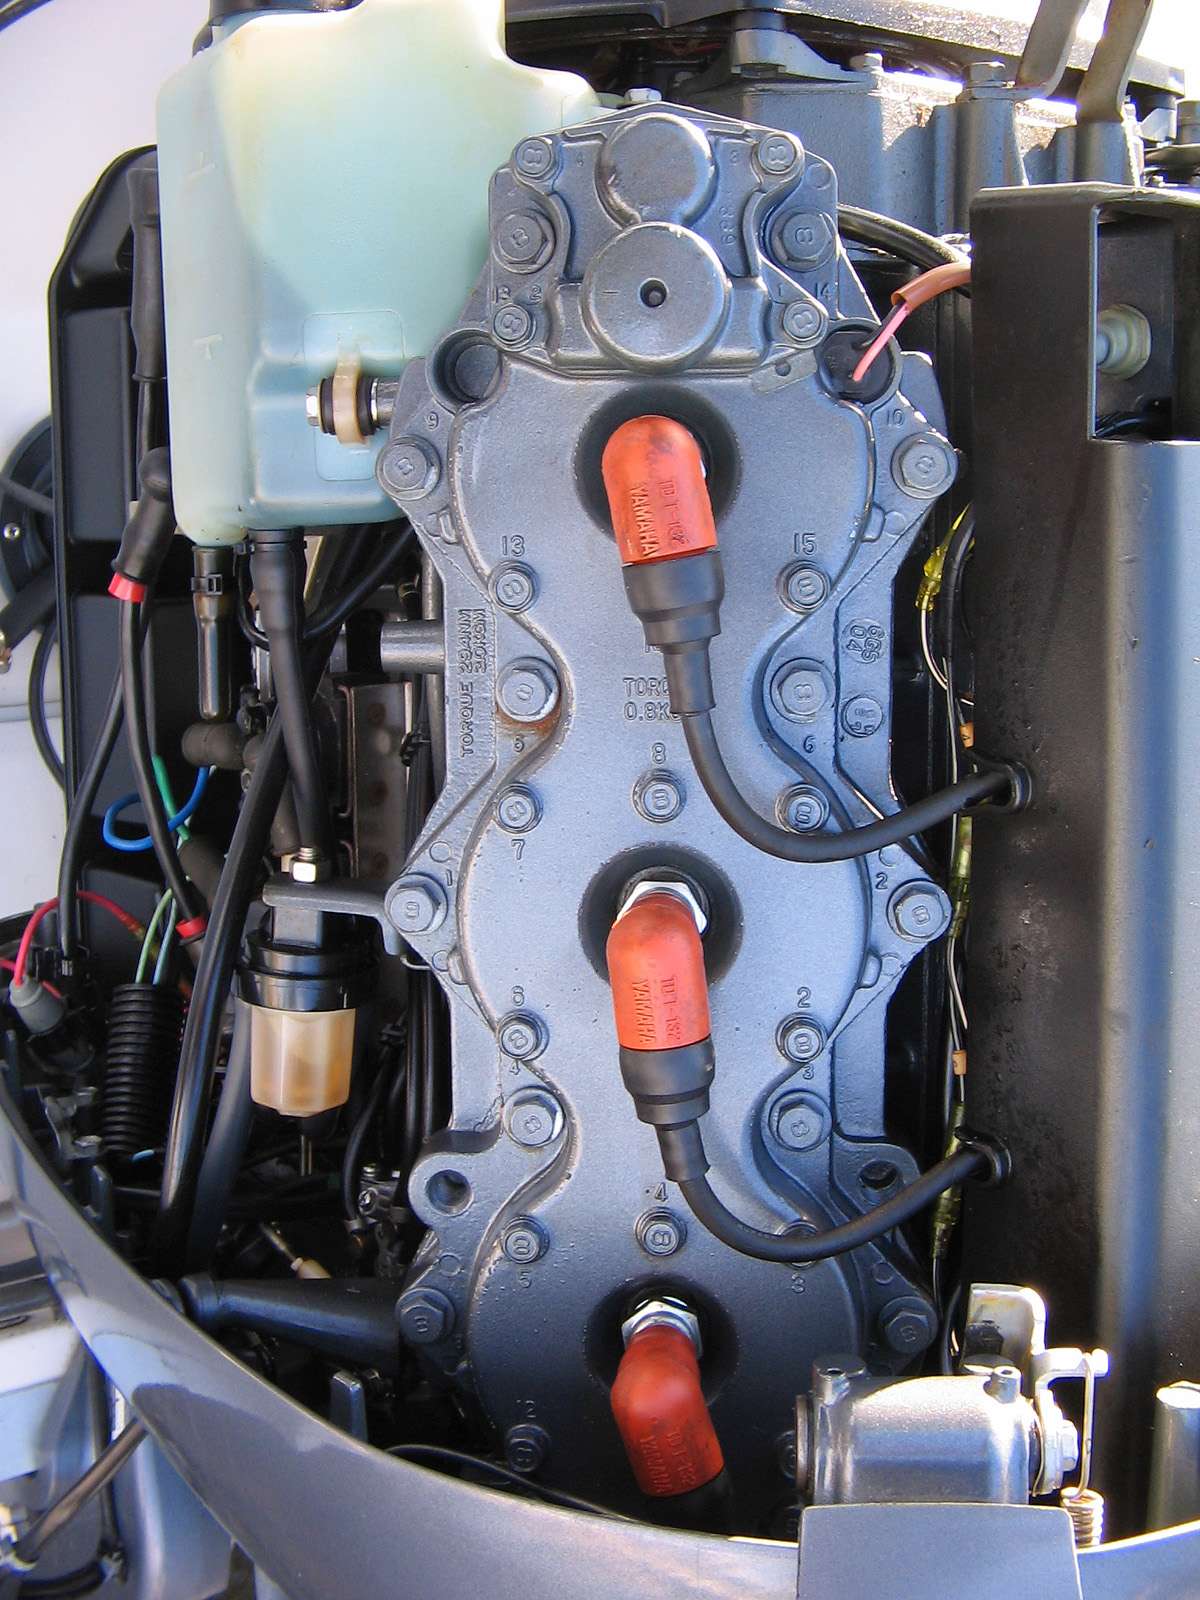 cylinder head: port side |
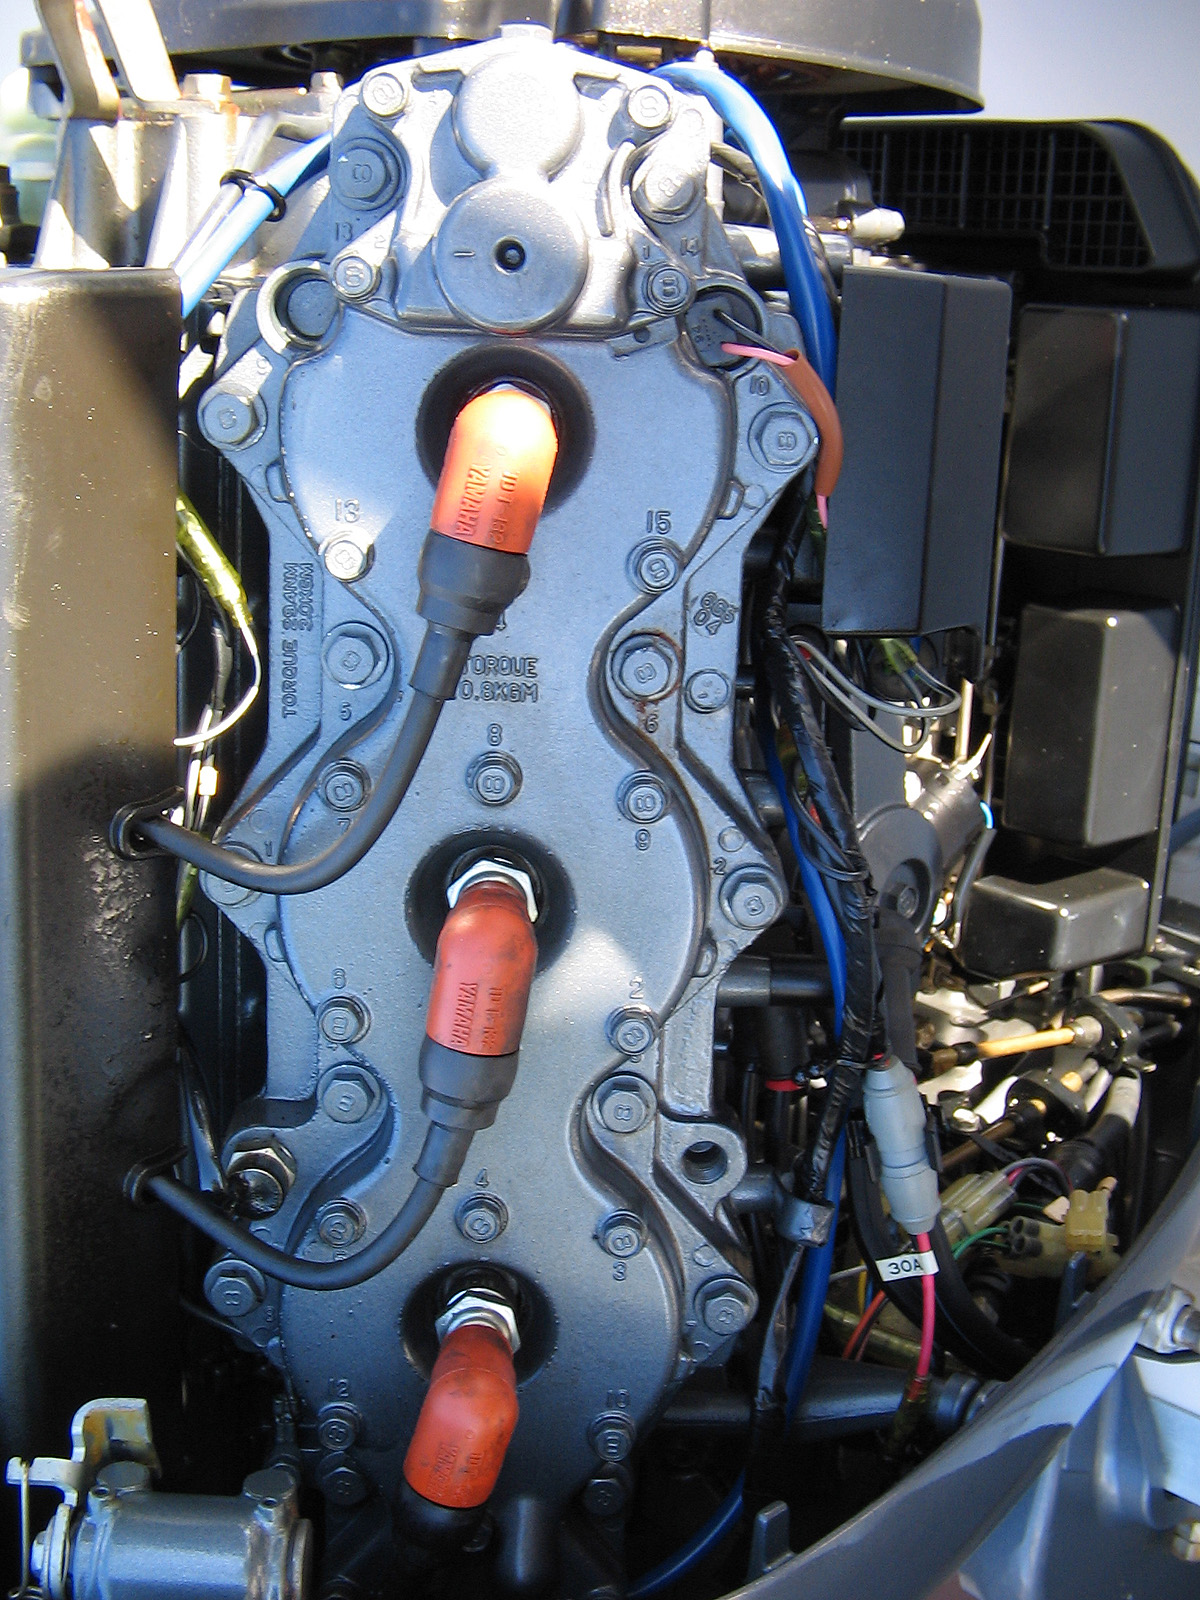 cylinder head: starboard side |
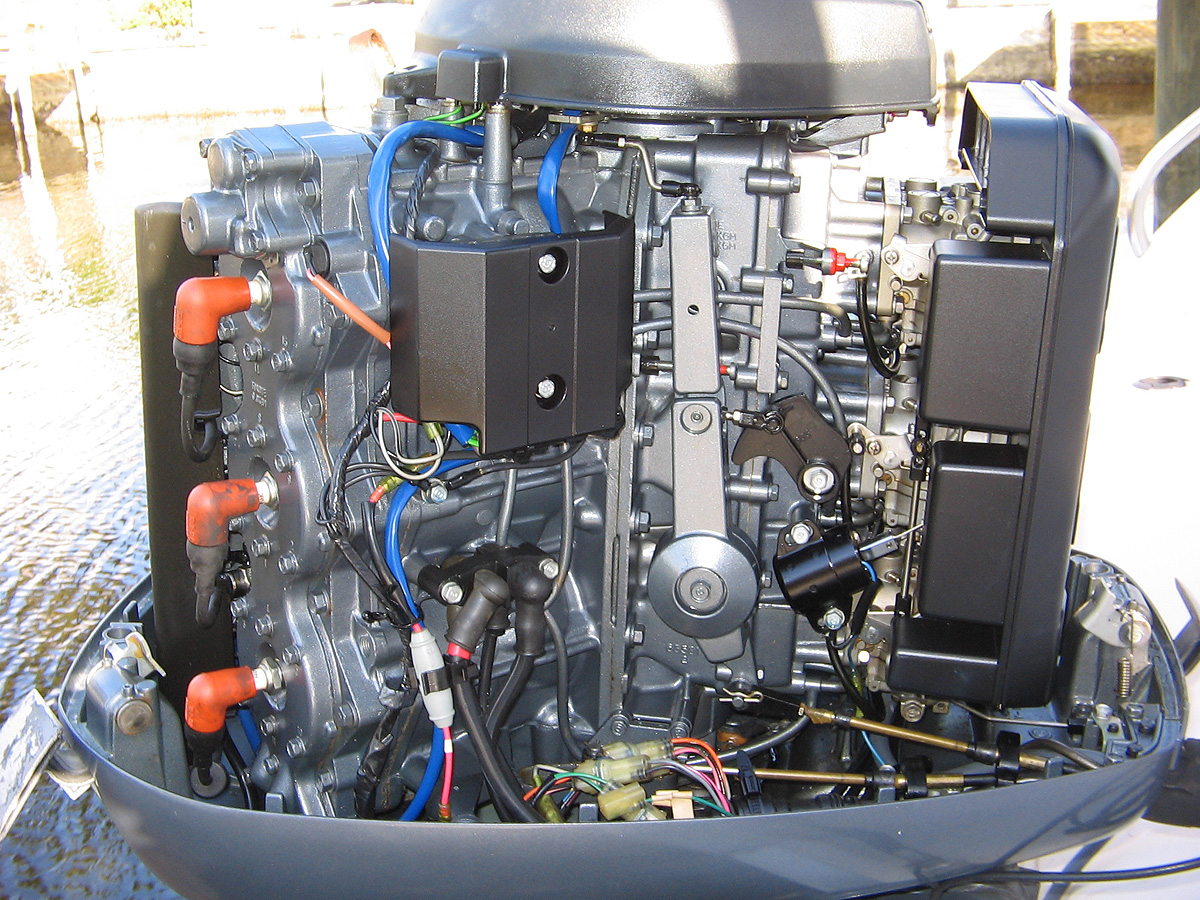 engine: starboard side |
^ Click the pictures for enlargement ^
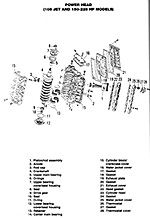
Update: Tuesday, January 24, 2006
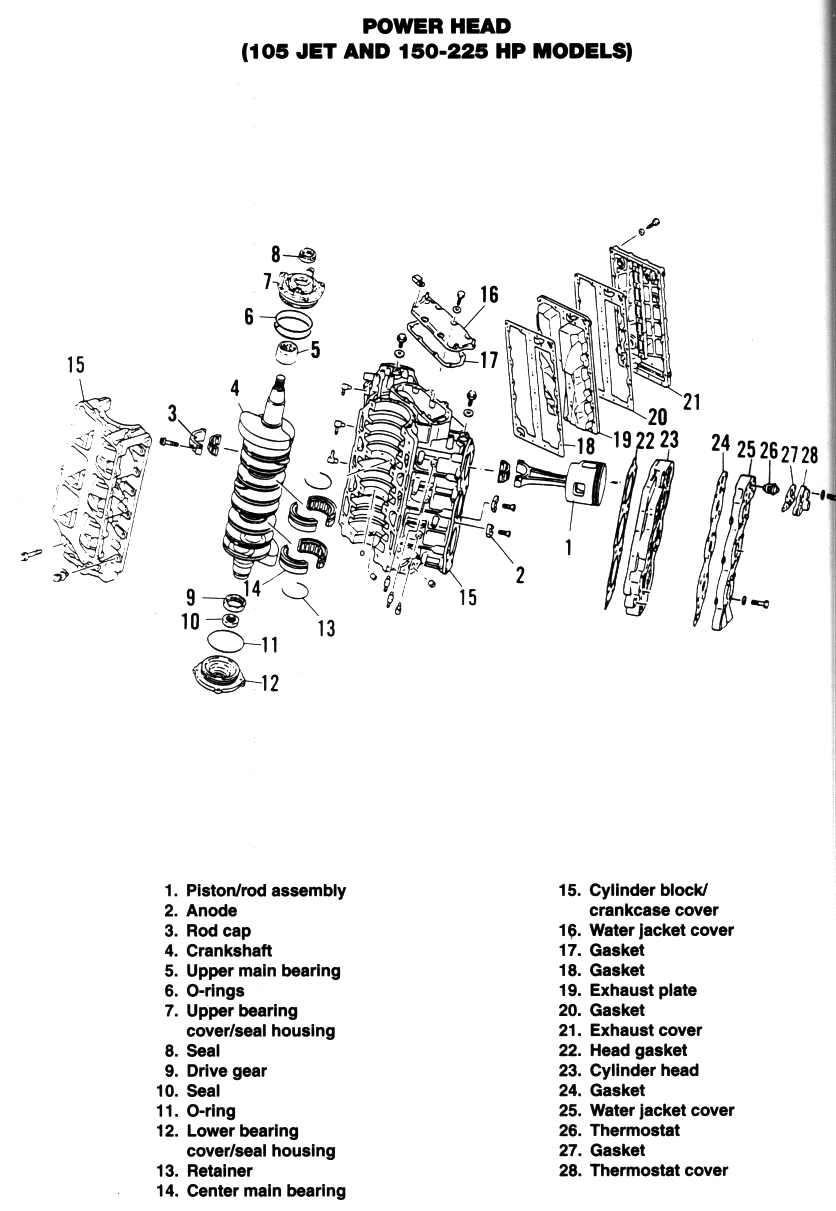
The next step will be to remove the starboard cylinder head for inspection.
Here is the Clymer diagram of my powerhead:
Update: Monday, January 23, 2006
After discussing the problem with a mechanic friend of mine regarding the
clunking while attempting to crank, he said how about removing
the spark plugs on starboard side, spray into cylinders lots of WD40, and
cranking the engine. The logic behind removal of the spark plugs was
because if there is water in the cylinder, and the piston is trying to
compress it, it will not be able to, so it makes sense to try cranking without
the plugs. Is it possible that my problem is merely water in the cylinders)
(and of course what caused this if so)?
So I did just that. I pulled all 3 plugs from starboard, oiled down the cylinders good with WD40 and cranked the engine. It seemed to work. Cranking was not as clunky, although it was still somewhat clunky. Then I pulled all plugs, oiled the cylinders, and cranked again. I expected completely smooth cranking, but that is not what happened. There were fits of clunking. It just wasn't right.
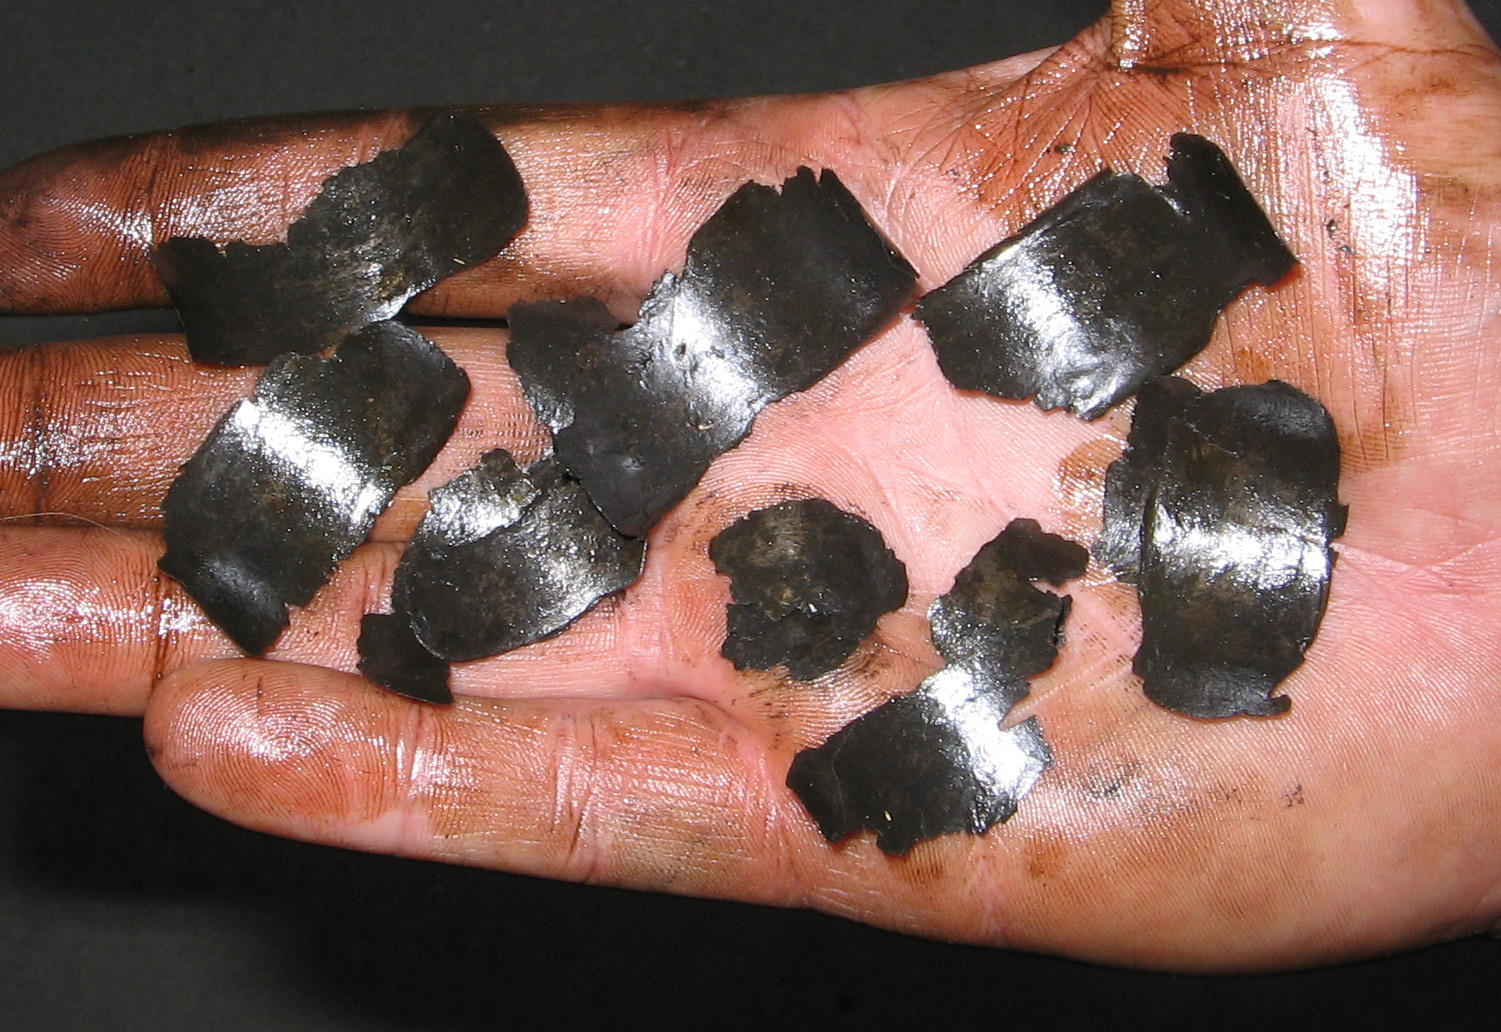
I also ran the engine for a moment with the starboard plugs out. It was very very clunky. I also proved that my water intake impeller works as water was strong out of the underside engine pee-hole.
It seemed possibly optimistic until what I found next. Small metal chips were found around the spark plug hole and embedded in the spark plug for cylinder starboard-bottom. Further examination of the chips shows some of them magnetic, some not. Not that this matters; having metal chips come out of a cylinder, to me, is clearly signs of mechanical failure.
But why? The cylinder that the metal chips came out of is not one of the cylinders I believe had significant water intrusion. The two cylinders above this one had their spark plugs rusty. This cylinder's plug was somewhat rusty - so water intrusion yes, but not so much as the two above. It seems possible that the oil injection system on that cylinder failed. I have never heard an alarm on the engine so I am not sure that the alarm system was even functioning and perhaps that is the reason the engine didn't shut down before becoming damaged....
Update: SUN, January 22, 2006 - Further investigation
I did some further investigating today. I found that I believe one or more starboard side
cylinders have water-intrusion because I connected the garden
hose to the flush tube and pulled out the spark plugs one by one. All
the spark plugs (3) on the starboard side of the engine have what appears to be
rust on them, especially the upper 2. As the engine was flushing, I looked into each cylinder
through the spark plug hole and inside the middle starboard cylinder plug-hole I saw water
misting sideways.
The engine is not seized, because it will turn over. But it labors as it tries to turn over, and sometimes it just won't turn over unless you give it a half hour.
January 21, 2006 - What happened? " The glory
can't last"
We were riding along in our boat "Amber
Bones", continuing south
in Pine Island Sound turning toward the east, slowed and passed by Picnic
Island, then sped up when all of a sudden there in the miserable mile, the engine starts
clanking and making just a horrible noise. I immediately put the boat in
neutral, and the noise was still present. Then shut it down. When
I tried to start it again, the engine wouldn't even turn over. The
battery wasn't dead. I dropped the anchor and called Seatow. I
pulled the engine cover and the engine was hot, although I don't know if it
was abnormally hot, it was just hot. I tried to crank it, and I saw the
starter engage and attempt to turn the flywheel, but once again the flywheel
wouldn't turn (just a half inch maybe). Great; it has seized.
If you have any suggestions, PLEASE feel free to contact me (click here). Thanks!
The purpose of this web site is to 1) Document this project for myself, 2) Share with the world my own experiences so that it helps others with their own sort of problems, 3) Share with the world so that anyone who feels so inclined to correct me where I am wrong or help me answer questions can do so.
Static address to this page: http://thealdens.org/boat/ABII/EngineFailureJan2006/default.htm
| SITE MENU: | Our Fishing Reports with Pictures | Useful Resources | Pleasure Craft "Amber Bones II" | Other Boating Stuff | |
|
|
Home
|
Other Boating-Related Pictures
|
Local Webcams | Contact
Us
|
|
| Website designed by | God Bless You. |